![09 Manual de Mantenimiento y Servicio HP60 [PDF]](https://pdfs.asia/img/200x200/09-manual-de-mantenimiento-y-servicio-hp60.jpg)
7 0 4 MB
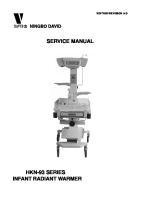
HP-60 Infusion Pump
Service Manual
HP-60 Infusion Pump
Version: V1.0
Intellectual Property and Statement Intellectual Property Rights The intellectual property rights of this product and its Service Manual belong to MEDCAPTAIN MEDICAL TECHNOLOGY CO., LTD. (MEDCAPTAIN for short). ©2017 MEDCAPTAIN MEDICAL TECHNOLOGY CO., LTD. All Rights Reserved. Without prior approval from MEDCAPTAIN in writing, this Service Manual shall not be photocopied, modified or translated, fully or partially, by any individual or organization.
, MEDCAPTAIN and
are registered trademarks or
trademarks of MEDCAPTAIN. Statement MEDCAPTAIN reserves the right for final interpretations of this Service Manual. MEDCAPTAIN reserves the right to modify the contents of this service manual for a more accurate and effective service quality. All the modified contents are accumulated in the service manual of the latest version. MEDCAPTAIN is responsible for safety, reliability and performance of this equipment only in the condition that:
All disassembly, replacement, test, modification and repair are conducted by qualified personnel approved by MEDCAPTAIN.
All replacement parts, supporting accessories and consumables used during the maintenance are provided by MEDCAPTAIN;
Maintenance records for the product are reserved.
Version Information Content HP-60 Infusion Service Manual
Pump
Language
Version
Chinese
V1.0
Release Time 2017-12
Code
Contents
Contents INTELLECTUAL PROPERTY RIGHTS ...................................................................................................... 2 STATEMENT ....................................................................................................................................... 2 1
2
3
IMPORTANT INFORMATION ............................................................................................. 6 1.1
SERVICE PERSONNEL .................................................................................................................. 6
1.2
LIMITATIONS OF THE SERVICE MANUAL ..................................................................................... 6
1.3
DEVICE MAINTENANCE AND INSPECTION ................................................................................... 6
1.4
QUALITY CONTROL..................................................................................................................... 7
1.5
SAFETY WARNINGS .................................................................................................................... 7
1.6
ACRONYMS AND ABBREVIATIONS .............................................................................................. 7
1.7
LIST OF SYMBOLS ....................................................................................................................... 7
1.8
CONTACT INFORMATION ............................................................................................................. 8
SYSTEM OVERVIEW ........................................................................................................... 9 2.1
INTENDED USE ............................................................................................................................ 9
2.2
PRODUCT FEATURES ................................................................................................................... 9
2.3
SPECIFICATIONS ........................................................................................................................ 10
2.4
COMPOSITION ........................................................................................................................... 14
2.5
APPEARANCE ............................................................................................................................ 14
HARDWARE ........................................................................................................................ 18 3.1
CIRCUIT BLOCK DIAGRAM ........................................................................................................ 18
3.2
POWER BOARD.......................................................................................................................... 19
3.3
MAIN CONTROL BOARD............................................................................................................ 19
3.4
HP-60 PUMP DOOR BOARD ...................................................................................................... 21
3.5
HP-60 DROP SENSOR INTERFACE BOARD ................................................................................. 21
3.6
HP-60 MOTOR SPEED MEASURING BOARD .............................................................................. 21
3.7
HP-60 PUMP FINGER POSITION DETECTION BOARD ................................................................. 22
3.8
HP-60 FLUID SIDE OCCLUSION PRESSURE DETECTION BOARD ................................................ 22
3.9
HP-60 PATIENT SIDE OCCLUSION PRESSURE DETECTION BOARD ............................................ 22
3.10
HP-60 TUBE DETECTION BOARD ......................................................................................... 23
3.11
HP-60 ANTI-FREE-FLOW CLAMP BOARD ............................................................................ 23
3.12
STEPPER MOTOR .................................................................................................................. 23
3.13
HP-60 DOOR POTENTIOMETER ASSEMBLY .......................................................................... 24
3.14
BATTERY PACK .................................................................................................................... 24
4
SOFTWARE .......................................................................................................................... 25 4.1
5
6
7
8
SENSOR INFORMATION TEST ..................................................................................................... 25
TEST AND MAINTENANCE .............................................................................................. 28 5.1
OVERVIEW ................................................................................................................................ 28
5.2
PERIODIC MAINTENANCE .......................................................................................................... 28
5.2.1
Checking the Appearance (Before Each Use) .............................................................. 28
5.2.2
Checking the Power Cable (Before Each Use) ............................................................. 29
5.2.3
Checking the Infusion Rate (Every Six Months) ........................................................... 29
5.2.4
Checking Alarm Functions (Every Six Months) ........................................................... 29
5.2.5
Electrical Safety Test (Every 12 Months) ..................................................................... 29
5.2.6
Checking the Internal Battery (Every Six Months) ....................................................... 30
5.2.7
Cleaning and Disinfection (Every Two Months) .......................................................... 30
CALIBRATION .................................................................................................................... 31 6.1
TOUCH SCREEN CALIBRATION .................................................................................................. 31
6.2
DOOR POTENTIOMETER CALIBRATION...................................................................................... 31
6.3
PRESSURE SENSOR CALIBRATION ............................................................................................. 33
6.4
UPPER/LOWER OCCLUSION LEVITATE VALUE CALIBRATION ................................................... 33
6.5
PUMP HEAD PRESSURE ADJUSTMENT ....................................................................................... 34
6.6
PATIENT SIDE OCCLUSION PRESSURE CALIBRATION ................................................................ 34
6.7
FLUID SIDE OCCLUSION PRESSURE CALIBRATION .................................................................... 35
6.8
INFUSION PUMP ACCURACY CALIBRATION ............................................................................... 35
ALARMS AND TROUBLESHOOTING .............................................................................. 39 7.1
ALARM LEVELS ........................................................................................................................ 39
7.2
COMMON FAULTS AND TROUBLESHOOTING ............................................................................. 40
7.3
INFUSION PUMP FAULTS AND TROUBLESHOOTING.................................................................... 41
7.4
SYSTEM FAULTS AND TROUBLESHOOTING................................................................................ 43
DISASSEMBLY AND ASSEMBLY ..................................................................................... 47 1.1
DISMANTLING THE BATTERY ............................................................................................................ 47
1.2
DISMANTLING THE REAR PANEL SOCKET ASSEMBLY ............................................................................. 48
1.3
DISMANTLING THE LOUDSPEAKER AND AC SOCKET .............................................................................. 48
1.4
DISMANTLING THE AC-DC MODULE ................................................................................................. 49
1.5
DISMANTLING THE PERISTALSIS PUMP MOTOR SPEED MEASURING PCBA AND PUMP FINGER POSITION
DETECTION PCBA .................................................................................................................................. 51 1.6
DISMANTLING THE SLIDING BLOCK AND HP-60 DOOR POTENTIOMETER ASSEMBLY ................................... 52
1.7
DISMANTLING THE HP-60 TUBE DETECTION PCBA, ANTI-FREE-FLOW CLAMP PCBA, PATIENT SIDE OCCLUSION
PRESSURE DETECTION PCBA AND ITS CONNECTION FFC ................................................................................ 55
1.8
DISMANTLING THE PERISTALSIS PUMP ............................................................................................... 56
1.9
DISMANTLING THE PERISTALSIS PUMP MOTOR ................................................................................... 57
1.10
DISMANTLING THE DOOR DRIVE ASSEMBLY ................................................................................... 59
1.11
DISMANTLING THE HP-60 FLUID SIDE OCCLUSION PRESSURE DETECTION PCBA .................................. 60
1.12
DISMANTLING THE SEPARATE AIR BUBBLE SENSOR MODULE A ......................................................... 61
1.13
DISMANTLING THE HP-60 PUMP DOOR PCBA .............................................................................. 62
1.14
DISMANTLING THE SEPARATE AIR BUBBLE SENSOR MODULE B.......................................................... 63
1.15
DISMANTLING THE HP-60 VENEER .............................................................................................. 64
1.16
DISMANTLING THE HP-60 PUMP DOOR BOARD’S CONNECTION FFC ................................................. 65
1.17
DISMANTLING THE HP-60 MAIN PCBA ....................................................................................... 66
1.18
DISMANTLING THE HP-60 DROP SENSOR INTERFACE PCBA ............................................................. 68
1.19
DISMANTLING THE FASTENER ASSEMBLY ....................................................................................... 69
1.20
ASSEMBLY............................................................................................................................... 70
9
LIST OF SPARE PARTS ...................................................................................................... 71
10
SOFTWARE UPGRADE ...................................................................................................... 79 10.1
SOFTWARE PROGRAMMING TOOLS ...................................................................................... 79
10.2
LIST OF EXECUTABLE FILES FOR SOFTWARE PROGRAMMING .............................................. 79
10.3
IQC SOFTWARE PROGRAMMING SEQUENCE ........................................................................ 80
10.4
EMULATOR SOFTWARE PROGRAMMING METHOD ................................................................ 81
10.5
DOWNLOADING METHOD OF THE “INFUSION CLINICAL INFORMATION SYSTEM.DOWNLOAD”
SOFTWARE ......................................................................................................................................... 87
Important Information 1 1.1
Important Information Service Personnel This service manual is used only for the reference of service personnel. Servicing must only
be conducted by personnel who:
Have basic knowledge of electronic circuits and mechanical engineering.
Have basic knowledge of medical devices and clinical applications.
Have received proper training on maintenance and servicing of MEDCAPTAIN products and have certain knowledge of the applicable device principles, structure, function, and operation.
Have the necessary equipment and tools.
Have written permission of MEDCAPTAIN to conduct servicing.
1.2
Limitations of the Service Manual This service manual describes all functions and configurations of only the device mentioned
in this manual. Differences may exist between the description in this manual and the actual situation of the device, especially after the device is modified. In this case, corresponding maintenance information may be required for maintenance. Therefore, this service manual may be used together with some follow-up complementary information for device maintenance. MEDCAPTAIN will complement the relevant information in time according to the actual situation of the device modification. Service personnel should also refer to the Operation Manual. 1.3
Device Maintenance and Inspection The power supply of this device may reach up to 100-240V. Maintenance in violation of the requirements in this service manual may cause electric shock, serious injury, and even death.
Maintenance in violation of the requirements in this service manual may seriously damage the device.
The service personnel must be trained and permitted in writing by MEDCAPTAIN to do so.
The maintenance must be performed under electrostatic discharge (ESD) protective conditions. Do not touch PCBA or semiconductors by hand without any protective measure.
Do not touch the display by using sharp objects. Otherwise, the display may be damaged.
Do not autoclave the infusion pump.
Before using the internal battery, check the battery to ensure that sufficient power is available. Recharge the battery if required.
Liquid intrusion into the AC power socket or nurse call socket may cause short-circuit. Before connecting the power cable, check if the connecting parts are dry. If liquid has spilled onto the infusion pump, clean the pump with a dry cloth and then perform an inspection and
maintenance.
Use the maintenance parts and accessories provided by MEDCAPTAIN for replacement and maintenance.
Do not maintain or use the infusion pump in a flammable environment.
High-frequency surgical equipment, mobile phones, wireless devices, and defibrillators may cause interference on the infusion pump. Therefore, keep the infusion pump away from these devices when using the pump.
After maintenance, perform a safety test and clean the pump according to this manual.
1.4
Quality Control MEDCAPTAIN meets the requirements for quality management system specified in
ISO9001 and ISO13485 standards. Complying with the requirements of the medical device directive (MDD), the product mentioned in this manual has also passed CE certification. 1.5
Safety Warnings
Warnings:
The power supply of this device may reach up to 100-240V. Maintenance in violation of the requirements in this service manual may cause electric shock, serious injury, and even death.
Maintenance in violation of the requirements in this service manual may seriously damage the device.
1.6
Acronyms and Abbreviations
ESD
Electro-static discharge
PCBA
Printed Circuit Board Assembly
ISO
International Standardization Organization
CE
Council of Europe
MDD
Medical Device Directive
IPX4
Level of protection from liquid intrusion
ON/OFF
ON/OFF key
CPU
Central processing unit
N/A
Not applicable
1.7
List of Symbols
Symbol
Description
Symbol
Description
CAUTION! Read the Type CF applied part accompanying document. Alternating current
IPX2
Level of protection
from liquid intrusion
1.8
Direct current
ON/OFF
Manufacturer
Date of manufacture
Contact Information
If you have any question when using the infusion pump, please contact local distributor or directly contact us at any time. The after-sales service contact details of MEDCAPTAIN MEDICAL TECHNOLOGY CO., LTD. are as follows: Address: 12th Floor, Baiwang Research Building, No.5158 Shahe West Road, Xili, Nanshan, 518055 Shenzhen, Guangdong, PEOPLE'S REPUBLIC OF CHINA Postal code: 518055 Telephone: +86-755-26953369 Fax: +86-755-26001651 Website: http://www.medcaptain.com/en/ E-mail: [email protected] WeChat official account of MEDCAPTAIN’s user service center:
MEDCAPTAIN and its distributors all over the world have established after-sales service agencies to effectively solve your problems in time.
System Overview 2 2.1
System Overview Intended Use
This product is intended to be used in conjunction with the IV set to control the dose of liquid infused into the patient’s body in clinical departments. 2.2
Product Features MEDCAPTAIN HP-60 is a high-precision continuous-operation infusion pump. It ensures
constant infusion rate and accurate dosage during a longtime infusion. This infusion pump is designed for clinical continuous infusion of low-volume and high-concentration liquid or liquid drug (like chemotherapeutic agent, cardiovascular agent, anticancer agent, oxytocic, anticoagulant, anesthetic, etc.) into the patient’s body under precise control.
Full press finger type peristaltic pump.
Supporting various brands of IV sets compliant with the ISO 8536-4: Infusion
equipment for medical use-Part 4: Infusion sets for single use, gravity feed AMENDMENT 1 and ISO 8536-8: Infusion equipment for medical use-Part 8: Infusion sets for single use with pressure infusion apparatus.
Large range of infusion rate: up to 1200 ml/h.
Step infusion accuracy: 0.01 ml/h.
Drive motor supporting a subdivision of up to 256.
Infusion accuracy calibration functions.
Support of multiple infusion modes, such as rate mode, time mode, weight mode, etc.
Auto screen lock, preventing accidental touch and ensuring infusion safety.
Replacement of the built-in battery without using a tool.
Limit control function.
Infusion parameter checking function, ensuing infusion safety.
Safe design and real-time monitoring of infusion status, ensuing that an alarm is reported in case of an infusion exception in time.
3-CPU design, independent drive control, and dual-channel monitoring.
Independent motor drive CPU and motor subdivision drive chip design.
Dynamic monitoring of occlusion pressure and real-time display of tube pressure.
Touch screen, providing a convenient and efficient man-machine interaction interface.
Support of barcode scanning function after being connected to a barcode scanner.
Interface protocol conversion into HL7 protocol.
Dose error reduction system (DERS) function of drug library.
Saving parameters in case of a power failure.
Electric pump door, protecting infusion.
Automatic anti-free-flow clamp, preventing free flow.
The infusion pump can be installed on a horizontal rod, vertical rod, or trolley.
Setting of maintenance period and automatic prompt.
Made of ABS medical plastics, the pump shell is elegant and durable and easy and safe to clean and disinfect.
Relay infusion function can be implemented after multiple pumps are connected to an infusion workstation.
Modular plug-in structure design, facilitating combination of multiple pumps.
WiFi networking function, enabling connection to the intravenous infusion central monitoring system.
Nurse call function.
Note: Based on user requirements, the following functional modules can be connected to the HP-60 infusion pump to provide corresponding functions: handle, pole clamp, barcode scanner, WiFi communication module, nurse call system, and infusion workstation. 2.3
Specifications
Name
Infusion pump
Model
HP-60
Dimensions
214(W) x 75(H) x 142(D) mm
Weight
About 1.4 kg (including the battery)
Operating Conditions
Temperature: 5°C to 40°C Humidity: 15%-95% RH, non-condensing Pressure altitude: 57.0-106.0 kPa
Storage and Shipping
Temperature: -20°C to +55°C
Conditions
Humidity: 10%-95% RH, non-condensing Pressure altitude: 22.0-107.4 kPa
Service Life
10 years
Safety Protection
1. Class I/internally powered equipment 2. Type CF applied part 3. IP23 4. Flame retardant rate: V2
Power Supply
AC power supply: 100-240 V, 50/60 Hz Input current (AC): 2A External DC power supply: 12 V Input current (DC): 2.5A Built-in lithium battery: 11.34V, 2900 mAh Battery operating time is not smaller than 10 hours if the infusion rate is 25 ml/h. Battery charging time ≤ 6 hours The battery can be charged when AC or DC input is available. When no AC or DC power supply is available, the power supply mode of the infusion pump automatically switches to built-in battery mode.
Screen
3-inch color resistive touch screen Resolution: 480 x 320 View angle: 160o
Indicators
Power/working indicator: yellow or green Alarm indicator: green, yellow, or red Key backlight
Interfaces
Micro USB 2.0: enables connection to the external drop sensor. USB 3.0: enables connection to a USB flash drive for software and drug library upgrade. USB2.0 barcode scanner/nurse caller/cabinet communication interfaces RJ45 network interface: 10/100 Mbps adaptive Ethernet WiFi network interface: 802.11-b/g/n, enables communication with the infusion central monitoring system.
Infusion Rate
0.10 - 1200.0ml/h or 0.03-400d/min (20d/ml IV set) 0.10 - 400.0ml/h or 0.1-400d/min (60d/ml IV set)
Minimum Increment
0.10-99.99ml/h (minimum increment: 0.01ml/h)
of Infusion Rate
100-999.9ml/h (minimum increment: 0.1ml/h) 1000-1200ml/h (minimum increment: 1ml/h)
VTBI
0.10 - 9999.99ml (minimum increment: 0.01 ml)
Total Volume Display
0.01 - 9999.99ml (minimum increment: 0.01 ml)
Infusion Time
00:00:01 - 99:59:59 (minimum increment: 1s)
Bolus Rate
0.10 - 1200.0ml/h (20d/ml IV set) 0.10 - 400.0ml/h (60d/ml IV set)
BOLUS VTBI
0.10 - 50ml (minimum increment: 0.01 ml)
Anti-Bolus
Anti-bolus function, unintended bolus ≤ 0.2 ml
KVO Rate
0.1 - 5.0ml/h (minimum increment: 0.01 ml/h)
Purge Rate
1200.0ml/h (20d/ml IV set) 400.0ml/h (60d/ml IV set)
Infusion Accuracy
Non-dedicated IV set: When infusion rate is smaller than 1 ml/h: infusion accuracy ≤ ±5% When infusion rate is not smaller than 1 ml/h: infusion accuracy ≤ ±3% Dedicated IV set: Infusion accuracy ≤ ±3%
Occlusion Level
Patient side occlusion: 150 to 975 mmHg, 12 occlusion levels available (default: level 6) Fluid side occlusion: -90 to -157.5 mmHg, 9 occlusion levels available (default: level 5)
Air Bubble Detection
Air bubble detection sensitivity ≥25ul 7 detection sensitivity levels: 25, 50, 100, 200, 300, 500, and 800 (ul)
Applicable IV Set
Various brands of 20d/ml and 60d/ml IV sets conforming to relevant standards
Infusion Modes
Rate mode, time mode, weight mode, sequence mode, trapezia mode, loading dose mode, drip mode, micro mode, and relay mode (used together with infusion workstation)
Drug Library
A maximum of 5000 drug types can be stored (default: 60 preset drug types).
Alarm Messages
Three alarm levels: high, middle, and low High-level alarms: Infusion End, BAT Empty, Patient Side OCCL, Infusion End KVO Start, KVO End, Relay Failed, Fluid Side OCCL, Air Bubble In Line, No Drop, Too Many Drops, Too Few Drops, Drip Chamber Overflow, and ERR 00X Middle-level alarms: Standby End, No Drop Sensor Low-level alarms: Near Finished, No Battery, No AC Power, BAT Low, Reminder Alarm
Prompt
Locking screen…; Parameter value exceeds limit; Parameter value change is not allowed Failed to start infusion/purge/bolus; Not a dedicated consumable; Pump Door Failure
Special Functions
Repeated alarming: After the sound of an alarm is muted, this alarm is reported again two minutes later if it persists. Event recording function: A maximum of 2000 events can be stored for playback. Sound volume: 5 levels are available for selection. Brightness: 10 levels are available for selection. Barcode scanning: Patient and drug information can be input by barcode scanning. Multiple languages: 7 languages are available for selection. Screen lock: Screen lock for protection is supported. Standby function: supported Permission management: Different permissions for changing and viewing data are assigned. Night mode: supported
Online infusion: The infusion rate can be changed during infusion. Parameter saving: Key parameters are saved automatically in case of a power failure. Text size adjustment: Three text size levels are available for selection. Wireless Networking
The wireless networking function enables the infusion pump to be connected to the infusion central monitoring system and nurse caller.
Date of Manufacture
See the label at the bottom of the product.
Main Safety
IEC 60601-1 Medical electrical equipment – Part 1: General
Standards
requirements for basic safety and essential performance IEC 60601-2-24 Medical electrical equipment – Part 2-24: Particular requirements for the basic safety and essential performance of infusion pumps and controllers IEC60601-1-8 Medical electrical equipment – Part 1-8:General requirements for basic safety and essential performance - Collateral standard: General requirements ,tests and guidance for alarm systems in medical electrical equipment and medical electrical systems IEC 60601-1-2 Medical electrical equipment – Part 1-2: General requirements for basic safety and essential performance – Collateral Standard: Electromagnetic disturbances – Requirements and tests
2.4
Composition Main unit + handle + pole clamp + power cable + nurse caller (optional) + drop sensor
(optional)
2.5
Appearance
a) Front view
1 – Touch screen
2 – HOME button
3 – ON/OFF button
4 – OPEN button
5 – Pump door
6 – Shell
2 – Alarm indicator
3 – Consumables anti-free-flow
7 – Alarm indicator b) Pump door interior
1 –Tube detector A
clamp block 4 – Anti-free-flow clamp
5
–
Downstream
occlusion
6 - Air bubble sensor
pressure sensor 7 – Middle plate
8 – Door catch
9 – Pump finger
11 – Tube detector B
12 - Micro USB
1 – Infusion stand retaining nut
2 – Loudspeaker
3 – RJ-15 network interface
4- USB3.0 interface
5 – AC power socket
6 – USB2.0 interface
10
–
Upstream
occlusion
pressure sensor 13 – Manual open pump door
c) Rear view
7 – Combination clamp d) Appearance of accessories
1– Handle Handle
2– Connection slide rail
1 – Infusion pump Pole
retaining knob
clamp
2 – Infusion stand retaining knob
1 – Button Nurse
2 – Cable
caller
3 – Plug
2 Drop sensor
3
1
1 – Button
4
2 – Drop hole 3 – Cable 4 – Plug
Hardware Description 3 3.1
Hardware Circuit Block Diagram
Figure 4 shows the circuit block diagram of the HP-60 infusion pump. The components of the HP-60 infusion pump are described in the following sections.
Figure 4
3.2 Power Board a. Circuit description: The AC/DC power board adopts a medical-grade switching power supply that features low leakage current and high isolation voltage and meets the EMC requirements. The input AC voltage range of the AC/DC power board is 100-240V, 50/60Hz. The output single DC power supply is 15.0V, and the maximum output current is 2A. b. Main test point: No. Test Name Range Unit Remarks Point 1 TB2 DC output voltage 14.0-16.0 V / c. Circuit board socket numbering and definition No.
Socket
1
TB1
PIN Quantity 2
2
TB2
2
Name
Description
Input socket of AC L and N wires DC output voltage socket
Used for connection to the AC power input socket. Used for connection to J4 of the HP-60 main board
Notes:
The maximum voltage of the AC/DC power board may reach up to about 400 V. The workbench must be insulated to avoid touch of the high-voltage circuit part. High voltage may cause electric shock and personal injury. When performing a test with a multimeter or oscilloscope, note that the test probe must not short-circuit the live part on the circuit board to avoid damage of the circuit board.
3.3 Main Control Board a. Circuit description: The HP-60 main board integrates the power system, main control system, communication circuit and interface, motor drive control circuit, air bubble detection circuit, and fluid side/patient side occlusion pressure detection circuit. The specific functions are as follows: (1) Power system: The power system consists of the battery and charging circuit, voltage conversion circuit, and backup alarm circuit. The battery and charging circuit adopts the BQ24125 charging scheme of TI. By default, quick charging mode is selected in power-off state and standard charging mode is selected in working state. Charging is supported when AC input or DC input is available. In case of AC input, the battery can be charged to 90% of the total capacity in 6 hours and fully charged in 8 hours. The voltage conversion circuit converts the 15V power supply output by AC-DC, battery power supply, or external DC power supply into the voltage required by the system. The voltage reduction circuit converts the power supply into 5V and 3.3V to provide the CPU and system with proper power supply. The voltage increase circuit converts the power supply into 24V for motor driving. (2) Main control system: 3-CPU design, independent drive control, and dual-channel monitoring. STM32F429IIT6 (M4 for short) is used for display driving, Ethernet drive control, and wireless module communication. STM32F030RCT6 (M0 for short) is used for control of motor drive chip, control of audible and visual alarm, and signal detection. STM32F030C8T6 (M0S for short) is used for signal detection and control of motor power supply. (3) Interface circuit: USB2.0 interface implements the RS232 interface function. In addition, it can implement communication with the HP-80 infusion workstation and connection to the barcode scanner for scanning of patient information, for example, scanning of medical record number and hospital number. The USB3.0 interface is used to connect to the nurse call system for implementing the nurse call function. 19
(4)
Audible alarm: The beeper and loudspeaker alarm circuit is used to implement the audible alarm function. (5) Motor drive control: The motor drive chip manufactured by TRINAMIC is used, which supports 24V/2A drive output. In addition, the stepper motor supports a subdivision of up to 256, ensuring infusion accuracy and stability at low infusion rate. The SPI communication interface is used for connection to M0. Motor start/stop, motor rotation speed, and motor acceleration/deceleration are all controlled by SPI signals. (6) Air bubble detection circuit: Air bubble drive and monitoring circuit is provided to monitor whether air bubbles exist in the infusion tube. (7) Fluid side/patient side occlusion pressure detection circuit: The fluid side/patient side occlusion pressure detection board is connected to test the fluid side/patient side occlusion pressure. (8) WiFi function: WiFi circuit and protocol are used for communication with the nurse station, implementing output of infusion data. (9) Wired network function: Wired network is used for communication with the nurse station, implementing output of infusion data. b. Main test point: No. Test Name Range Unit Remarks Point 1 TP15 24V DC output 22-26 V / voltage 2 TP25 5V DC output voltage 4.9-5.1 V / 3 TP31 3.3V DC voltage 3.2-3.4 V / 4
TP7
2.7-3.4
V
/
TP35
3.0V ordinary power supply DC voltage 3.3V DC voltage
5
3.2-3.4
V
TP22
3.3V DC voltage
3.2-3.4
V
MOS chip power supply WiFi chip power supply
6
c. Circuit board socket numbering and definition No. Socket PIN Name Quantity 1 J2 4 M4 programming port 2 J1 RJ45 Network port interface 3
J3
50
4 5
J10 J6
4 2
6
J8
4
7
J9
4
8
J19
USB2.0
9
BUS3
USB3.0
10
J11
16
Description
Socket for connection to HP-60 pump door board M0 programming port Loudspeaker interface Door opening motor interface Infusion motor interface RS232 communication interface and DC power supply inlet USB signal or nurse caller Patient side occlusion pressure signal interface 20
Used for software programming. Ethernet interface, used for communication with the infusion central monitoring system. Used for connection to J1 of the HP-60 pump door board. Used for software programming. Used for connection to the loudspeaker. Used for connection to the door opening motor. Used for connection to the infusion motor. Used for communication with the HP-80, for connection to the barcode scanner, or for DC power supply input. / Used for connection to J1 of HP-60 patient side occlusion pressure detection board.
11
J12
6
Speed measuring and pump finger signal interface Fluid side occlusion pressure signal interface
12
J7
7
13
J13
3
Drop sensor interface
14 15
J5 J4
3 3
16
J25
2
17
J14
4
Battery interface AC/C power module output line interface Air bubble receiving terminal M0S programming port
Used for connection to J3 of the HP-60 motor speed measuring board. Used for connection to J1 of HP-60 fluid side occlusion pressure detection board. Used for connection to J12 of HP-60 drop sensor interface board. Used for connection to the battery. Used for connection to the AC/DC power module. Used for connection to the air bubble sensor. Used for software programming.
3.4 HP-60 Pump Door Board a. Circuit description: Main functions of HP-60 pump door board: (1) Display function: A 3-inch color LCD display with a touch screen is used, whose resolution is 480x320 pixels. (2) Button function: Three buttons are available on the infusion pump, that is, HOME, ON/OFF, and OPEN. HOME: Used to access the main menu. ON/OFF: Used to power on/off the pump. OPEN: Used to open the pump door. (3) Red and yellow alarm indicators are built in the pump. (4) Transmitting end of the air bubble sensor: Provides interface J2 of the transmitting end of the air bubble sensor. b. Main test point: None c. Circuit board socket numbering and definition No. Socket PIN Name Description Quantity 1 J1 50 HP-60 pump door board Used for transmitting display screen wiring terminal drive signal, alarm signal, and air bubble signal. Used for connection to J3 of HP-60 main board. 2 J2 2 Air bubble sensor Used for connection to the air transmitting socket bubble sensor. 3.5 HP-60 Drop Sensor Interface Board a. Circuit description: As the adapter board of the drop sensor, the interface board provides the Micro USB interface for connecting to the drop sensor. b. Main test point: None c. Circuit board socket numbering and definition No. Socket PIN Name Description Quantity 1 J12 3 Socket for connection to J13 / of HP-60 main board 2 J2 5 Micro USB socket Used for connection to the drop sensor. 3.6
HP-60 Motor Speed Measuring Board a. Circuit description: Two optical coupling circuits are used to detect the motor rotation speed. The rotation speed and rotation direction can be determined based on signal existence/absence and sequence of optical couplers A and B. 21
b. Main test point: None c. Circuit board socket numbering and definition No. Socket PIN Name Quantity 1 J13 6 Socket for connection to J12 of HP-60 main board 2 J2 3 Socket for connection to J2 of HP-60 pump finger position detection board 3.7
Description / /
HP-60 Pump Finger Position Detection Board
a. Circuit description: One optical coupling circuit is used to detect the original position of the pump finger. When the gap of the pump finger turnplate reaches the optical coupler, the optical coupler is turned on. The software judges that the pump finger already reaches the original position by detecting optical coupler signals. b. Main test point: None c. Circuit board socket numbering and definition No. Socket PIN Name Description Quantity 1 J2 3 Socket for connection to J2 / of HP-60 motor speed measuring board
3.8 HP-60 Fluid Side Occlusion Pressure Detection Board a. Circuit description: (1) The fluid side occlusion pressure detection board consists of the Honeywell pressure sensor, pressure amplification circuit, and EEPROM chip. When the pressure of the strain body changes, the bridge is out of balance and therefore outputs out-of-balance voltage and obtains pressure signals. The pressure sensor and amplification circuit are used to detect the fluid side occlusion pressure during infusion, and the EEPROM chip is used to record the initial value of the pressure sensor. (2) The fluid side occlusion pressure detection board contains an optical coupling circuit, which is used to detect the infusion tube. When an infusion tube is installed, the light baffle shields the optical coupler, indicating that an infusion tube is installed. (3) The fluid side occlusion pressure detection board also contains a sensitive switch circuit, which is used to detect the dedicated infusion set for the HP-60C. b. Main test point: None c. Circuit board socket numbering and definition No. Socket PIN Name Description Quantity 1 J1 7 Socket for connection to J7 / of HP-60 main board 3.9 HP-60 Patient Side Occlusion Pressure Detection Board a. Circuit description: The patient side occlusion pressure detection board consists of the Honeywell pressure sensor, pressure amplification circuit, and EEPROM chip. When the pressure of the strain body changes, the bridge is out of balance and therefore outputs out-of-balance voltage and obtains pressure signals. The pressure sensor and amplification circuit are used to detect the patient side occlusion pressure during infusion, and the EEPROM chip is used to record the initial value of the pressure sensor. b. Main test point: None c. Circuit board socket numbering and definition 22
No.
Socket
1
J1
PIN Quantity 16
2
J2
3
3
J3
10
Name
Description
Socket for connection to J11 of HP-60 main board Socket for connection to HP-60 door potentiometer assembly Tube detection board and anti-free-flow clamp board signal terminal
/ /
Used for connection to J1 of the HP-60 tube detection board and J1 of the HP-60 anti-free-flow clamp board.
3.10 HP-60 Tube Detection Board a. Circuit description: (1) The tube detection board contains a Hall switch assembly, which is used to detect whether the pump door is closed. The pump door contains a magnet. When the pump door approaches, the signal of the Hall switch assembly changes. Whether the door is closed is judged by detecting signal changes. (2) The fluid side occlusion pressure detection board contains an optical coupling circuit, which is used to detect the infusion tube. When an infusion tube is installed, the light baffle shields the optical coupler, indicating that an infusion tube is installed. b. Main test point: None c. Circuit board socket numbering and definition No. Socket PIN Name Description Quantity 1 J1 5 Socket for connection to J3 / of HP-60 patient side occlusion pressure detection board 3.11 HP-60 Anti-Free-Flow Clamp Board a. Circuit description: The anti-free-flow clamp board contains an optical coupling circuit, which is used to detect the anti-free-flow clamp signals of the simple dedicated infusion set. When the anti-free-flow clamp is installed, the light baffle shields the optical coupler. b. Main test point: None c. Circuit board socket numbering and definition No. Socket PIN Name Description Quantity 1 J1 3 Socket for connection to J3 / of HP-60 patient side occlusion pressure detection board 3.12 Stepper Motor a. HP-60 uses two types of stepper motor, that is, door opening motor and infusion motor. The door opening motor connects to the main board J8 to control door opening and closing. The drive voltage of the infusion motor is 24V, 2-phase drive. b. Socket numbering and definition: No. Socket PIN Name Description Quantity 1 Door 4 Socket for connection to J8 Silver-white motor opening of HP-60 main board motor 23
2
Infusion motor
4
Socket for connection to J9 of HP-60 main board
Black motor
3.13 HP-60 Door Potentiometer Assembly a. Description of the HP-60 door potentiometer assembly A linear sliding resistor is used to implement position detection. When the resistor slides, the resistance changes and position signal is output. Note: The sliding resistor is a very sensitive and precise device. When disassembling or assembling the resistor, be careful not to touch peripheral components and not to pull the connection cable. b. Main test point: None c. Socket numbering and definition: No. Socket PIN Name Quantity 1 / 3 Socket for connection to power control board
Description Used for connection to J2 of HP-60 patient side occlusion pressure detection board.
3.14 Battery Pack a. Description: The HP-60 adopts a 11.34V/2900mA lithium-ion battery pack. b. Main test point: No. Test Point Name Range Unit Remarks 1 Red-black Battery pack voltage 8.25-13.05 V The battery volume wire affects the voltage. Note: The quality of a battery pack cannot be judged based on the battery pack voltage. The actual operation time of a battery pack can be measured after connecting it to the infusion pump. c. Socket numbering and definition: No. Socket PIN Name Description Quantity 1 / 3 Socket for connection to Used for connection to J5 of the main main board board.
24
Software Description 4
Software
This chapter only describes the software UIs related to servicing and test. For the description of other software functions, see the corresponding operation manual. 4.1
Sensor Information Test Choose HOME > Local Set > Maintenance, input the password 1666, and choose Sensor Info. a) Motor status test: Select Clockwise or Anticlockwise for the motor, select the start speed of the motor (motor speed setting range: 0.01-150r/s), and check whether you can hear the motor rotation sound. If you does not head the rotation sound, the motor or main control board may be faulty. b) Upper/lower pipeline check: When the upper/lower pipeline is equipped with an infusion tube, the status displayed is 1. Otherwise, the status displayed is 0. If the display status is incorrect, the optocoupler corresponding to the upper/lower pipeline may be damaged.
c) Pump finger signal: When the pump finger board optocoupler is shielded, the status displayed is 1. d)
e)
f)
Otherwise, the status displayed is 0. If the display status is incorrect, check the pump finger optocoupler and related connection cable. Air bubble detection: When no tube is installed or the tube is empty, a value in the range of 0-100 is displayed. When a full tube is installed, a value larger than 1000 is displayed. Otherwise, check whether the tube is installed in position and whether the air bubble sensor and detection board are faulty. Dedicated consumable: Check whether the consumable used is a dedicated consumable. If yes, the status displayed is 1. Otherwise, the status displayed is 0. AC test: Check whether a value in the range of 14V-16V is displayed when the pump is connected to AC power supply and a value smaller than 2V is displayed when the pump is not connected to AC power supply. If the displayed value is incorrect, the device generates the ERR007 alarm, which may be caused by a power module failure.
25
g) DC test: This value varies with the input DC input voltages. Connect the infusion pump to the DC
h)
i) j)
k) l)
power supply and check whether the test value falls within the range of 14-16V. Then, disconnect the pump from the DC power supply and check whether the test value is about 6V. If the voltage is incorrect, the power module may be faulty. Battery test: Install the battery in the infusion pump and check whether the test value is stable and falls within the range of 9-13V. If the test value keeps changing, the battery may be damaged or the main board is faulty. VDD test: The normal value is 3.3±0.2V. If the test value is abnormal, the main board may be faulty. VAA test: The normal value is 24±2V. If the test value is abnormal, the main board may be faulty.
VCC test: The normal value is 3.3±0.2V. If the test value is abnormal, the main board may be faulty. Fluid/patient side pressure test: Press the pressure sensor to check whether the pressure value changes. If the pressure value does not change, the pressure sensor may be faulty. 26
m) Pump door Hall signal: Check whether 1 is displayed when the door is open and 0 is displayed when
n)
the door is closed. If the displayed value is incorrect, check whether the electromagnet is properly installed and whether the Hall switch functions properly. Number of drops: Check whether the actual number of drops is consistent with that detected by the drop sensor with naked eyes. If there is a large difference between them, check whether the drop sensor is properly installed and whether the drop sensor is faulty.
27
Servicing and Maintenance 5 5.1
Test and Maintenance Overview
To ensure long-term steady operation of the infusion pump, service personnel must check, maintain, and test the pump at regular intervals. This chapter describes the basic test method of the infusion pump and recommends appropriate test frequency and test tools. Service personnel must select appropriate test tools to maintain and test the infusion pump based on actual requirements. The test and inspection methods provided in this chapter are used to verify that the performance of the infusion pump meets the specification requirements. During the test, if the test results do not meet requirements, a certain functional module of the infusion pump is faulty. In this case, immediate maintenance or replacement must be performed. In case of any other doubts, please contact the after-sales service department of Medcaptain in time. Caution
5.2
All the tests must be performed by qualified professional service personnel. Before a test, the service personnel must ensure that all required test tools and connection cables are applicable. Service personnel must know well how to use these test tools. Periodic Maintenance
Customers are suggested to perform maintenance at regular intervals to ensure safe use and extend the service life of the pump. If a customer is not capable to perform maintenance, this customer can contact the manufacturer or the local distributor for handling. Inspection/Maintenance Item Inspection of the entire product’s appearance and power cable Test after startup
Infusion rate test
Frequency After installation for the first time or after each re-installation 1. After installation for the first time or after each re-installation 2. After maintenance or replacement of a component of the main unit Test the infusion rate once every half an year or when a user doubts that the infusion rate is abnormal.
Alarm test
Once every half an year
Electrical safety test
At least once every year
1. At least twice every year. 2. After infusion pump maintenance or when a user doubts that the fault is caused by a battery problem 1. (Suggested) Once every month Cleaning and disinfection 2. A complete cleaning is required before and after a prolonged storage. 5.2.1 Checking the Appearance (Before Each Use) Appearance check: Check that no crack or damage exists. Button operation: Check that the buttons can be smoothly pressed and function properly. Drive head operation: Press the clutch and slide the drive head to check that the drive head moves smoothly and no component is abnormally loose. Sealing condition: Check that all silica gel protective jackets are properly installed and no material fractures. Battery power supply
28
5.2.2 Checking the Power Cable (Before Each Use) Check the appearance of the power cable. If a surface damage or poor contact between plug and socket is found, maintenance is required. If the AC/DC power indicator is not illuminated after the infusion pump is connected to an AC/DC power supply or the infusion pump cannot be started, maintenance is required. 5.2.3 Checking the Infusion Rate (Every Six Months) Check the infusion rate once every six months using a measuring cylinder and stopwatch. Check method: Select an infusion set of built-in brand, set the infusion rate to 60 ml/h, fill the infusion bag with distilled water, and lead the needle to the measuring cylinder. Start the infusion, stop the infusion 10 minutes later, and check the liquid volume in the measuring cylinder. The infusion rate passes the test if the liquid volume falls within the range of 9.5-10.5 ml. 5.2.4 Checking Alarm Functions (Every Six Months) 1) Air Bubble In Line Check method: Simulate an infusion process, and tilt the drip chamber during the infusion to form some air bubbles. Check that Air Bubble In Line is displayed on the screen, the “di-di-di…di-di…di-di-di…di-di” alarm sound is given every 15 seconds, and the red alarm indicator flashes. 2) Occlusion alarm Check method: Select an infusion set of built-in brand, and set the infusion rate to 25 ml/h. Set the occlusion level to P2, and use the speed adjustment roller to form an occlusion. Start the infusion and check whether the following alarm is generated within 1 minute: Infusion Occlusion is displayed on the screen, the “di-di-di…di-di…di-di-di…di-di” alarm sound is given every 15 seconds, and the red alarm indicator flashes. 5.2.5 Electrical Safety Test (Every 12 Months) Warnings:
Electrical safety test is performed to detect hidden electrical dangers. If these hidden dangers are not detected in time, they may cause injury of patients or operators.
A safety analyzer is used as the electrical safety test device. Service personnel must know how to use the safety analyzer.
The electrical safety test is performed according to IEC/EN60601-1.
The electrical safety test must be performed in normal environment (including temperature, humidity, and atmospheric pressure).
The electrical safety test provided in this section takes the 601 safety analyzer as an example. The test performed using the safety analyzers of other brands may differ from the test in this section.
If the product fails to pass the electrical safety test, contact the after-sales service personnel of Medcaptain.
5.2.5.1 1 2 3 4 5 6
Shell Leakage Current Test Connect the 601 safety analyzer to the AC power supply. Connect the applied part of the tested device to the SUM end of the process equipment and the RA end of the safety analyzer. Connect the tested device to the auxiliary power output socket of the 601 safety analyzer through a power cable. Connect one end of the red test lead to the red input terminal of the safety analyzer and clamp the other end of the red test lead onto the metal foil attached to the shell of the tested device. Plug in the 601 safety analyzer, and press 5-Enclosureleakage on the panel of the safety analyzer to access the shell leakage current test page. Normally, the shell leakage current is not greater than 100 μA. In case of a single fault, the shell leakage current is not greater than 500 μA. 29
5.2.5.2 1 2 3 4 5
Earth Leakage Current Test Connect the 601 safety analyzer to the AC power supply. Connect the applied part of the tested device to the RA end of the safety analyzer. Connect the tested device to the auxiliary power output socket of the 601 safety analyzer through a power cable. Plug in the 601 safety analyzer, and press 4-Earth leakage on the panel of the safety analyzer to access the earth leakage current test page. Normally, the earth leakage current is not greater than 500 μA. In case of a single fault, the earth leakage current is not greater than 1000 μA.
5.2.5.3 1 2
Patient Leakage Current Test Connect the 601 safety analyzer to the AC power supply. Connect the applied part of the tested device to the SUM end of the process equipment and the RA end of the safety analyzer. 3 Connect the tested device to the auxiliary power output socket of the 601 safety analyzer through a power cable. 4 Plug in the 601 safety analyzer, and press 6-Patient leakage on the panel of the safety analyzer. 5 Press APPLIED PART repeatedly to select AC or DC measurement. When DC is selected, DC is displayed behind the limit value. 6 Normally, the patient leakage current is not greater than 10 μA. In case of a single fault, the patient leakage current is not greater than 50 μA. 5.2.6 Checking the Internal Battery (Every Six Months) 1 Check that the device successfully reports an alarm when no battery is installed or in case of low battery. 2 Check that the device cannot be started or stops operating when the BAT Empty alarm is triggered. 5.2.7 Cleaning and Disinfection (Every Two Months) Before cleaning the infusion pump, power off the infusion pump and disconnect it from the AC/DC power supply. If dirt exists on the infusion pump, wipe the dirt using soft and wet gauze. When cleaning the AC or nurse call socket, use a dry software cloth if possible. Use the pump after confirming that the socket and connector are dry. If the drive head or clutch needs to be removed for cleaning, contact the manufacture or local distributor. Do not use alcohol, diluents, or other organic solvents for the cleaning. If the device needs to be disinfected, use common disinfectants, such as chlorhexidine gluconate and benzalkonium chloride. After using a disinfectant, soak a soft cloth in water, wring out the soft cloth, and use the soft cloth to clean the device. Use the disinfectant according to its operation manual. In an environment where the temperature is 50°C or lower and the relative humidity is 60% or lower, use ethylene oxide gas (EOG) to disinfect the infusion pump. After disinfection, place the infusion pump in a ventilation device for over 8 hours. The preceding operations are guiding operations. A sufficient method must be adopted to verify the disinfection effects. The infusion pump must not be autoclaved. The infusion pump must not be dried using a drying machine or similar products. If liquid splashes on the pump, check whether the pump works properly, and perform an insulation and leakage current test if necessary. Do not soak the infusion pump in water.
30
Calibration 6
Calibration
6.1 Touch Screen Calibration 1 Choose HOME > Local Set > Maintenance, input the password 1666, and choose Device Cali. > Screen Cali. to access the touch screen calibration screen. Perform calibration based on the hint dot until the prompt "Calibration success" is displayed, and tap Confirm to finish calibration.
6.2 Door Potentiometer Calibration 1 Choose HOME > Local Set > Maintenance, input the password 1666, and choose Device Cali. > Sensor Cali. > Door Sensor Cali. 2 Select the motor rotation direction (Clockwise: consistent with the infusion direction), set the rotation speed, and tap Start. The sliding block starts to slide, the mark line (crosshair) on the anti-free-flow clamp is aligned with the mark lines on the sliding block respectively. Tap Calibrate at Calibrate 1 to Calibrate 4 respectively, as shown in the following figure. Notes: Calibrate 1: To calibrate the door opening status. If the calibration is not well performed, the door cannot open or cannot open smoothly. Calibrate 2 and 3: To calibrate the clamp status. If the calibration is not well performed, the anti-free-flow clamp may be loose and liquid may leak. Calibrate 4: To calibrate the occlusion pressure status. If the calibration is not well performed, the monitoring status of fluid/patient side occlusion pressure may be incorrect, affecting the sensitivity of triggering an occlusion alarm.
31
(Schematic diagram)
(Picture of real product) 32
6.3 Pressure Sensor Calibration 1 Choose HOME > Local Set > Maintenance, input the password 1666, choose Device Cali. > Sensor Cali. > Door Sensor Cali. > Pressure Sensor Cali., and input the k, b, upk, and upb values. The labels of these values are affixed on the middle plate (or the pressure sensor).
6.4
1
Upper/Lower Occlusion Levitate Value Calibration Open the pump door. The upper occlusion pressure sensor is in suspended state, and the upper occlusion levitate value is displayed. Tap Calibrate to obtain the calibration value. The calibration is finished. Note: If the levitate value is inaccurate, the zero point of the occlusion pressure may be affected, thereby affecting the sensitivity of triggering an occlusion alarm.
33
6.5 1 2 3 4 5
Pump Head Pressure Adjustment Connect the infusion tube directly to the pressure gage (10 Bar sensor), and set the unit to Bar. Install the infusion tube onto the infusion pump. Choose HOME > Local Set > Maintenance, input the password 1666, and select the calibration mode. Set the infusion rate of the infusion pump to 100 mL/h, perform purge, and start infusion. Use a slot type screwdriver to adjust the position of the peristalsis pump (anticlockwise rotation increases the pressure) until the maximum reading on the pressure gage becomes steady and falls within the range of 2.4-3.0 Bar.
Use a slot type screwdriver to adjust the peristalsis pump position. 6
6.6 1 2 3 4 5 6 7
Cancel the calibration mode. Note: Ensure that the section of the infusion tube to be installed onto the infusion pump has never been extruded. Patient Side Occlusion Pressure Calibration Connect the pressure gage to a 2 Bar pressure sensor, perform relevant settings, and set the unit to mmHg. Connect the pressure gage to the IV set. Install the infusion tube onto the infusion pump. Rotate the three-way valve to ensure that the test IV set, backup syringe, and pressure gage are connected and unblocked. Perform purge until all air bubbles are removed from the infusion tube. Rotate the three-way valve to ensure that only the test IV set and pressure gage are connected and unblocked. Choose HOME > Local Set > Maintenance, input the password 1666, choose Brand Maintenance > Cali. Consum. > Brand, and select a corresponding IV set brand based on the IV set used. 34
8 9 10 11
Turn to the next page, that is, the Down Press Cali. page. Wait for 5 minutes. Set the pressure calibration speed to 0.06 r/s, and tap Start. Observe the reading on the pressure gage. When the reading reaches the value (unit: mmHg) listed in the following table, click Read in a corresponding line to refresh the pressure value. Level Level Level Level Level Level Level Level Level Level Level Level 1 2 3 4 5 6 7 8 9 10 11 12 press press press press press press press press press press press press ure ure ure ure ure ure ure ure ure ure ure ure 150
12 6.7 1 2 3 4 5 6
225
300
375
450
525
600
675
750
825
900
975
Press HOME to return to the initial page. Fluid Side Occlusion Pressure Calibration Install the infusion tube onto the infusion pump, and block the input end. Choose HOME > Local Set > Maintenance, input the password 1666, choose Brand Maintenance > Cali. Consum. > Brand, and select a corresponding IV set brand based on the IV set used. Access the Down Press Cali. page. Set the pressure calibration speed to 10 r/s, and tap Start. When the infusion tube is totally compressed, tap Read to refresh the value. Press HOME to return to the initial page.
6.8 Infusion Pump Accuracy Calibration Infusion set calibration purpose: IV set calibration aims to increase the infusion accuracy of the IV set brands not built in the pump. The parameters to be calibrated include the rates of the 18 points of the IV set, fluid side occlusion pressure, and patient side occlusion pressure. Various data of the user-defined brands is left blank when the pump is delivered. If a user-defined IV set brand is not calibrated, users cannot use it. a) Method 1: 1 Choose HOME > Local Set > Maintenance, input the password 1666, choose Cali. Consum. > New Consum. to access the new consumables editing screen, and specify Brand, Model, and Size (Brand and Size are mandatory).
2 After the setting, tap
to access the New Consum. screen. 35
3
Manually input the rates of the 18 points of a known IV set, fluid side occlusion pressure, and level 11 patient side occlusion pressure.
4 Tap to finish consumables editing. b) Method 2: The calibration parameters of the consumable can be manually input. If a brand of consumable is not available, build this brand of consumable according to method 1. 1 Choose HOME > Local Set > Maintenance, input the password 1666, and choose Brand Maintenance > Cali. Consum.
36
2
Select a brand of consumable to be calibrated (if a desired consumable does not exist, execute method 1 to add this consumable).
3
Tap Purge to remove the air bubbles and fill the entire infusion tube with liquid.
4
Tap
to access the next page, and tap IV Set Cali. to access the IV set calibration page.
37
5
Tap Start to start calibration.
6
A 10-minute countdown starts when the calibration starts.
7
After the countdown, the calibration is finished. Note: After calibration, you can access the consumable brand selection page to check whether the consumable is normal.
c)
Method 3: consumable editing The calibration parameters of a known consumable can be manually imported. For details, see method 1.
38
Alarms and Troubleshooting 7
Alarms and Troubleshooting
Warnings:
During troubleshooting by service personnel, there is a 100-240V AC high voltage in the HP-60 and the switching power supply circuit may generate a 400V DC high voltage. An accidental touch may cause serious personal injury. Please follow the requirements in related regulations and ensure that the maintenance is performed by professional qualified personnel.
When a device is used to measure a circuit board or other parts, short circuit or incorrect measurement method may cause serious personal injury or serious device damage.
The device safety and functions must be verified after being disassembled for maintenance and then assembled each time. For details, see chapter 7. Basic tools for maintenance and inspection: PC (used for downloading software and filling table) Software downloading connector Digital multimeter 20-50 ml measuring cylinder (accuracy: 0.2 ml) or electronic balance Time keeping device like a stopwatch Notes: Among the aforementioned tools, the measuring cylinder or electronic balance is used to check the infusion accuracy. For the tools required for disassembling and assembling the device, see chapter 8. Dedicated safety test devices must be used to test safety items after disassembling and then assembling the device.
7.1
Alarm Levels The infusion pump provides users with a variety of status information about itself and its infusion process. If
any exception is detected, the infusion pump generates an alarm and informs users in the form of sound, light, and character. Based on the criticality of the exception information, alarms are classified into three levels: low, middle, and high. The following table describes the sound-light presentation mode of these three levels of alarm. The alarm volume ranges from 45 dB to 85 dB. Alarm Level
Alarm Sound
Alarm Indicator Status
Low
“Di” is given one time.
The
yellow
indicator is steady on. Middle
“Di-di-di” is given every 12s.
The 39
yellow
indicator flashes. High
Prompt
“Di-di-di..di-di…Di-di-di..di-di” is given every
The red indicator
6s.
flashes.
“Di-di” is given transiently.
/
After an alarm is triggered, you can tap Silent to silence the alarm. Two minutes later, the alarm sound is given again if the alarm level is middle or high and it still exists. 7.2
Common Faults and Troubleshooting
The following table lists the alarm message, alarm level, alarm cause, and troubleshooting. Alarm Message
Alarm Level
Alarm Cause
Troubleshooting Connect to the external
No external AC or DC No AC power
Low
AC or DC power power. immediately. No built-in battery or
No Battery
Low
Install the battery. built-in battery failure Connect to the external
BAT Low
Low
Low battery power
AC
or
DC
power
immediately. Connect to the external BAT Empty
High
Out of battery power.
AC
or
DC
power
immediately. The VTBI or infusion Tap Stop to eliminate the Infusion End
High
time in Infusion Set is alarm. reached. The
infusion
will
be Wait until the infusion is
Infusion Near End
Low
completed in the alarm completed. time. The VTBI or infusion
Infusion End KVO
time in Infusion Set is
Tap Stop to eliminate the
reached and the KVO
alarm.
High Start
process is started. The
KVO
process
is Tap Stop to eliminate the
KVO End
High
started and maintained alarm. for 30 min.
Patient Side OCCL
High
1. The syringe line is 40
Tap Stop to eliminate the
Alarm Message
Alarm Level
Alarm Cause
Troubleshooting
occluded.
alarm.
Identify
2. A low occlusion level
remove
the
is set for high-viscosity
cause and resume the
solution infusion.
infusion.
and
occlusion
3. The system will auto reduce the volume when an occlusion occurs. Tap Cancel to exit the Standby End
Middle
The standby time is out. standby state. No
key
operation
is Tap any key to eliminate
Reminder Alarm
Low
performed in 2 min after the alarm. the syringe is installed. The
Relay Failed
High
communication is
interrupted in the relay
Tap Stop to eliminate the
process or any external
alarm. Enable the local
interference causes relay
relay again.
sequence failure. 7.3
Infusion Pump Faults and Troubleshooting
The following table lists the alarm message dedicated for the infusion pump and the alarm level, alarm cause, and troubleshooting. Alarm Message
Alarm Level
Alarm Cause
Troubleshooting Tap Stop to eliminate the alarm. Identify and
Fluid Side OCCL
High
Upstream occlusion
remove the occlusion cause and resume the
1. There is air bubble inside the infusion tube. Air Bubble In Line
High
2. Damaged infusion set is installed on the air bubble sensor.
41
infusion. Tap Stop to eliminate the alarm. Check that the part of the infusion set installed on the air bubble sensor does not deform, and remove the air bubble.
The
drop
detection Install the drop sensor, or
function is enabled but stop infusion and disable No Drop Sensor
Middle
the drop sensor is not the drop detection installed
during
the function.
infusion. Tap Stop to eliminate the alarm. Check the No No Drop
drop
is
detected
High
installation of the drop during the infusion. sensor and the status of the infusion tube. Tap Stop to eliminate the
Too Many Drops
The drop rate is too high
alarm.
Check
the
during the infusion.
installation of the drop
High sensor. Tap Stop to eliminate the
Too Few Drops
The drop rate is too low
alarm.
Check
the
during the infusion.
installation of the drop
High sensor. Tap Stop to eliminate the The
Drop
drip
chamber
Chamber
alarm. High
overflows
during
Overflow
Check
the
the installation of the drop
infusion. sensor.
42
7.4
System Faults and Troubleshooting
System Faults and Troubleshooting Alarm Alarm Alarm Content Message Level
Patient Side OCCL
ERR 001
ERR 002
ERR 003
ERR 005
ERR 006
ERR 007
Patient Side OCCL
System error: motor drive locked (motor rotation speed is abnormal) System error: reversed rotation of motor drive (motor rotation direction is abnormal) System error: pressure sensor failure (pressure sensor is faulty) Main chip voltage 3.3V (CPU voltage is abnormal) DC input voltage (DC voltage is abnormal) AC input voltage (AC power supply is abnormal)
High
Alarm Cause
Real-time pressure in the tube ≥ occlusion alarm value configured
High
1. The motor is locked. 2. The motor rotation speed is too low. 3. The motor rotation speed is too high.
High
The motor rotation direction is opposite to the expected direction.
High
The pressure sensor status is incorrect.
High
The monitored voltage is smaller than 1.67V or greater than 2.25V.
High
High
The monitored voltage is smaller than 2.15V or greater than 3.3V. The monitored voltage is smaller than 2.12V or greater than 2.87V. 43
Troubleshooting 1. Check whether the infusion tube is twisted or extruded and whether the retaining needle leaks. 2. Check whether the occlusion level setting is reasonable (an older patient indicates a higher drug liquid viscosity and higher infusion rate, and the occlusion level also needs to be higher). 3. Calibrate the pressure value of the consumable. 4. Calibrate the pressure value of
the pressure sensor when it does not touch the infusion tube, and check that the KB value is correct. (Generally, the K value is 404mV/N±50 and B value is about 500mV±200.) 5. Check the pressure sensor. 6. Check the drive head board, nut displacement detection board, main board, and related connection cable. 1. Check the optocoupler and related connection cable. 2. Check the motor and related connection cable. 3. Check the speed measurement board and related connection cable. 4. Check the main board. 1. Check the optocoupler and related connection cable. 2. Check the speed measurement board and related connection cable. 1. Check the pressure sensor and related connection cable. 2. Check the drive head board and related connection cable. 3. Check the main board. 1. Check the main board and related connection cable (generally, check whether the C71 voltage on the main board falls within the range of 1.67-2.25V). 1. Check the power board and related connection cable. 2. Check the main board. 1. Check the power board and related connection cable.
ERR 008
Motor voltage 24V (motor voltage is abnormal)
High
The monitored voltage is smaller than 2.47V or greater than 3.24V.
High
Two neighboring pumps involved in the relay communicate improperly or fail to communicate with each other.
Infusion Start Fail
Warning
The device detects that a start criterion is not met.
Purge Start Failed
Purge Start Failed
Warning
The device detects that a purge criterion is not met.
Failed to start bolus
Failed to start bolus
Warning
The bolus VTBI is greater than the current volume.
ERR 012
Communication error: M0 fails to detect the data of M4.
Relay Failed
Relay failed (workstation)
Infusion Start Fail (with the alarm criterion)
High
A communication error occurs between M0 and M4.
1. Check the power board and related connection cable. 1. Check whether the relay devices are properly connected. 2. Check the USB2.0 interface and related connection cable. 3. Check the main board. 4. Check the main board of the combination cabinet, USB communication interface, and related connection cable. 1. Check whether the pump door is closed. 2. Check whether the infusion tube is properly installed. 3. Check whether a common consumable is used for a dedicated model. 4. Check whether the infusion parameters are properly set. 5. Check whether the device is faulty. 6. Check the high-level alarm function (air bubble option). 7. Check whether the relay sequence number is correct. 1. Check whether the pump door is closed. 2. Check whether the infusion tube is properly installed. 3. Check whether a common consumable is used for a dedicated model. 4. Check whether system self-test fails. 5. Check whether the device is faulty. 6. Check the high-level alarm function. 1. Check whether the bolus VTBI is greater than the current volume. Possible cause: The wires of the fluid/patient side occlusion pressure board are disconnected the communication with the EEPROM of the pressure board fails, or the communication between M0 and M4 is interrupted. 1. Check the fluid/patient side occlusion pressure board and related connection cable. 2. Check the connection cable between the main board and pump door board. 3. Check the main board.
ERR 013
Drive communication error: M4 fails to detect the data of
High
A communication error occurs between M0 and M4. 44
1. Check the fluid/patient side occlusion pressure board and related connection cable. 2. Check the connection cable between
M0.
ERR 009
System error: fluid side pressure sensor failure (fluid side pressure sensor is faulty)
Fluid Side OCCL
Fluid side occlusion (mutual exclusion with the drop sensor)
Air Bubble In Line
Air bubbles/air bubble accumulation
ERR 011
No Drop Sensor
No Drop
Pump finger failure (peristalsis pump
finger drive failure)
No Drop Sensor
No Drop
the main board and pump door board. 3. Check the main board.
High
The AD value of the fluid side pressure sensor exceeds the normal range.
High
1. No drop sensor is connected or the drop detection is disabled. 2. Real-time occlusion pressure ≥ preset occlusion alarm value
High
The detected air bubble value is greater than the preset air bubble threshold.
High
When the second pump finger reaches the highest position, the pump finger encoding disk does not reach the specified position.
Middle
The drop detection function is enabled but no drop sensor is connected.
High
1. The infusion tube is inserted into the drop sensor. 2. Drop detection is enabled. 3. The drop signal does not generate any signal all the time.
45
1. Calibrate the pressure sensor. 2. Check the pressure sensor and related connection cable. 3. Check the main control board. 1. Check whether the drop sensor is properly installed. 2. If no drop sensor is installed, check whether the drop detection function is disabled. 3. Calibrate the pressure sensor. 4. Check the pressure sensor and related connection cable. 5. Check the main control board and related connection cable. 1. Check whether air bubbles exist in the tube. 2. Check the air bubble sensor and related connection cable. 3. Check the pump door board and related connection cable. 4. Check the main control board and related connection cable. 1. Check whether dust or dirt exists on the pump finger optocoupler. 2. Check the pump finger detection board and related connection cable. 3. Check the motor speed measurement board and related connection cable. 4. Check the main control board and related connection cable. 1. Check whether the drop detection function is enabled while no drop sensor is connected. 2. Check whether the drop sensor works properly. 3. Check the drop sensor interface board and related connection cable. 4. Check the main control board and related connection cable. 1. Check whether the drop detection function is enabled while no drop sensor is connected. 2. Check whether the drip chamber is dripping liquid. 3. Check whether the drop sensor is properly installed. 4. Check whether the drop sensor is faulty. 5. Check the drop sensor interface board and related connection cable. 6. Check the main control board and related connection cable.
Too Many Drops
Too Many Drops
Too Few Drops
Too Few Drops
Consum. Error
Common consumable (dedicated device model) (prompt displayed when closing door)
Door Error
Pump door failure (failed to open/close)
The number of drops is greater than the setting.
1. Check whether the specification of the consumable is set properly. 2. Calibrate the consumable. 3. Check the drop sensor and related connection cable.
High
The number of drops is smaller than the setting.
1. Check whether the specification of the consumable is set properly. 2. Calibrate the consumable. 3. Check the drop sensor and related connection cable.
Warning
A dedicated devices detects that a common consumable is installed.
1. Check whether the consumable is a dedicated consumable.
High
Warning
During infusion set installation, the pump door failed to be opened or closed. (After the pump door is opened or closed, the detection potentiometer exceeds the range. Time limit: 3s.)
1. Check whether the pump door is blocked by a foreign object. 2. Calibrate the pump door sensor. 3. Check the pump door motor and related connection cable. 4. Check the patient side occlusion pressure detection board and related connection cable.
Notes:
For the alarm message ERR 00X, X indicates a character. The specific alarm message may be ERR 001, ERR 002, and etc.
For all problems related to the potentiometer, judge whether the hardware is faulty. Access the AD value on the Maintenance screen, move the potentiometer, and observe whether the AD value changes to judge whether the sensor and related wires are damaged.
Access the AD value displayed on the screen, press the pressure sensor, and observe whether the AD value displayed changes to judge whether the pressure sensor and related wires are damaged.
46
Disassembly and Assembly 8
Disassembly and Assembly 1.1
Dismantling the Battery
No.
Part Number
Part Name
Quantity
1
60Z0000005
HP-60 face shell
1
2
60Z0000044
HP-60 lower shell hole plug
5
3
53M0001005
PM3*6 cross recessed pan head machine
5
thread screw 4
4801000004
Battery
1
1.
Use tweezers to remove the five lower shell hole plugs (2).
2.
Use a Philips screwdriver to remove the four M3 screws (3).
3.
Take down the face shell (1).
4.
Press the fastener on the battery connector to separate the plug and socket, and take out the
battery (4). Confidential Information of MEDCAPTAIN MEDICAL TECHNOLOGY CO., LTD. 47 / 90
1.2
Dismantling the Rear Panel Socket Assembly
No.
Part Number
1
5300000007
2
9115001127
Part Name
Quantity
PT3*8 cross recessed pan head drilling PT
1.
thread tapping screw HP-60 rear panel socket assembly
2
1
Remove the AC power supply connection cable, ground wire, and loudspeaker connection
cable. 2.
Use a Phillips screwdriver to remove the two PT3*8 cross recessed pan head drilling PT thread
tapping screws (1). 3. 1.3
Take down the rear panel socket assembly.
Dismantling the Loudspeaker and AC Socket
Confidential Information of MEDCAPTAIN MEDICAL TECHNOLOGY CO., LTD. 48 / 90
No.
Part Number
Part Name
Quantity
1
66Z0000018
HP-60 loudspeaker foam
1
2
4905000001
Loudspeaker
1
3
60Z0000045
AC socket
1
4
5300000007
5
7000000024
HP-60 AC power socket
1
6
69Z01100211
Power socket sealing gasket
1
7
53M0010041
8
60Z0000037
PT3*8 cross recessed pan head drilling PT thread tapping screw
5
KT3*10 cross recessed countersunk drilling tapping screw Interface socket
2
1
1. Remove the five cross recessed pan head drilling PT thread tapping screws (4), and take down the AC socket and loudspeaker. 2. Screw out the two cross recessed countersunk drilling tapping screws (7), and take down the AC socket. 1.4
Dismantling the AC-DC Module
Confidential Information of MEDCAPTAIN MEDICAL TECHNOLOGY CO., LTD. 49 / 90
No.
Part Number
1
5300000007
2
60Z0000050
Part Name
Quantity
PT3*8 cross recessed pan head drilling PT thread tapping screw HP-60 AC shield
2
1
1. Remove the HP-60 AC power supply connection cable. 2. Use a Phillips screwdriver to remove the two PT3*8 cross recessed pan head drilling PT thread tapping screws (1). 3. Take out the HP-60 AC shield.
Confidential Information of MEDCAPTAIN MEDICAL TECHNOLOGY CO., LTD. 50 / 90
No.
Part Number
3
5300000007
4
4801000003
Part Name
Quantity
PT3*8 cross recessed pan head drilling PT thread tapping screw AC-DC module
2
1
4. Use a Phillips screwdriver to remove the two PT3*8 cross recessed pan head drilling PT thread tapping screws (3). 5. Take out the AC-DC module (4). 1.5
Dismantling the Peristalsis Pump Motor Speed Measuring PCBA and Pump Finger Position Detection PCBA
Confidential Information of MEDCAPTAIN MEDICAL TECHNOLOGY CO., LTD. 51 / 90
No.
Part Number
Part Name
Quantity
Cross recessed pan head, spring washer, 1
5300000004
and flat washer combination screw
1
M2x6 GB 9074.4 2
9121060081
HP-60 pump finger position detection
1
PCBA 3
9104060011
HP-60 motor speed measuring PCBA
1
Cross recessed pan head, spring washer, 4
5300000004
and flat washer combination screw
1
M2x6 GB 9074.4 1. Remove the connection cable (7008000021) of the pump finger position detection board. 2. Screw out the cross recessed pan head, spring washer, and flat washer combination screw M2x6 GB 9074.4 (1), and take down the HP-60 pump finger position detection PCBA (2). 3. Remove the connection cable (7000000025) of the HP-60 motor speed measuring board. 4. Screw out the cross recessed pan head, spring washer, and flat washer combination screw M2x6 GB 9074.4 (4), and take down the HP-60 motor speed measuring PCBA (3). 1.6
Dismantling the Sliding Block and HP-60 Door Potentiometer Assembly
Confidential Information of MEDCAPTAIN MEDICAL TECHNOLOGY CO., LTD. 52 / 90
No.
Part Number
Part Name
Quantity
1
60Z0000023
HP-60 door drive gear G3
1
2
60Z0000021
HP-60 sliding block
1
1. Turn the HP-60 door drive gear G3 (1) to make the HP-60 sliding block (2) slide to the rightmost shown in the figure.
Confidential Information of MEDCAPTAIN MEDICAL TECHNOLOGY CO., LTD. 53 / 90
No.
Part Number
Part Name
Quantity
3
55M0000019
HP-60 door drive push rod
1
4
55M0000024
HP-60 sliding block set pin
2
5
60Z0000021
HP-60 sliding block
1
6
5600000002
PM2*3 cross recessed small pan head
2
machine thread screw 7
9121000008
HP-60 door potentiometer assembly
1
2. Screw out the HP-60 door drive push rod (3) and the two HP-60 sliding block set pin (4). 3. Take down the HP-60 sliding block. 4. Remove the connection cable plug on the HP-60 door potentiometer assembly. 5. Screw out the two PM2*3 cross recessed small pan head machine thread screws (6), and take out the HP-60 door potentiometer assembly (7). Note: When taking out the HP-60 sliding block, be careful not to break off the shifting rod of the HP-60 door potentiometer assembly. During installation, ensure that the shifting rod is installed into the slot of the HP-60 sliding block, as shown in the following figure.
Confidential Information of MEDCAPTAIN MEDICAL TECHNOLOGY CO., LTD. 54 / 90
1.7
Dismantling the HP-60 Tube Detection PCBA, Anti-Free-Flow Clamp PCBA, Patient Side Occlusion Pressure Detection PCBA and its Connection FFC
No.
Part Number
Part Name
Quantity
1
9121060051
HP-60 tube detection PCBA
1
2
53M0020011
3
9121060111
PT2.3*6 cross recessed pan head drilling PT thread tapping screw HP-60 anti-free-flow clamp PCBA
Confidential Information of MEDCAPTAIN MEDICAL TECHNOLOGY CO., LTD. 55 / 90
2
PT2.3*6 cross recessed pan head drilling PT 4
53M0020011
5
9121060101
6
53M0020011
thread tapping screw HP-60 patient side occlusion pressure detection PCBA PT2.3*6 cross recessed pan head drilling PT
2
1
2
thread tapping screw HP-60 patient side occlusion pressure 7
7008000012
detection board’s connection FFC
1
1. Take down the HP-60 rear panel socket assembly and HP-60 AC shield. 2. Remove the HP-60 patient side occlusion signal connection cable (7008000019). 3. Screw out the two PT2.3*6 cross recessed pan head drilling PT thread tapping screws (2), and take down the HP-60 tube detection PCBA (1). 4. Screw out the two PT2.3*6 cross recessed pan head drilling PT thread tapping screws (4), and take down the HP-60 anti-free-flow clamp PCBA (3). 5. Remove the HP-60 patient side occlusion pressure detection board’s connection FFC (7). 6. Screw out the two PT2.3*6 cross recessed pan head drilling PT thread tapping screws (6), and take down the HP-60 patient side occlusion pressure detection PCBA (5). 1.8
Dismantling the Peristalsis Pump
Confidential Information of MEDCAPTAIN MEDICAL TECHNOLOGY CO., LTD. 56 / 90
No.
Part Number
Part Name
Quantity
1
6000000035
HP-60 common consumable middle plate
1
2
53M0001005
PM3*6 screw
4
3
9115001128
Peristalsis pump assembly
1
1. Take down the HP-60 sliding block according to the method in section 8.6. 2. Take down the HP-60 common consumable middle plate (1). 3. Screw down the four PM3*6 screws (2). 4. Remove the HP-60 door potentiometer assembly (9121000008), HP-60 motor speed measuring board’s connection cable (7000000025), and plug of the peristalsis pump motor’s connection cable. 5. Take down the peristalsis pump assembly (3). 1.9
Dismantling the Peristalsis Pump Motor
Confidential Information of MEDCAPTAIN MEDICAL TECHNOLOGY CO., LTD. 57 / 90
No.
Part Number
Part Name
Quantity
Cross recessed pan head, spring washer, 1
5300000003
and flat washer combination screw M3x6
2
GB 9074.4 PM2.5*10 cross recessed small pan head 2
53M0000006
machine thread screw+spring washer+flat
4
washer assembly 3
50M0000020
HP-60 speed measuring encoding disk
4
5600000004
PM2.5*6 cross recessed small pan head
1
machine thread screw+spring washer+flat washer assembly 1 5
5300000003
Cross recessed pan head, spring washer, and flat washer combination screw M3x6
Confidential Information of MEDCAPTAIN MEDICAL TECHNOLOGY CO., LTD. 58 / 90
1
GB 9074.4 6
57M0000016
HP-60 peristalsis pump spring
2
7
60Z0000013
HP-60 pump adjustment nut
1
8
50M0000019
HP-60 pump spring support
1
9
9100000019
Stepper motor
1
10
54M0000007
HP-60 peristalsis pump gear G1
1
1. Take down the peristalsis pump assembly according to the method in section 8.8. 2. Remove the three cross recessed pan head, spring washer, and flat washer combination screws M3x6 GB 9074.4 (1 and 5). 3. Remove the two HP-60 peristalsis pump springs (6), HP-60 pump adjustment nut (7), and HP-60 pump spring support (8). 4. Screw out the only PM2.5*6 cross recessed small pan head machine thread screw+spring washer+flat washer assembly (4). 5. Take down the HP-60 speed measuring encoding disk (3). 6. Screw out the four PM2.5*10 cross recessed small pan head machine thread screw+spring washer+flat washer assembly (2). 7. Take down the stepper motor (9). 1.10 Dismantling the Door Drive Assembly
No.
Part Number
Part Name
Quantity
1
9115001129
Door drive assembly
1
Confidential Information of MEDCAPTAIN MEDICAL TECHNOLOGY CO., LTD. 59 / 90
Cross recessed pan head, spring washer, and 2
5300000004
flat washer combination screw M2x6 GB
2
9074.4
3
53M0020011
PT2.3*6 cross recessed pan head drilling PT
1
thread tapping screw 1. Remove the two cross recessed pan head, spring washer, and flat washer combination screws M2x6 GB 9074.4 (2) and the PT2.3*6 cross recessed pan head drilling PT thread tapping screw (3). 2. Remove the motor connection cable, and take down the door drive assembly.
No.
Part Number
Part Name
Quantity
PM2.5*6 cross recessed small pan head 4
5600000004
machine thread screw+spring washer+flat
2
washer assembly 5
7600000004
HP-60 door control two-layer motor
3. Remove the two PM2.5*6 cross recessed small pan head machine thread screw+spring washer+flat washer assemblies (4). 4. Take down the HP-60 door control two-layer motor (5). 1.11 Dismantling the HP-60 Fluid Side Occlusion Pressure Detection PCBA
Confidential Information of MEDCAPTAIN MEDICAL TECHNOLOGY CO., LTD. 60 / 90
1
No.
Part Number
1
53M0020011
2
9121060092
Part Name PT2.3*6 cross recessed pan head drilling PT thread tapping screw HP-60 fluid side occlusion pressure
Quantity
3
1
detection PCBA 1. Remove the three PT2.3*6 cross recessed pan head drilling PT thread tapping screws (1). 2. Take down the HP-60 fluid side occlusion pressure detection PCBA (2). 1.12 Dismantling the Separate Air Bubble Sensor Module A
Confidential Information of MEDCAPTAIN MEDICAL TECHNOLOGY CO., LTD. 61 / 90
No.
Part Number
Part Name
Quantity
1
7700000003
Separate air bubble sensor module A
1
2
53M0020011
PT2.3*6 cross recessed pan head drilling PT thread tapping screw
2
1. Disconnect the separate air bubble sensor module A and the main board connection plug. 2. Remove the two PT2.3*6 cross recessed pan head drilling PT thread tapping screws (2). 3. Take down the separate air bubble sensor module A (1). 1.13 Dismantling the HP-60 Pump Door PCBA
Confidential Information of MEDCAPTAIN MEDICAL TECHNOLOGY CO., LTD. 62 / 90
No.
Part Number
Part Name
Quantity
1
60Z0000043
HP-60 pump door hole plug
7
2
53M0020011
3
60Z0000025
HP-60 cover plate
1
4
9121060021
HP-60 pump door PCBA
1
5
53M0020011
PT2.3*6 cross recessed pan head drilling PT thread tapping screw
PT2.3*6 cross recessed pan head drilling PT thread tapping screw
7
7
1. Use tweezers to remove the seven pump door hole plugs (1). 2. Remove the seven PT2.3*6 cross recessed pan head drilling PT thread tapping screws (2). 3. Take down the HP-60 cover plate (3). 4. Remove the seven PT2.3*6 cross recessed pan head drilling PT thread tapping screws (5). 5. Take out the HP-60 pump door PCBA (4). 1.14 Dismantling the Separate Air Bubble Sensor Module B
Confidential Information of MEDCAPTAIN MEDICAL TECHNOLOGY CO., LTD. 63 / 90
No.
Part Number
1
5300000005
2
50M0000024
3
7700000002
Part Name
Quantity
Cross recessed pan head screw M2x4 GB 818 HP-60 patient side occlusion pressure detection board Separate air bubble sensor module B
4
1
1
1. Screw out the four cross recessed pan head screws M2x4 GB 818 (1). 2. Take down the HP-60 patient side occlusion pressure detection board (2). 3. Take down the separate air bubble sensor module B (3). 1.15 Dismantling the HP-60 Veneer
No.
Part Number
Part Name
Confidential Information of MEDCAPTAIN MEDICAL TECHNOLOGY CO., LTD. 64 / 90
Quantity
1 1.
8400000002
HP-60 veneer
1
Use tweezers to strip off the veneer (1) from the seam between the veneer and shell.
1.16 Dismantling the HP-60 Pump Door Board’s Connection FFC
No.
Part Number
Part Name
Quantity
1
60Z0000043
HP-60 pump door hole plug
1
2
53M0020011
3
7008000009
HP-60 pump door board connection FFC
1
4
60Z0000004
HP-60 bottom shell FPC cover
1
PT2.3*6 cross recessed pan head drilling PT thread tapping screw
1
1. Use tweezers to remove the HP-60 pump door hole plug (1). 2. Remove the PT2.3*6 cross recessed pan head drilling PT thread tapping screws (2). 3. Take down the HP-60 bottom shell FPC cover (4). 4. Disconnect one end of the HP-60 pump door board’s connection FFC (3). No.
Part Number
Part Name
Quantity
5
7008000009
HP-60 pump door board connection FFC
1
Confidential Information of MEDCAPTAIN MEDICAL TECHNOLOGY CO., LTD. 65 / 90
5. Take down the HP-60 cover plate (60Z0000026) according to the method in section 8.13. 6. Take down the HP-60 pump door board connection FFC (5). 1.17 Dismantling the HP-60 Main PCBA
Confidential Information of MEDCAPTAIN MEDICAL TECHNOLOGY CO., LTD. 66 / 90
No.
Part Number
Part Name
Quantity
1
60Z0000044
HP-60 lower shell hole plug
8
2
53M0001005
PM3*6 screw
8
3
60Z0000005
HP-60 face shell
1
1. Remove the eight HP-60 lower shell hole plugs (1) and eight PM3*6 screws (2). 2. Take down the HP-60 face shell (3).
No.
Part Number
Part Name
Quantity
4
9121060011
HP-60 main PCBA
1
5
60Z0000050
HP-60 AC shield
1
6
5300000007
7
9115001127
PT3*8 cross recessed pan head drilling PT thread tapping screw HP-60 rear panel socket assembly
Confidential Information of MEDCAPTAIN MEDICAL TECHNOLOGY CO., LTD. 67 / 90
2
1
PT3*8 cross recessed pan head drilling PT 8
5300000007
thread tapping screw
2
Cross recessed pan head, spring washer, and 9
5300000003
flat washer combination screw M3x6 GB
5
9074.4 10
9115001125
HP-60 middle plate assembly
1
11
9115001126
HP-60 pump door assembly
1
3. Take out the HP-60 middle plate assembly (10) and HP-60 pump door assembly (11). 4. Remove the two PT3*8 cross recessed pan head drilling PT thread tapping screws (6), and take down the HP-60 AC shield (5). 5. Remove the two PT3*8 cross recessed pan head drilling PT thread tapping screws (8), and take down the HP-60 rear panel socket assembly (7). 6. Remove the five cross recessed pan head, spring washer, and flat washer combination screws M3x6 GB 9074.4 (9), and take down the HP-60 main PCBA (4). 1.18 Dismantling the HP-60 Drop Sensor Interface PCBA
No.
Part Number
1
53M0020011
Part Name PT2.3*6 cross recessed pan head drilling PT
Quantity
2
thread tapping screw 2
9121060031
HP-60 drop sensor interface PCBA
Confidential Information of MEDCAPTAIN MEDICAL TECHNOLOGY CO., LTD. 68 / 90
1
3
9115001125
HP-60 middle plate assembly
1
4
9115001126
HP-60 pump door assembly
1
1. Take down the HP-60 middle plate assembly (3) and HP-60 pump door assembly (4) according to the method in section 8.17. 2. Remove the two PT2.3*6 cross recessed pan head drilling PT thread tapping screws (1). 3. Take down the HP-60 drop sensor interface PCBA (2). 1.19 Dismantling the Fastener Assembly
No.
Part Number
Part Name
Quantity
1
60Z0000052
HP-60 shifting block plate
1
2
53M0020011
3
60Z0000063
HP-60 fastener seat
1
4
60Z0000064
HP-60 fastener
1
5
57M0070031
Shifting block plate pressure spring
1
1.
PT2.3*6 cross recessed pan head drilling PT thread tapping screw
Take down the shifting block plate (1). The shifting block plate is connected through the fastener. Be careful not to break off the fastener when taking down the shifting block plate.
2.
2
Remove the two PT2.3*6 cross recessed pan head drilling PT thread tapping screws. Confidential Information of MEDCAPTAIN MEDICAL TECHNOLOGY CO., LTD. 69 / 90
3.
Take down the fastener seat (3) together with the fastener (4) and shifting block plate pressure spring (5).
1.20 Assembly Perform assembly in the reversed order of the disassembly procedure. When performing assembly, note the following points: 1.
The screw types and specifications must be correct.
2.
All parts and components must be properly installed.
3.
For the parts where lubricating grease has been applied but already erased, the operator must reapply lubricating grease on these parts.
4.
When installing the main PCBA, do not forget to install the main board shielding case and main board protection plate.
5.
When installing the main motor, pay attention to the direction of the outgoing line.
6.
After installing the main motor and reduction gear assembly, manually make the gear rotate for over one circle to ensure that the gear assembly rotates steadily and smoothly. Ensure that the speed measuring encoding disk and speed measuring optocoupler do not rub each other.
7.
When installing the pump door board, ensure that the surface of the display screen and transparent window of the veneer is clean without dust.
8. All cables and wires must be connected correctly and firmly. The wire arrangement must be tidy, and the wires must be bundled and fastened as requested.
Confidential Information of MEDCAPTAIN MEDICAL TECHNOLOGY CO., LTD. 70 / 90
List of Spare Parts 9
List of Spare Parts
Note: For the disassembly and assembly procedure of spare parts, see the corresponding section listed in the following table. No.
Componen
Component
Spare
t Name
Code
Name
Parts Spare Parts Picture
Disassembl y
and
Assembly Procedure 1
Upper shell
60Z0000005
HP-60 face shell
8.1
60Z0000052
HP-60
8.19
assembly
2
Upper shell assembly
3
Upper shell
block plate
9100000009
assembly
4
HP fastener and
8.19
fastener seat
60Z0000021
Middle
shifting
separation
HP-60
sliding
8.6
door
8.6
block
assembly
5
Middle
9121000008
HP-60
separation
potentiometer
assembly
assembly
Confidential Information of MEDCAPTAIN MEDICAL TECHNOLOGY CO., LTD. 71 / 90
6
Middle
7000000025
HP-60
motor
separation
speed measuring
assembly
board’s
8.5
connection cable 7
Middle
7008000021
Pump
finger
separation
position
assembly
detection board’s
8.5
connection cable 8
9
10
Middle
9104060011
HP-60
motor
separation
speed measuring
assembly
PCBA
Middle
9121060081
HP-60
pump
separation
finger
position
assembly
detection PCBA
Middle
7008000019
HP-60
separation
side
assembly
signal
patient
8.5
8.5
8.7
occlusion
connection cable 11
Middle
7008000012
HP-60
patient
separation
side
assembly
pressure
8.7
occlusion
detection board’s connection FFC 12
Middle
9121060101
HP-60
patient
separation
side
assembly
pressure
occlusion
detection PCBA
Confidential Information of MEDCAPTAIN MEDICAL TECHNOLOGY CO., LTD. 72 / 90
8.7
13
14
15
16
Middle
9121060111
8.7
HP-60
separation
anti-free-flow
assembly
clamp PCBA
Middle
60Z0000002
HP-60
simple
separation
consumable
assembly
middle plate
Middle
60Z0000001
HP-60 dedicated
separation
consumable
assembly
middle plate
Middle
9121060051
separation
HP-60
tube
8.8
8.8
8.7
detection PCBA
assembly
17
18
19
Middle
9100000018
HP-60 peristalsis
separation
pump
assembly
assembly
Middle
9100000019
pump
assembly
assembly
Middle
50M0000020
body
HP-60 peristalsis
separation
HP-60
8.8
8.9
motor
speed
separation
measuring
assembly
encoding disk
Confidential Information of MEDCAPTAIN MEDICAL TECHNOLOGY CO., LTD. 73 / 90
8.9
20
Middle
9115001129
separation
Door
drive
8.10
door
8.10
assembly
assembly
21
22
Middle
7600000004
HP-60
separation
control two-layer
assembly
motor
Middle
9121060092
HP-60 fluid side
separation
occlusion
assembly
pressure
8.11
detection PCBA (common consumable) 23
Middle
9121060091
HP-60 fluid side
separation
occlusion
assembly
pressure
8.11
detection PCBA (dedicated consumable) 24
25
26
Middle
7700000003
Separate
separation
bubble
assembly
module A
Middle
9100000024
air sensor
HP-60
separation
anti-free-flow
assembly
clamp assembly
4801000004
Bottom
8.12
Battery
shell assembly
Confidential Information of MEDCAPTAIN MEDICAL TECHNOLOGY CO., LTD. 74 / 90
8.1
27
Bottom
9115001127
shell
HP-60 rear panel
8.2
socket assembly
assembly
28
Bottom
60Z0000045
AC socket
8.3
4905000001
Loudspeaker
8.3
60Z0000037
Interface socket
8.3
7000000024
HP-60
AC
8.3
shell
power
supply
assembly
connection cable
shell assembly
29
Bottom shell assembly
30
Bottom shell assembly
31
32
Bottom
Bottom
69Z01100211
shell
Power
socket
8.3
sealing gasket
assembly
33
Bottom
4801000003
AC-DC module
shell assembly
Confidential Information of MEDCAPTAIN MEDICAL TECHNOLOGY CO., LTD. 75 / 90
8.4
34
35
36
37
38
Bottom
7000000013
DC
power
shell
supply
assembly
connection cable
Bottom
9121060011
HP-60
main
shell
PCBA
(with
assembly
WiFi)
Bottom
9121060012
HP-60
main
shell
PCBA (without
assembly
WiFi)
Bottom
9121060031
HP-60
drop
shell
sensor interface
assembly
PCBA
Bottom
60Z0000003
shell
8.17
8.17
8.18
bottom
8.17
HP-60
door
8.13
cover
plate
HP-60 shell
assembly
39
9100000025
Door assembly
assembly
40
Door
69Z0000002
assembly
HP-60
door
sealing gasket
Confidential Information of MEDCAPTAIN MEDICAL TECHNOLOGY CO., LTD. 76 / 90
8.13
41
Door
9121060021
assembly
42
Door
60Z0000029
Door
57M0000017
Door
HP-60 occlusion
8.14
pressing plate
assembly
44
8.13
door PCBA
assembly
43
pump
HP-60
HP-60 occlusion
8.14
spring
7700000002
assembly
Separate bubble
air
8.14
sensor
module B
45
Door
7008000009
assembly
HP pump door
8.16
board connection FFC
46
Door
9100000026
assembly
47
Door
front
8.13
panel assembly
9100000027
assembly
HP-60
HP-60C
front
panel assembly
Confidential Information of MEDCAPTAIN MEDICAL TECHNOLOGY CO., LTD. 77 / 90
8.13
48
Door
8400000002
HP-60 veneer
8.15
assembly
Note: The list of spare parts is updated as requested based on product changes and maintenance at regular intervals.
Confidential Information of MEDCAPTAIN MEDICAL TECHNOLOGY CO., LTD. 78 / 90
Software Upgrade 10
Software Upgrade
10.1 Software Programming Tools 1)
PC: Windows 7 operating system
2)
Programming device: J-Link ARM emulator (SEGGER)
3)
Upper computer software: Jlink-Flash-V4.9, “Infusion clinical information system.download”
4)
Programming device: USB-to-RS232 serial port cable
10.2 List of Executable Files for Software Programming 1)
List of software downloaded using “Infusion clinical information system.download” Software
Software Name
BIN File
Code
9300000003
9300000026
Main program of HP-30 UI system software Main program of HP PCA-UI
MCMainUI_30Debugxxxxx.bin
MCMainUI_PCADebugxxxxxx.bin
system software Main program of HP TCI-UI 9300000027
9300000004
system software Main program of HP-60 UI system software
MCMainUI_TCIDebugxxxxxx.bin
MCMainUI_60Debugxxxxx.bin
Main program of HP-60C-1UI 9300000015
9300000025
system software Main program of HP-60C-2UI system software
MCMainUI_60CDebugxxxxx.bin
MCMainUI_60SDebugxxxxx.bin
Main program of HP-80 9300000009
9300000012
workstation control software Main program resource of HP-30/60 UI system software
9300000014 HP-30 consumables library
MCDockCover_Debugxxxxx.bin
flash_simplifyxxxxx.bin
Syringe_Vx.0.bin
Confidential Information of MEDCAPTAIN MEDICAL TECHNOLOGY CO., LTD. 79 / 90
2)
9300000016 HP-60 consumables library
Tube_Vx.0.bin
9300000023 HP-30/60 drug library
Drug_Vx.0.bin
List of software programmed using the ARM emulator
Software
Software Name
Code
HEX File
Programmi ng Port
Main program of HP-30 infusion 9300000005
9300000006
control software Main program of HP-60 infusion control software
HP30Driverxxxxx.hex
J10
HP60Driverxxxxx.hex
J10
HP30SafeDriverDebugxxxxx.hex
J15
HP60SafeDriverDebugxxxxx.hex
J14
HP30TCIDriverxxxxx.hex
J10
Main program of HP-30 security 9300000007
9300000008
monitoring software Main program of HP-60 security monitoring software Main program of HP TCI
9300000028
9300000029
infusion control software Main program of HP TCI
HP30TCISafeDriverDebugxxxxx.
security monitoring software
hex
J15
Main program of HP-80 9300000010
workstation subsidiary
HPDockBoxxxxxx.hex
SWD1
communication software
9300000013
9300000024
Boot program of HP-30/60 UI system software
HP_BootLoad_Debugxxxxx.hex
Boot program of HP-80
HP_BootLoad_Debug_HP80xxxx
workstation control software
x.hex
J2
SWD1
10.3 IQC Software Programming Sequence Main program of control software, main program of security monitoring software > boot program of system software > main program of UI system software, main program resource, consumables library, drug library Note: For programming of several programs, you must also comply with the preceding sequence. Confidential Information of MEDCAPTAIN MEDICAL TECHNOLOGY CO., LTD. 80 / 90
10.4 Emulator Software Programming Method Note: Select the engineering file and hex file according to the “List of software programmed using the ARM emulator”. 1)
Double-click the Jlink-Flash-V4.9 icon on the desktop.
2)
Select or open a corresponding engineering file.
3)
Click Start J-Flash to access the main page of the software.
4) Connect one end of the JLink emulator to the USB port of the PC and the other end to the target board. Note: For the information about how to select a port on the board, refer to the
27
corresponding programming ports provided in the “list of software programmed using the ARM emulator”.
Connection between the HP-30/HP-60 and PC
HP-30 and HP-60
SWD 1
82
HP-80 combination cabinet
SWD 1
HP-80 controller 5)
Power on the board or integrated machine and start the device.
6)
Choose File > Open data file..., and import the corresponding hex file.
7)
Wait until the file is successfully imported.
83
8)
Choose Target > Connect to connect to the target board.
9)
“Connected successfully” is displayed in the information prompt bar after successful connection.
Note: If the connection fails, check whether the port connection is successful, whether the power supply of the board or integrated machine is in normal state, and whether the J-Link drive is properly installed. 10) Choose Target > Program & Verify.
84
11) Click 是(Y) in the confirmation dialog box to access the download page.
12) A dialog box indicating that the downloading is successful is displayed. Click confirm.
13) Choose Target > Start application to restart.
85
14) Change the port and software settings, and perform the next software programming.
86
10.5 Downloading Method of the “Infusion clinical information system.download” Software Note: When this programming method is selected, one PC can be used for programming of multiple devices concurrently. 1)
Connect the white end of the USB-to-RS232 connection cable to the USB port of the process equipment PC. Note: A drive needs to be installed at the first use. After drive installation, determine a
fixed USB port for connection of the USB-to-RS232 connection cable in the future. If you change the port for connection of this line, you need to reinstall the drive. 2)
Connect the black end of the USB-to-RS232 connection cable to the external USB port of the HP-30/HP-60 rear panel assembly.
3)
Access the DownloadTool folder, and double-click Programmer.exe.
4) Restart the integrated machine or power on the board. The system displays a message indicating that the connection is successful.
87
5)
Click add, and select the bin file for loading.
6)
Select the port on the left, and select the bin file to be programmed on the right.
7) Click start download. A download progress bar is displayed. It takes about 20 minutes for programming of the “main program resource”.
88
8)
After downloading is completed, a message is displayed to indicate that the downloading is successful.
9)
Remove the USB cable from the machine. Note: The cable connected to the PC must not be removed. Otherwise, the PC may break down or restart.
10) Restart the machine.
END
89
MEDCAPTAIN MEDICAL TECHNOLOGY CO., LTD. After-sales service address: 12th Floor, Baiwang Research Building, No.5158 Shahe West
Road, Xili, Nanshan, 518055 Shenzhen, Guangdong, PEOPLE'S REPUBLIC OF CHINA Phone: +86-755-26953369 Fax: +86-755-26001651 Postal code: 518055 Website: http://www.medcaptain.com Email: [email protected] WeChat official account of MEDCAPTAIN’s user service center:
©2017 MEDCAPTAIN MEDICAL TECHNOLOGY CO., LTD. All Rights Reserved.
90