![Belajar Tentang Proses Sepatu [PDF]](https://pdfs.asia/img/200x200/belajar-tentang-proses-sepatu.jpg)
15 0 298 KB
Materi Sepatu
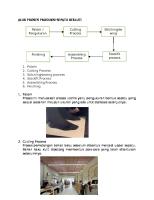
Flow chart prosedur standar pembuatan sepatu (standard shoes manufacturing procedure)
Keterangan :
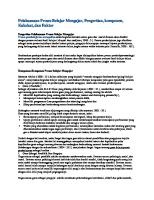
1. Upper Components Cutting Cutting process adalah proses pemotongan bahan baku sebelum dibentuk menjadi upper sepatu. Bahan baku sepatu (kain/kulit) dipotong sesuai dengan pola yang telah ditentukan menggunakan mesin potong (cutting machine) dan alat potong cutting dies yang ukuran dan bentuknya sudah disesuaikan dengan pola-pola potongan. 2. Stitching / Sewing Bahan baku yang telah di potong sesuai pola pada cutting process dijahit dan dibentuk menjadi upper sepatu. Pada proses penjahitan membutuhkan waktu yang cukup lama karena tingkat kesulitan yang tinggi saat menjahit dan membutuhkan ketelitian yang tinggi juga. 3. Outsole Production Outsole merupakan bagian terbawah dari sepatu yang langsung bersentuhan dengan tanah. Outsole yang baik yaitu yang memiliki karakteristik yaitu cengkraman (grip), daya tahan dan tahan air. Proses pembuatan outsole terdapat 2 jenis, yaitu molding dan injection. 4. Insole Production Insole merupakan bagian dalam sepatu tepatnya berada di bawah kaki. Bahan yang digunakan untuk insole sangat menentukan kenyamanan saat sepatu dikenakan. 5. Assembly Proses assembling merupakan proses perakitan sepatu dikerjakan. Bagian-bagian sepatu yang berupa upper dan bottom mulai digabungkan sehingga menjadi sepatu.
SHOE MAKING Product Development Department: Product development is the core function of any manufacturing company. It is the basic tool to attract customer and eventually to come to a business contract. This initially developed sample under goes many modification through different stages, finally it is perfected by accommodating the suggestions from both the customers and the manufacturers. Before placing any order to the facility, the Buyer/Customer wants to know whether the factory is capable of producing the styles with the desired quality level or not. So it is very important to understand the sample development process to control quality and cost in the initial stage Objectives:
To create innovative product range to attract potential customers.
It must be competitive in the market.
It can be produced in the existing manufacturing facility.
It should be promptly responsive to the customer
Before finalization of sample, different steps are followed depending on the Buyer/Customer to Buyer/Customer and style to style. The steps are as follows:
1) 2) 3) 4) 5) 6)
Initial Salesman Advertisement/Press Fitting Confirmation Pre-Production /Gold
Sample seal
Sample sample Sample Sample & Sample
These samples are sent to the Buyer/Customer one after another for approval. Assessment
of
sample:
Upon receiving the samples, Buyer/Customers check the sample quality, fitting, finishing etc and gives the feed back within 5-7 days through e-mail . Feedback from the Buyer/Customer comes in three different forms 1. Accepted, 2. Not accepted or 3. Accepted with comments. After getting their approval, it proceeds step by step. Sometimes the Buyer/Customer suggests some changes in the prepared sample both in terms of technicality and material.
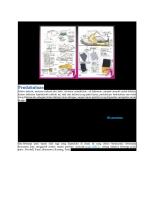
Bellow The Product Development Flow chart are given
Making Shoe is a Step-By-Step Process. Bellow chart is a shoe making process chart.
Upper Cutting & Prefabrication: First step in making shoe is to cut the upper material into shoe components as per the required style. There the cutter places the material on the clicking machine and cut it with the help of cutting die /knife to achieve the following objectives. 1) Receiving of material: 2) Receiving of cutting knife: 3) Practical cutting:
After the components are cut, the pieces are checked & counted first by the helper and then by the quality checker and put into poly bag pair by pair. In case of nonconformity of the components, the bad components are dropped in a bag attached in the cutting table and make the necessary replacement.
Upper Cutting & Prefabrication Process Flow Chart
Upper Cutting Process flow chart
Cutting leather: The method of cutting “uppers” from a leather is a great importance, and is necessary for cutter to know the structure of the skin. The cutter must know which parts of the skin have better physical properties, the direction of the stretch and the nature and origin of the various defects. A good cutter will always be cost minded and get maximum utilization from a skin. A good cutter must know how to use to the maximum the various parts of the leather.
Cutting synthetic and fabric: Synthetic material & fabrics are cut in layer. Depending on the thickness and hardness of the material the number of layers is determined. Some times to maintain the design, particular direction need to be maintained.
Knives: The knives are manufactured from steel. Double edge cutting knives are in use wherever possible; this minimizes the number of knives required, so reducing cost.
Two heights: 19 mm. 32 mm. for textiles and other multi layer cutting.
Cutting Block : The blocks on which leathers cut are made of poly propylene or phenolic resin block, the cutter should always use the entire surface area of the block to wear it uniformly, this saves knives and improves cutting quality.
Machine: Basically two types of cutting machines are in use
Swinging head cutting machine
Beam head cutting machine
Quality Inspection: After completion of all the operations in the cutting & prefabrication, each and every component are checked pair by pair, put in poly bag and store in the cutting dept. for delivery. In case of non conformity, respective components are replaced.
The two major parts of a shoe are the upper and the bottom
for
leather
Bottom: The bottom is comprised of the:
Sole: The sole is the layer of material covering bottom of the shoe and it is the walking surface of the shoe. Heel: The heel is the component of the shoe that supports the back part of the foot (Lifts from the layer of material used to build up the heel; the top lift is the wearing layer of the heel). Today most soles and heels are pre-fabricated as a single bottoming unit, eliminating a series of operations on the assembly line and reducing costs. Insole: The insole is the inner component of the shoe and it is considered to be the foundation of the shoe since the upper is attached to it. It is made from materials that will absorb moisture from perspiration and it is molded to conform to the bottom of the last before the upper is lasted to ensure the comfort and the shape of the shoe. Shank: The shank is a strip of metal, or other material, shaped to the inside profile of the last to reinforce the waist of the shoe so it is comfortable and maintains its shape during wear. Bottom filling: The bottom filling is a flexible material used to fill the cavity between the insole and the sole. Sock: The sock is a piece of material shaped to cover or part of the insole. It is inserted into the completed shoe and usually bears the shoe brand name.
Upper: The upper is comprised of the:
Quarters: The quarters enclose the sides and back of the foot and are joined at the back seam. Vamp: The vamp covers the toe and forepart or front of the shoe. Toe/toe cap: The toe/toe cap refers only to the foremost (most forward) area of the shoe. Feather edge: The feather edge is not really part of the upper . It is the lower extremity where the upper meets the sole or insole. Lasting Allowance: When the patterns are cut, an additional margin of material is added to the feather edge fro stitching. This is what is called the lasting allowance. o
Counter: A simple shoe is made up of two quarters, which are joined at the back. It is sometimes desirable, however, to eliminate this back heel seam so that the back of the shoe is cut as one piece. When this is done, that one piece is called a counter. o Wing Cap: The wing cap os a conventional toe cap set squarely across the shoe. A wing cap is angled back to give a streamline effect. o Tongue: The tongue is a strip of material found under the lacing or fastening of the shoe. A vamp may have a separate tongue or the vamp and tongue may be cut all in one piece. o Quarter facings: The front panels at the lace-up area of the shoe are called facings or quarter facings. The facings may either be separate piece or part of the quarter. o Topline or quarter topline: the top of the shoe which surrounds the opening of the foot is called the topline or quarter topline. o Backstrap: Since the heel seam is often subjected to considerable strain both in lasting and wear. It is common to reinforce it with backstrap. All the upper pieces are fully lined with one or more linings. The linings of the shoe help grip the foot and cover the inside materials.
Production Process - Sewing Department The Sewing Dept. plays a very important role in shoe making. It has an impact both in terms of functionality and outlook. Maximum value addition in a shoe making happens in sewing Department. Both for functional and decorative feature , it is important to use number of stitches per cm. Therefore utmost care should be taken in the sewing operations. Besides that the maximum job content, workforce and machinery are involved in the sewing dept. Let's see sewing objective and main functions. Objective:
To stitch the cut components of uppers as per plan, size assortment and approved sample within the stipulated time. To ensure the best utilization of the manpower and machinery. To ensure the stitching of right quantity of upper in the right quality in the most efficient manner.
Main Functions:
TO make an analysis of the file (Production Guide), production plan received from planning and the approved sample. In case of any deviation to be communicated to the person concern and get it corrected. To ensure necessary equipment, machinery and manpower are available well ahead of production start time for avoiding any sort of interruption during production. Practical Stitching: Preparation: Before starting the job, a preparatory check is done of the approved sample, component, related accessories, guides, gadgets, machinery and the required manpower. Thread color & number to be matched with the approved style. Needle to be set as per thread number, stitch length to be adjusted as per sample. marking ink & cleaner to be selected well ahead of production. Line Setting: Since every style have their uniqueness in sewing, it requires different setting in the sewing line for the sequential operation avoiding repetition of movement. One pair is stitched first following the approved sample to check every technical details.Consult with the product development dept. and get it approved after necessary correction if required. After getting the approval, the volume production stats, components are sometimes reinforced, laminate and progressively stitched together such as collars are joined to quarters, tongue to vamps, vamps to quarters, eyelets to uppers and so on depending on the style using a wide variety of specialized sewing machines until the upper is completely stitched. Sequential operation of a typical sewing line shown bellow:
Each operator along with the helper is responsible for efficiently producing high quality work. They must follow the approved sample. Proper thread, needle, number of stitches per cm, distances from edges or other raws of stitches to be maintained. Loose threads
to be trimmed, shoe components are straight and wrinkle free during attachment. Line supervisor check the quality different point and gives technical solutions.
At the end of the sewing process the quality controller inspect the stitched upper pair by pair so that a standard of excellence is maintained. After completion of stitching, the stitched uppers are stored in the section. Delivery: Depending in the style, some of the uppers are directly delivered to the lasting line and some of them to the Hand Sewing for Moccasin Stitch.
How are shoes made in factories? The manufacturing process for shoes is basically the same for all types of shoes. The sports shoe manufacturing process used to make a kids sneaker, Air Jordan™, or women’s high heel fashion shoe are very similar. Shoe factories around the world follow the basic steps to make a shoe. The basic shoemaking steps are:
#1. Cutting upper parts #2. Stitching shoe uppers #3. Lasting and assembly In this article, we will look at each of these factory processes for shoes. Of course, the number of operations is not 3. The number of operations is more like 30,000 depending on how you are counting. Cutting Shoe Parts The shoe production process starts with cutting the materials. Shoe parts are generally cut by steel dies in a hydraulic press. The cutting dies for shoe parts look like simple cookie cutters but they are very sharp. Every shoe part requires it’s own cutting die. Every part for every size needs its own die. These shoe parts are called the shoe pattern. To support the production of high volume shoes in popular sizes, often many die sets are required. The cutting dies are placed on the leather or fabric materials by hand, then the press closes to make the cuts. After the parts are cut a worker will carefully organize and stack the shoe parts. The parts will then be moved on to be processed before stitching. The parts will be marked for alignment or have logos added by the embroidery or printing departments.
Once the parts are prepared, the shoe factory workers will organize the parts into kits for the stitching department. Stitching Shoe Parts Once the shoe parts are processed and organized, the shoe factory stitching department takes over. In the stitching department, the operations are divided into simple steps. Each worker is given one task to complete. For example, one worker will sew the vamp parts to the mudguard then pass the shoe onto the next worker to attach the eyestay parts. With each operation assigned to one worker, the QC staff can quickly track any problems. The division of the operations also allows the worker to quickly master their operation. In the stitching department, the upper parts are assembled, the lining attached, and the foam for collars and tongues are inserted. The upper is completely assembled with the reinforcing parts added and heat molded into shape. Toe caps and heel counters are formed and ready for the final assembly operations. Shoe lasting and assembly Process With the stitching complete, the upper is ready to be bonded to the outsole. Before the outsole can be attached, the upper must be “lasted.” Lasting is the operation that gives the shoe its’ final shape. The plastic, metal, or wood foot form (the “last”) is inserted into the upper. The upper is pulled tight, this sets the shape. With the upper tight to the last, the outsole unit can be permanently cemented to the upper. During this process, the shoe travels inside a heat tunnel to dry the glue before the final bonding process. The last steps are QC and packing. The process of making shoes is covered in great detail in the book How Shoes are Made. Inside How Shoes are Made you will find chapters on the cold cement process, vulcanized shoemaking processes, stitching, and outsole fabrication.