![Perkins Diesel Engine 2006-12t1 [PDF]](https://pdfs.asia/img/200x200/perkins-diesel-engine-2006-12t1.jpg)
7 0 2 MB
PERKINS DIESEL ENGINE 2006–12T1 1.1 GENERAL
• Make sure a battery is the correct voltage and polarity before it is connected.
This section has the description and repair instructions for the 2006–12T1 Perkins diesel engine.
• Do not check for current flow by making a spark because the transistors can be damaged.
WARNING Some gaskets used in this engine can contain dangerous fibers. Breathing dust from these fibers is a cancer or lung disease hazard. Do not make dust! Use vacuum equipment approved for dangerous fibers or follow the cleaning procedure described below.
• Use a hand scraper to remove old gasket material. Do not use a power tool or compressed air.
• Make sure the gasket material is wet with water or oil to prevent particles in the air.
• Discard all gasket material in a closed container while it is still wet. Put an “DANGEROUS FIBERS” warning label on the container. Discard gasket material safely.
CAUTION Disconnect the battery cables before doing any disassembly and repair to the engine or parts of the electrical system. The diodes and resistors in the electrical system can be damaged if the following cautions are not followed:
• Do not disconnect the battery when the engine is running. The voltage surge can damage the diodes and resistors.
• Do not disconnect an electric wire before the engine is stopped and the switches are “OFF”.
• Do not cause a short circuit by connection of the electric wires to the wrong terminals. Make sure a correct identification is made of the wire before it is connected.
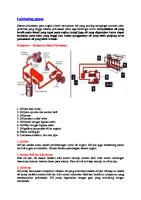
1.2 DESCRIPTION The 4–stroke diesel engine has six cylinders in a vertical in–line configuration. The turbocharged engine is liquid cooled, and is equipped with an air compressor. There are two cylinder heads on each engine. Each cylinder head covers three cylinders. Each cylinder head is cast iron and has one inlet valve and one exhaust valve for each cylinder. The valve seats and the valve guides are replaceable. The fuel injectors are in the cylinder head. The overhead valve assembly is actuated by a camshaft inside of the engine block. A gear train, turned by the crankshaft, turns the camshaft, coolant pump, injection pump, and a power–take–off (PTO) for the air compressor. The crankshaft has seven main bearings. The main bearing in the center of the crankshaft is the thrust bearing and has thrust washers on both sides of the bearing. Each aluminum alloy piston has three piston rings (two compression rings, and an oil control ring). The groove for the top compression ring has a special cast iron insert. The coolant pump, cooling fan and the alternator are turned by drive belts. The fuel pump brings fuel from the fuel tank to the Bosch injection pump. A fuel pump is fastened to the housing of the fuel injection pump and is actuated by a cam in the fuel injection pump. The timing and quantity of fuel sent to the fuel injectors is controlled by a throttle and governor in the fuel injection pump. The static timing is set by the position of the fuel injection pump when it is installed. The throttle linkage must be correctly adjusted to control the quantity of fuel sent to the injectors. A mechanical governor is used to control the maximum engine speed.
1
2
2
3
4
5
13
10
12
9
8
7
6 14 15
11
19 1. THERMOSTAT HOUSING 2. ROCKER ARM COVER (2) 3. CONNECTOR PIPE, TURBOCHRGER TO INLET MANIFOLD 4. FUEL FILTER 5. FLYWHEEL HOUSING 6. TURBOCHARGER 7. OIL DRAIN PIPE, TURBOCHARGER 8. OIL SUPPLY PIPE, TURBOCHARGER 9. EXHAUST MANIFOLD 10. GOVERNOR
16 18 17 11. 12. 13. 14. 15. 16. 17. 18. 19.
17
OIL SUMP FUEL INJECTION PUMP FUEL PUMP INLET MANIFOLD ALTERNATOR COOLANT SUPPLY PIPE TO OIL COOLER OIL FILTER (2) OIL COOLER STARTER
FIGURE 1. 6–CYLINDER DIESEL ENGINE, PERKINS 2000 SERIES 2
1.3 Engine Serial Number Codes The engine number is on a data plate on the left–hand side of the engine block.
FIGURE 2. SERIAL NUMBER LOCATIONS A typical serial number has the following code: 8B 26549 U 73545 S 1 2 3 4 5 where: 1 = Type of engine 2 = Parts list number 3 = Country of manufacture (U = manufactured in the United Kingdom) 4 = Build number 5 = Year of manufacturer. The letter indicates the year of manufacture starting with “A” in 1974 (S=1988). The letters I, O, Q, R, and Z are not used. If parts or service are required for your engine, the complete engine number must be given to your dealer. 1.4 Engine Data The specifications and tolerance details for engine repair are in a chart at the end of this chapter.
Power Rating at 2100 rpm
201 kW (270 bhp) Number of cylinders 6 Firing order 1–4–2–6–3–5 (Cylinder numbers are from fan to flywheel) Bore and stroke 130.17 x 152.4 mm (5.125 x 6.000 in) Displacement 12.17 litres (742.64 in#) Compression Ratio 15.9:1 Direction of rotation Counter–clockwise (seen from flywheel end of engine) Minimum oil pressure 207 kPa (30 psi) (at normal rpm and operating temperature) Governor speed 2100 rpm Idle speed 750 rpm Thermostat Begin to open 78–85°C (172–185°F) Fully open 92–95°C (198–203°F) Valve clearance (cold): Inlet 0.25 mm (0.010 in) Exhaust 0.50 mm (0.020 in) Turbocharger Holset H2C Fuel pump Bosch – single acting Injection pump Bosch with mechanical governor Alternator Butec A3024, 24 volts Starter Butec LMS1A, 24 volts Air compressor WABCO 411, 293 cc Approximate dry weight 1293 kg (2850 lb)
1.5 REMOVAL AND INSTALLATION See the THE FRAME section for the procedure for removing the engine and transmission. See the TRANSMISSION section for the procedure to separate the transmission from the engine.
3
CYLINDER HEAD ASSEMBLY 1.6 VALVE COVER 1.7 Removal 1. Remove the cap nuts from the top of the valve cover. See FIGURE 3. 2. Lift the valve cover from the cylinder head. (If necessary, remove the air duct between the turbocharger and the inlet manifold.
1.11 Installation 1. Check that the push rods fit correctly in the sockets of the cam followers. Install the rocker arm assembly. Make sure that the adjustment screws fit into the upper ends of the push rods. 2. Make sure that the alignment of the rocker arms and the push rods are correct. Install the capscrews and washers that hold the brackets for the rocker arm shafts to the cylinder head. 3. Tighten the capscrews evenly. Begin tightening the capscrews at the center of the rocker arm shaft and tighten in sequence towards the ends of the shaft. The final torque on the capscrews is 41 N.m (30 lbf ft).
FIGURE 3. CAP NUTS FOR VALVE COVER
1.8 Installation 1. Check the condition of the valve cover gasket. Install a new valve cover gasket if there are indications of leakage. Make sure that the surfaces are clean. 2. Install the valve cover and gasket on the cylinder head. Tighten the cap nuts evenly to 11 N.m (8 lbf ft). Do not tighten the cap nuts more than the specification and cause damage.
1.9 ROCKER ARM ASSEMBLY 1.10 Removal 1. Remove the valve cover. 2. Loosen the capscrews evenly that fasten the brackets for the rocker arm shaft to the cylinder head. FIGURE 4. Lift the rocker arm assembly from the cylinder head. Remove the push rods. 4
1. CAPSCREW AND WASHER
FIGURE 4. CAPSCREWS AND WASHERS FOR ROCKER ARM BRACKETS 1.12 Disassembly 1. Remove the snap rings from both ends of the rocker arm shaft. Make sure that the ends of the rocker arm shaft are not damaged. 2. Make a note of the position of each component on the rocker arm shaft so that they can be assembled correctly. Remove the components from the rocker arm shaft. 1.13 Assembly 1. Clean and inspect all the components for wear and damage. Make sure that the lubrication holes in the rocker arms and the rocker arm shaft are open and clean. 2. Lubricate the components with clean engine oil as they are assembled on the rocker arm shaft. Make sure
the components are assembled in the correct order. Install the snap rings at the ends of the rocker arm shaft.
1.14 VALVE CLEARANCE ADJUSTMENTS The valve clearance is measured between the top of the valve stem and the rocker arm as shown in FIGURE 5. Valve clearance (cold) Inlet 0.25 mm (0.010 in) Exhaust 0.50 mm (0.020 in) Number 1 cylinder is at the end of the engine with the fan. The inlet valve is the first valve in the sequence. 1. Turn the crankshaft in the normal direction of rotation until the inlet valve of number 6 cylinder has just opened and the exhaust valve of the same cylinder has not fully closed. Check the clearance of the valves of number 1 cylinder and adjust them as necessary. 2. Turn the crankshaft in the normal direction of rotation until the inlet valve of number 2 cylinder has just opened and the exhaust valve of the same cylinder has not fully closed. Check the valve clearances on number 5 cylinder and adjust them as necessary. 3. Turn the crankshaft in the normal direction of rotation until the inlet valve of number 4 cylinder has just opened and the exhaust valve of the same cylinder has not fully closed. Check the valve clearances on number 3 cylinder and adjust them as necessary. 4. Turn the crankshaft in the normal direction of rotation until the inlet valve of number 1 cylinder has just opened and the exhaust valve of the same cylinder has not fully closed. Check the valve clearances on number 6 cylinder and adjust them as necessary. 5. Turn the crankshaft in the normal direction of rotation until the inlet valve of number 5 cylinder has just opened and the exhaust valve of the same cylinder has not fully closed. Check the valve clearances on number 2 cylinder and adjust them as necessary. 6. Turn the crankshaft in the normal direction of rotation until the inlet valve of number 3 cylinder has just opened and the exhaust valve of the same cylinder has not fully closed. Check the valve clearances on number 4 cylinder and adjust them as necessary.
FIGURE 5. VALVE CLEARANCE ADJUSTMENT
1.15 VALVE SPRINGS NOTE: This procedure is normally for changing the valve springs of a single cylinder while the cylinder head is still installed on the engine. If the valves and springs must be removed from the cylinder head for repairs, see the procedures under ¶ 1.19 Valves And Valve Springs later in this section. Special Tools: Valve spring compressor Stud adaptor Setscrew adaptor 1. Remove the valve cover. 2. Turn the crankshaft in the normal direction of rotation until the piston for the cylinder is at top dead center (TDC). The inlet valve will just open and the exhaust valve will not be fully closed when the cylinder is at TDC. 3. Remove the rocker arm assembly. Put covers over the push rod holes to make sure that parts do not fall into the engine. 5
4. Install the spring compressor and the adaptor. See FIGURE 6. 5. Compress the valve springs and remove the retainers. Make sure the valve springs are compressed parallel to the valve stems or the valve stems can be damaged.
shaft by hand in the normal direction until the piston touches the valve. Continue to turn the crankshaft, and at the same time, release the pressure on the valve spring compressor until the piston is at TDC. See FIGURE 7.
6. Release the valve spring compressor and remove the retainer cap and valve springs. NOTE: Do not turn the crankshaft while the valve springs are removed. 7. Install the retainer cap. 8. Use the valve spring compressor to compress the valve springs and install the retainers. Remove the valve spring compressor. 9. Install the rocker arm assembly. 10. Check the valve clearances. See ¶ 1.14 Valve Clearance Adjustments.
1. VALVE SPRING COMPRESSOR 2. STUD ADAPTER 3. CAPSCREW ADAPTER
FIGURE 7. FIND TDC WITH THE VALVE SPRING COMPRESSOR
1.16 CYLINDER HEAD ASSEMBLY
FIGURE 6. VALVE SPRING COMPRESSOR 1.17 Removal 11. Install the valve cover. NOTE: Valve springs can be changed in two cylinders at a time. When the piston in cylinder 1 is at TDC, the piston in cylinder 6 is also at TDC. When the piston in cylinder 2 is at TDC, the piston in cylinder 5 is also at TDC. When the piston in cylinder 3 is at TDC, the piston in cylinder 4 is also at TDC. If the rocker arm assembly was removed before TDC was found, install the valve spring compressor and compress the valve springs to open the valve. Turn the crank6
1. If the engine is still in the lift truck, do the following procedures: a. Drain the cooling system. b. Disconnect the battery terminals. c. Disconnect the sender unit for the coolant temperature gauge. 2. Remove air filter connection at the compressor inlet of the turbocharger.
3. Disconnect all connections to the turbocharger and remove the turbocharger. See ¶ 1.93 Turbocharger, Removal. 4. Remove the inlet manifold. 5. Remove the exhaust manifold. 6. Remove the high pressure fuel lines. Put plugs in the open ports of the fuel injection pump. 7. Remove the return fuel line from the fuel injectors.
FIGURE 8. CYLINDER HEAD TIGHTENING SEQUENCE
8. Remove the fuel injectors from the cylinder head. Keep the fuel injectors clean and prevent damage to the nozzles. 9. Remove the coolant pipe between the cylinder head and the compressor. Remove the coolant pipe between the by–pass connection and the compressor. 10. Remove the coolant outlet manifold and thermostat housing from the cylinder head. 11. Remove the valve cover. See ¶ 1.7 Valve Cover, Removal. 12. Remove the Rocker arm assembly. See ¶ 1.10 Rocker Arm Assembly, Removal. 13. Remove the push rods. 14. Evenly loosen the capscrews and the nut for the oil passage stud for the cylinder head in a reverse sequence from the sequence shown in FIGURE 8. 15. Use a lifting device and lift the cylinder head from the engine block. Do not use a prybar between the cylinder head and the engine block that can cause damage to the gasket surfaces. NOTE: A lifting bar, Part No. GA 5066, for lifting and lowering the cylinder head is available from Perkins Engines. 16. Remove the cylinder head gasket and the coolant transfer inserts. 17. Inspect the capscrews for the cylinder head with a straight edge. See FIGURE 9. Check that the capscrews are straight and do not have distortion. If there is a reduction in the diameter of the thread that has not been in engagement with the cylinder block, the capscrew must be discarded.
1. STRAIGHT EDGE 2. CAPSCREW MUST BE STRAIGHT WITHOUT DISTORTION 3. THREADS MUST BE IN GOOD CONDITION AND NOT HAVE REDUCED DIAMETER
FIGURE 9. INSPECT THE CAPSCREWS 1.18 Installation 1. Make sure the surfaces of the cylinder head and the top of the engine block are clean. Make sure that there is no dirt or objects in the cylinders. 2. Install the gasket for the cylinder head. Make sure the “TOP” is in the correct position. Do not use gasket sealant on the surfaces. 3. Install new seal rings on the coolant transfer inserts and install them in position in the cylinder block. 4. Lubricate the capscrews with a thin coat of oil. Install the washers on the capscrews and install them into their holes in the cylinder head. Install the nut and washer for the oil passage stud. 5. Evenly tighten the capscrews in the sequence shown in FIGURE 8. Tighten the capscrews in at least three steps to an initial torque of 204 N.m (150 lbf ft). 6. Make sure all of the capscrews are tightened to the correct torque described in step E. The capscrews must 7
be further tightened in the sequence shown in FIGURE 8. Tighten capscrews indicated by the black circles in steps to a final torque of 237 N.m (175 lbf ft). 7. Install the push rods in the engine. Make sure that the end of each push rod fits correctly in the tappet socket. 8. Install the rocker arm assembly. See ¶ 1.13 Rocker Arm Assembly, Installation. 9. Adjust the valve clearances. See ¶ 1.14 Valve Clearance Adjustments. 10. Install the inlet manifold. Do not install the duct to the turbocharger at this time. 11. Install the exhaust manifold. Tighten the bolts to a torque of 45 N.m (33 lbf ft). 12. Install new seal rings in the coolant outlet manifold and thermostat housing. See FIGURE 88. Install the coolant manifold and thermostat housing. See ¶ 1.135 Thermostat. 13. Install the fuel filter and bracket. Install the low– pressure fuel lines between the fuel filter and the fuel injection pump. 14. Install the fuel injectors. Tighten the clamp bolts to 10.8 N.m (8 lbf ft). See ¶ 1.132 Fuel Injectors, Installation.
e. If the engine is ready to operate, remove the air from the fuel system. See the procedure described in ¶ 1.133 Remove Air From The Fuel System. 19. When the engine can be started, run it at low speed. Check that oil flows from the holes in the rocker arms. If the oil flow is correct, install the valve cover. See ¶ 1.8 Valve Cover, Installation. NOTE: The torque on the capscrews for the cylinder heads must be checked again after the engine has been operated approximately 10 hours.
1.19 VALVES AND VALVE SPRINGS Special Tools: Valve spring compressor Stud adapter Setscrew adaptor 1.20 Removal 1. Remove the cylinder head. See ¶ 1.17 Cylinder Head Assembly, Removal. 2. Clean the bottom face of the cylinder head and check the depth of the heads of the valves below the face of the cylinder head. See FIGURE 10.
15. Install the high pressure fuel lines between the fuel injection pump and the fuel injectors. Tighten the nuts to 25 N.m (18.5 lbf ft). Install the fuel return line. Use new washers on the “banjo bolts”. 16. Install the coolant pipe between the cylinder head and the compressor. Install the coolant pipe between the by–pass connection and the compressor. 17. Install the turbocharger. See ¶ 1.94 Turbocharger, Installation. 18. If the engine is still in the lift truck, do the following procedures: a. Connect the sender unit for the coolant temperature gauge. b. Install air filter connection at the compressor inlet of the turbocharger. c. Fill the cooling system. d. Connect the battery terminals. 8
FIGURE 10. CHECK THE DEPTH OF THE VALVES Check the depth of the valves below the face of the cylinder head before the valve springs are removed. Put the dial indicator and fixture or other measuring tool on the face of the cylinder head and set the gauge to zero. Carefully put the dial indicator over the head of each valve and make a note of the measurement. The limits for the valves are 0.025 to 0.33 mm (0.001 to 0.013 in). If a valve is below the depth limit, remove the valve and install a new valve in that position. If the valve depth is
still below the limit, the valve seat must be replaced. See ¶ 1.33 Installation Of New Valve Seats.
NOTE: The exhaust valve springs have yellow paint on them for identification. The inlet valve springs have red paint on them for identification.
3. If the valves will be used again, make a mark with ink, chalk, or paint on each valve head so that they can be installed again in the same positions. 4. Use the valve spring compressor and the correct adaptor to compress the valve springs and remove the retainers. Make sure the valve springs are compressed parallel to the valve stems or the valve stems can be damaged. 5. Release the valve stem compressor. Remove the valve spring cap, valve springs, seal (exhaust valves only), and seat washer. 6. Repeat steps 4 and 5 to remove the other valves.
1.21 Inspection Check the valves for cracks. Check the stems of the valves for wear and the correct clearance in their valve guides. A penetrant test is a recommendation to carefully check the valves for cracks. See ¶ 1.23 Valve Guides. Check that the seat faces of the valves are not badly burned. A correction for minimum wear and damage to the valve and valve seat can be done by a process called “lapping”. Seat faces of valves that are damaged, but can be repaired, must be checked for valve depth when they are installed. See FIGURE 10. When new valves are installed, the valve depth must be checked. Check the valves with a gauge (GA5009) as shown in FIGURE 11. Put a straight edge across the face of the valve. If the valve head is below the face of the gauge, discard the valve.
1. 2. 3. 4.
GAUGE STRAIGHT EDGE VALVE THERE MUST BE SPACE BETWEEN THE GAUGE AND THE STRAIGHT EDGE
FIGURE 11. CHECK THE VALVE HEAD Exhaust Valve Springs – Outer Free length
86.6 mm (3.41 in)
Length under 636–689 N (143–155 lbf) load: 37.0 mm (1.457 in)
Exhaust Valve Springs – Inner Free length
85.9 mm (3.38 in)
Length under 364–396 N (82–89 lbf) load: 32.8 mm (1.292 in)
Inlet Valve Springs – Outer Put a straight edge across the face of the valve. If the space between the straight edge and across the face of the valve is greater than 0.038 mm (0.015 in), discard the valve.
Free length
77.9 mm (3.07 in)
Length under 529–583 N (119–131 lbf) load: 37.0 mm (1.457 in)
Inlet Valve Springs – Inner Check that valve springs is at their correct length under load. Install new valve springs during a complete overhaul of the engine.
Free length
73.4 mm (2.89 in)
Length under 271–306 N (61–69 lbf) load: 9
32.8 mm (1.1.292 in)
pressed parallel to the valve stems or the valve stems can be damaged. 5. Repeat the installation procedure for each valve.
FIGURE 13. INSTALLATION OF A VALVE STEM SEAL (EXHAUST VALVES)
1.23 VALVE GUIDES 1.24 Inspection
1. 2. 3. 4. 5.
RETAINERS VALVE SPRING CAP VALVE SPRING, INNER VALVE SPRING, OUTER SEAL VALVE STEM
6. SEAT WASHER 7. INLET VALVE 8. EXHAUST VALVE 9. VALVE GUIDE 10. O–RING
FIGURE 12. VALVE COMPONENTS
Check the valve guides for wear. The maximum clearance between the valve stem and the bore of the guide is 0.13 mm (0.005 in) for inlet valves and 0.15 mm (0.006 in) for exhaust valves. If the clearance is greater than the limit when a new valve is installed, the valve guide must be replaced. 1.25 Removal Use a driver (tool GA5007) to remove the valve guide. Use the driver to push the valve guide from its bore so that it can be removed from the top of the cylinder head (top = area for rocker arms).
1.22 Installation (See FIGURE 12.)
1.26 Installation
1. Lubricate the valve stems with engine oil when they are installed in their valve guides.
1. Make sure the new valve guide and the bore in the cylinder head are clean.
2. Install the seat washer (6). Install new seals (5) on the exhaust valve guides. See FIGURE 13. Always install new seals on the exhaust valve guides. 3. Install the inner (3) and outer (4) valve springs on the seat washer. 4. Use the valve spring compressor and the correct adaptor to compress the valve springs. Slide a new O–Ring (10) over the end of the valve stem and then install the retainers (1). Make sure the valve springs are com10
2. Freeze the valve guide in liquid air or liquid nitrogen. If liquid air or liquid nitrogen is not available, use machine oil with graphite. 3. Install the valve guide on the special tool (GA 5018). See FIGURE 14. Use the special tool and a press to push the valve guide into the cylinder head. When the valve guide is correctly installed, the the special tool will touch the bottom surface of the cylinder head. NOTE: The valve guides for the inlet valves are the same shape on either end. The valve guides for the ex-
haust valves have a machined space for the seal. Make sure the valve guides for the exhaust valves are installed so that the machined space is at the top of the cylinder head. 4. Use a reamer (GA5003) to finish the bore in the valve guide to the correct size for the valve stem. Work carefully so that the clearance between the valve stem and the bore of the guide is not greater than the specifications. [0.13 mm (0.005 in) for inlet valves and 0.15 mm (0.006 in) for exhaust valves]
1. O–RING 2. INJECTOR SLEEVE
FIGURE 15. INJECTOR SLEEVE
1. Remove the fuel injector. See ¶ 1.127 Fuel Injectors. 2. Put the removal tool (GA5164) in the slots in the top of the injector sleeve. Turn the injector sleeve in a counterclockwise direction to loosen it. 3. Insert the extractor tool (GA5165) and pull the injector sleeve from the cylinder head. 4. Remove and discard the O–ring from the cylinder head and the copper washer from the the bottom of the injector sleeve.
FIGURE 14. INSTALLATION OF A VALVE GUIDE
NOTE: The copper washer is the seal between the injector sleeve and the fuel injector. When the fuel injector is removed, the copper washer often stays in the bottom of the injector sleeve. 1.29 Installation
1.27 INJECTOR SLEEVES
1. Install a new O–ring into the groove in the cylinder head. Lubricate the O–ring with Never–SeezeR. 2. Lubricate the threads of the injector sleeve with a high temperature polyurethane sealing compound.
1.28 Removal (See FIGURE 15.) The injector sleeves fit through the coolant spaces in the cylinder head. Each injector sleeve has threads on the bottom end that fasten it in the cylinder head. Liquid sealant is used on the threads to prevent leakage of coolant into the cylinder. An O–ring on the upper area of the injector sleeve prevents leakage of coolant from the top of the head.
3. Apply a thin coat of Never–SeezeR to the outside of the injector sleeve. Carefully install the injector sleeve in position in the cylinder head. 4. Put the tool (GA5164) in the slots in the top of the injector sleeve. Turn the injector sleeve in a clockwise direction to tighten it. Tighten the injector sleeve to 27 N.m (20 lbf ft). 5. Install the fuel injector. See ¶ 1.127 Fuel Injectors. 11
1.30 CYLINDER HEAD AND VALVE SEATS
1.32 Repair Special Tools: Valve seat repair tool (GA5091)
1.31 Inspection The valves must be removed from the cylinder head before the valve seats can be inspected and repaired. Carefully clean the cylinder head.
Face Angles for valve seats: Exhaust 45 degrees Inlet 30 degrees
1. Check the cylinder head for cracks. Carefully check the areas around the valve seats and around the holes for the fuel injectors.
1. Install the valve seat repair tool into the valve seat that is to be repaired. Carefully turn the tool. Remove only the minimum metal to repair the valve seat. Keep the valve seat as narrow as possible.
2. If the face of the cylinder head must be machined, remove only the minimum metal.
2. When the valve seat has been cut, remove the tool. Clean the port area and remove any particles.
NOTE: After the cylinder head has been machined, the valve seats must be checked for the correct depth. See ¶ 1.21 Valves And Valve Springs, Inspection. If the depth of the valve seats must be increased, use the minimum limit to allow for later wear.
3. Use the “lapping” process to make sure the valve and valve seat fit tightly together.
3. Check the valve seats for wear and damage. Before any work is done on the valve seats, make sure the valve guides are good. See ¶ 1.24 Valve Guides, Inspection for inspection and replacement. 4. A correction for minimum wear and damage to the valve and valve seat can be done by a process called “lapping”. When the valve seats are “lapped”, keep the valve seat as narrow as possible. Make sure all of the lapping compound is removed from the valve and valve seat when the process is completed. 5. Damaged valve seats can be repaired with a valve seat repair tool (GA5091). See FIGURE 16. If the valve seat can not be repaired so that the valve depth is within the specifications, the valve seat must be replaced.
4. Check the valve depth. See ¶ 1.21 Valves And Valve Springs, Inspection. If the valve seat is badly damaged or worn, replace the valve seat as described in the following paragraphs. 1.33 Installation Of New Valve Seats Special Tools: Handle (GA5101) Installation tool (GA5101–8) Valve seat repair tool (GA5091) 1. Use an end milling machine to drill two 9.5 mm (0.375 in) holes close together into the valve seat.
CAUTION Do not permit the cutter to drill into the cylinder head. Set the depth of the cutter so that a margin of 0.5 mm (0.020 in) remains after the cutter has reached the end of its stroke. The minimum depth of the valve seat is 10.74 mm (0.423 in) 2. Put a punch into one of the holes and break the valve seat. 3. Remove the broken valve seat. Make sure the bore in the cylinder head is clean and not damaged. 4. Replacement valve seats are available in two sizes: Standard and 0.050 mm (0.002 in) oversize. Make sure that you have the correct size for the repair.
FIGURE 16. VALVE SEAT REPAIR TOOL
12
5. Freeze the valve seat in liquid air or liquid nitrogen. If liquid air or liquid nitrogen is not available, the cylinder head must be heated in boiling water for 30 minutes.
6. Install the valve seat in the cylinder head. (Use tool GA5101–8.) 7. Use a 0.05 mm (0.0015 in) spacer gauge to check that the valve seat is correctly installed in its bore in the cylinder head. 8. Install the valve seat repair tool into the valve seat that
is to be repaired. Carefully turn the tool. Remove only the minimum metal to repair the valve seat. Keep the valve seat as narrow as possible. I. Use the “lapping” process to make sure the valve and valve seat fit tightly together. Check the valve depth as shown in FIGURE 10.
PISTON AND CONNECTING ROD ASSEMBLIES 1.34 ROD BEARINGS The connecting rods are forged from steel. The bearing cap is fastened to the connecting rod with two nuts and special bolts. See FIGURE 17. The bearing cap and the connecting rod are a made as a set. Each bearing cap and connecting rod have an assembly number as indicated by Item 1 in the Figure.
3. If the oil pump must be removed for access to the rod bearing, remove the capscrews that hold the oil pump to the main bearing cap and remove the oil pump. Make a note of the shim arrangement installed between the oil pump and the main bearing cap. 4. Remove the cooling jet from the bottom of the cylinder for the rod bearing that is to be removed.
CAUTION Do not permit the connecting rods to hit the cooling jets for the pistons. If a cooling jet is hit, the alignment must be checked and the cooling jet replaced if necessary.
1. ASSEMBLY NUMBER 2. IDENTIFICATION MARK FOR THE WEIGHT GROUP
FIGURE 17. CONNECTING ROD ASSEMBLY, IDENTIFICATION MARKS FIGURE 18. COOLING JET When the connecting rod assemblies are made, they are weighed and separated into groups of 113 grams (4 oz). Each group has an identification number as indicated by Item 2 in the Figure. If a connecting rod assembly must be replaced, a connecting rod with the same weight group identification must be used for the replacement. 1.35 Removal 1. Drain the engine oil from the sump. Remove the oil sump. See ¶ 1.101 Oil Sump, Removal. 2. Remove the suction pipe and oil strainer.
5. Turn the crankshaft until the rod bearing to be removed is at its lowest position on the crankshaft. 6. Remove the nuts and remove the bearing cap. 7. Remove the lower bearing half from the bearing cap. Keep the bearing half with its cap. 8. Carefully push the connecting rod up the cylinder bore just enough to permit access to the upper bearing half. Remove the upper bearing half from the connecting rod. Keep the bearing halves together. 13
1.36 Installation 1. Clean the bearing surfaces of the connecting rod and the crankshaft. Clean the bearing halves and lubricate them with clean engine oil. 2. Install the upper bearing half into the connecting rod. Make sure that the location tab is installed correctly into its position in the connecting rod. See FIGURE 19.
8. Install the oil sump. See ¶ 1.102 Oil Sump, Installation.
1.37 PISTON AND CONNECTING ROD ASSEMBLY 1.38 Removal 1. If the engine is still in the lift truck, drain the engine oil and the coolant. 2. Remove the cylinder head assembly as described under ¶ 1.17 Cylinder Head, Removal. Remove the carbon from the tops of the bores of the cylinder liners. 3. Remove the oil sump. See ¶ 1.101 Oil Sump, Removal. 4. Remove the suction pipe and oil strainer. 5. Remove the capscrews that hold the oil pump to the main bearing cap and remove the oil pump. Make a note of the shim arrangement installed between the oil pump and the main bearing cap. 6. Remove the cooling jet from the bottom of the cylinder for the rod bearing that is to be removed.
1. POSITION OF LOCATION TAB IN BEARING HALVES AND CONNECTING ROD
FIGURE 19. POSITION OF ROD BEARINGS 3. Install the bearing cap on the connecting rod. Make sure that the assembly number on the bearing cap is the same as the number on the connecting rod. Make sure that the two assembly numbers are on the same side of the connecting rod as shown in FIGURE 17. 4. Install and tighten the nuts evenly to a torque of 217 N.m (160 lbf ft). Make sure that the crankshaft turns freely. 5. Install the cooling jet. Rotate the crankshaft to make sure that the jet pipe is in a center position of the slot in the piston skirt. 6. If the oil pump was removed, install the oil pump and tighten the capscrews. Install the same shim arrangement between the oil pump and the main bearing cap. The gear clearance must be 0.0010 to 0.025 mm (0.004 to 0.010 in) and is adjusted by the addition or removal of shims. 7. Use new O–rings and install the oil strainer and pipes to the oil pump. Make sure that the suction pipe is aligned correctly. 14
CAUTION Do not permit the connecting rods to hit the cooling jets for the pistons. If a cooling jet is hit, the alignment must be checked and the cooling jet replaced if necessary. 7. Remove the bearing cap and rod bearings as described under ¶ 1.35 Rod Bearings, Removal. Mark the bearing caps and rod bearings so that they can be installed again in their original positions. 8. Push the piston and connecting rod out of the top of the cylinder liner. 9. Inspect the bearing surfaces on the crankshaft for wear or damage. 1.39 Installation Special Tools: Piston installation tool (GA5033) (piston ring compressor) Piston height tool (GA5031) Dial indicator gauge 1. Make sure all of the parts are clean. Lubricate the parts with engine oil as they are installed. 2. Turn the crankshaft until the position for the connecting rod to be installed is at the lowest position on the crankshaft.
3. Install the upper bearing half into the connecting rod. Make sure that the location tab is installed correctly into its position in the connecting rod. See FIGURE 19.
engine block and measure the height of the piston below the face of the engine block. See FIGURE 21.
4. Put the piston installation tool (GA5033) at the top of the cylinder. See FIGURE 20. The tool has a bore with a taper to compress the piston rings as the piston and connecting rod assembly is installed in the cylinder. Make sure the smaller end of the taper is toward the engine block.
FIGURE 21. MEASURE THE HEIGHT OF THE PISTON BELOW THE ENGINE BLOCK
1. PISTON INSTALLATION TOOL
FIGURE 20. INSTALL THE PISTON
The correct clearance height of the piston below the engine block is 0.28–0.38 mm (0.011–0.015 in). The top of a piston can be machined if necessary for the correct clearance height. The maximum metal that can be removed from the top of the piston during the machining process is 0.127 mm (0.005 in). Replace the FRONT mark and other identification marks if they are removed by the machining process.
5. Put the spaces in the three piston rings so that they are 120_ apart. Put the connecting rod through the piston installation tool and permit the piston to enter the tool.
11. Use a new O–ring and install the cooling jet. Rotate the crankshaft to make sure that the jet pipe is in the center position of the slot in the piston skirt.
6. The arrow or FRONT mark on the piston must be turned towards the end of the engine with the cooling fan.
12. Install the oil pump and tighten the capscrews. Install the same shim arrangement between the oil pump and the main bearing cap. The gear clearance must be 0.0010 to 0.025 mm (0.004 to 0.010 in) and is adjusted by the addition or removal of shims.
7. Lubricate the lower half of the rod bearing and install it into the bearing cap. 8. Install the bearing cap on the connecting rod. Make sure that the assembly number on the bearing cap is the same as the number on the connecting rod. Make sure that the two assembly numbers are on the same side of the connecting rod. 9. Install and tighten the nuts evenly to a torque of 217 N.m (160 lbf ft). Make sure that the crankshaft turns freely. 10. Measure the clearance height of the piston below the top of the engine block with a dial indicator gauge. The crankshaft must be turned so that the piston is at TDC in the engine block. Put the dial indicator on the top of the
13. Use new O–rings and install the oil strainer and pipes to the oil pump. Make sure that the suction pipe is aligned correctly. 14. Install the oil sump. See ¶ 1.102 Oil Sump, Installation. 15. Install the cylinder head. See ¶ 1.18 Cylinder Head, Installation.
1.40 PISTONS AND PISTON RINGS The pistons are made from aluminum alloy and have a cast iron insert for the top ring groove. See FIGURE 22. The top of the piston is machined for a combustion 15
chamber and two spaces for valve clearances. See FIGURE 23.
Height of piston below top face of engine block at TDC 0.30–0.38 mm (0.012–0.015 in) Maximum limit for machining top of piston 0.127 mm (0.005 in)
Piston Rings (See FIGURE 24.)
1. CAST IRON INSERT
FIGURE 22. PISTON
Top compression ring
15 _ wedge shape, molybdenum inlay, top and bottom faces are the same.
Gap of top ring
0.406–0.610 mm (0.016–0.024 in)
Second compression ring Chrome plate with chamfer on top inner face. One face has “TOP” mark for installation. Gap of second ring
0.406–0.610 mm (0.016–0.024 in)
Oil ring
Coil spring back–up, chromium face
Gap of oil control ring
0.406–0.660 mm (0.016–0.026 in)
1. VALVE CLEARANCE SPACE 2. COMBUSTION CHAMBER
FIGURE 23. COMBUSTION CHAMBER AND VALVE SPACES, TOP OF PISTON Each piston has three piston rings. The top of each piston has an “anodized” surface. Each piston has identification marks to show the FRONT, the compression ratio (15.9:1), and piston height specification. The piston pin that connects the piston to the connecting rod is held in the piston by two snap rings. The position of the piston pin is moved from the center line of the piston.
1.42 Disassembly
1.41 Specifications
Check that the piston rings can move freely in their grooves and are not broken.
Pistons Type: Controlled expansion, top ring groove has insert, anodized top face. Compression height
16
98.81–98.93 mm (3.890–3.895 in)
1. TOP COMPRESSION RING 2. SECOND COMPRESSION RING 3. OIL CONTROL RING
FIGURE 24. PISTON RINGS
1. Remove the piston rings with a ring expander. Increase the diameter of the piston rings only enough to remove them without damaging the piston. 2. Make a mark on the piston to indicate the cylinder number as shown on the connecting rod. Do not make a
mark into the metal. Make the mark on the same side of the piston as the number on the connecting rod. See FIGURE 25.
ings are installed, install one from each end of the bore in the connecting rod.
FIGURE 25. MARK THE PISTON 3. Remove the snap rings that hold the piston pin in the piston. Push the piston pin from the piston with your thumb. If the piston pin is tight, heat the piston and connecting rod to 40–50_C (100–120_F) to make removal of the piston pin easier. 1.43 Inspection 1. Clean and inspect all the components for wear and damage. Use a new piston ring as a guide to check for wear in the ring grooves. 2. Clean the carbon from the top of the cylinder liners. Fit the piston rings in the top part of the cylinder liner and measure the clearance at the ends of the ring. The spring must be installed in the oil control ring when its end clearance is measured. The clearance measurements for the piston rings are shown in the specifications. 3. Check the clearance between the piston and the piston pin. The piston pin will normally just fit the bore when the piston is approximately 20_C (68_F). If the piston pin is loose in the piston at this temperature, the parts must be replaced so that the clearance is correct. 4. Check the clearance of the bushings in the connecting rod with the piston pin. If the clearance is greater than than 0.043 mm (0.0017 in) or is damaged, install new bushings. If the bushings in the connecting rod is worn, use a press to remove the bushing. The tools (GA5063) for replacement of the bushings are shown in FIGURE 26. Make sure that the two bushings have a space of 2.5 mm (0.10 in) between them to form an oil passage. If new bush-
FIGURE 26. TOOLS FOR BUSHING REPLACEMENT 5. Use a reamer in the bushing as necessary to give a clearance on the piston pin of 0.020–0.043 mm (0.0008–0.0017 in). 6. Check the alignment of the connecting rods with a test fixture. See FIGURE 27. Replace a damaged or bent connecting rod.
Alignment + 0.025 mm _ (+_ 0.010 in)
127 mm (5 in)
127 mm (5 in)
Alignment _ 0.025 mm + (+_ 0.010 in)
The large and small bores in the connecting rod must be square and parallel with each other within the limits of + 0.25 mm (0.010 in). The measurement is made at 127 mm (5.0 in) on each side of the axis of the connecting rod. If the bushing is installed in the small end of the connecting rod, the limits are reduced to + 0.06 mm (0.0025 in).
FIGURE 27. CHECK THE ALIGNMENT OF THE CONNECTING ROD 1.44 Installation Make sure that the parts are clean. Lubricate the parts with engine oil as they are assembled.Install the piston rings with a ring expander. See FIGURE 24. Increase 17
the diameter of the piston rings only enough to remove them without damaging the piston. 1. Install the spring for the oil control ring in the bottom groove of the piston. Install the latch pin inside both ends of the spring. Install the oil control ring over the spring so that the end space in the oil control ring is 180° to the latch pin. 2. Install the piston ring taper into the second groove of the piston. Make sure that the word “TOP” or the manufacturer’s symbol is toward the top of the piston. 3. Install the top piston ring into the top groove of the piston. 4. Make sure that the spaces at the ends of the piston rings are installed on the piston in an orientation of 120° from each other before the piston is installed.
5. Install a new snap ring into one of the grooves to hold the piston pin. 6. Turn the piston for access to install the connecting rod. Install the connecting rod in position in the piston. If the original piston is to installed again, make sure that the mark on the piston is aligned with the mark on the connecting rod as shown in FIGURE 25. Make sure that the piston and connecting rod are installed in the same cylinder again. 7. Install the piston pin to fasten the connecting rod to the piston. If the piston pin is tight, heat the piston to 40 to 50°C (100 to 120°F) to make installation of the piston pin easier. 8. Install the other snap ring to hold the piston pin in the piston. 9. See ¶ 1.37 Piston And Connecting Rod Assembly, Installation.
CRANKSHAFT ASSEMBLY 1.45 GENERAL
1.46 CRANKSHAFT PULLEY 1.47 Removal
The crankshaft is forged from chrome–molybdenum steel and has nitrided bearing journals. There are seven main bearing journals. The center main bearing is the thrust bearing that controls the axial movement of the crankshaft. The thrust bearing are lead and bronze alloy thrust bearings on both sides of the bearing. The front and rear oil seals are lip seals. A flange for the flywheel is machined on the crankshaft. The front oil seal fits around a removable crankshaft hub. Each oil passage in the crankshaft journal also has a small chamber drilled in it that is a “sludge” trap. A plug and and O–ring seal the chamber. A snap ring holds the plug in the crankshaft journal. This plug can be removed to clean the oil passages in the crankshaft journals. See FIGURE 55.
1. Loosen the tensioner pulley and remove the drive belts. 2. Remove the 16 capscrews which hold the crankshaft pulley and damper to the crankshaft. 3. Remove the crankshaft pulley, lock plate, spacer, and damper. 1.48 Installation 1. Put the crankshaft pulley, lock plate, spacer, and damper into position on the crankshaft. Install the 16 capscrews and tighten them evenly to 41 N.m (30 lbf ft). 2. Install the drive belts. See ¶ 1.152 Drive Belts.
1.49 CRANKSHAFT HUB AND FRONT OIL SEAL 1.50 Removal
The crankshaft has a pinion gear (crankshaft gear) for turning the timing gear assembly, a drive gear for the oil pump, and splines for the position of the front pulley. The crankshaft pulley is fastened to the crankshaft with 16 capscrews and lock washers. A damper is fastened to the rear face of the crankshaft pulley. 18
1. Remove the crankshaft pulley as described in ¶ 1.46 Crankshaft Pulley. 2. Use the hub spanner (GA5055) and a hammer to loosen the nut that fastens the hub to the crankshaft. This nut is tightened to 950 N.m (700 lbf ft).
3. Remove the nut, and pull the hub and front cone from the crankshaft.
8. Lubricate the seal area of the crankshaft pulley with engine oil. Install the crankshaft pulley. See ¶ 1.46 Crankshaft Pulley.
4. Use a small prybar to remove the front oil seal from the timing gear cover. Put the prybar behind the main lip of the front oil seal. Make sure that the edge of the housing for the oil seal is not damaged during removal. 1.51 Installation 1. Clean the oil seal housing. Inspect the new oil seal for damage. Do not install a front oil seal that has a scratch or any damage on the lip of the seal. 2. Inspect the hub splines and the cone for wear. Replace any worn or damaged parts. 3. A plastic insert is included with the oil seal that is used for installation. Make sure that the lip of the seal is towards the inside of the cover for the timing gear case and the front oil seal is parallel to the bore of the oil seal housing. Install the front oil seal. Remove the plastic insert from the oil seal.
1. DUST SEAL, OIL SEAL
FIGURE 28. OIL SEAL POSITION
1.52 REAR OIL SEAL 1.53 Removal
4. Apply a thin coat of oil to the hub splines and install the cone and hub.
The engine must be removed from the lift truck if the rear oil seal must be replaced.
5. Inspect the threads for the hub nut and apply a thin coat of oil. Install the hub nut with your hand.
1. Remove the drive components from the rear of the engine.
6. Tighten the hub nut to 950 N.m (700 lbf ft) with a torque wrench.
2. Remove the oil sump and the oil pump. See ¶ 1.101 Oil Sump, Removal and w1.108 Oil Pump, Removal.
If a large torque wrench is not available, use the hub spanner (GA5055) and a 2 kg (4 lb) hammer and the following procedure:
3. Remove the flywheel and housing. See ¶ 1.146 Flywheel and ¶ 1.150 Flywheel Housing, Removal.
a. Use the hub spanner to tighten the nut as much as possible by hand. b. Put alignment marks on the hub and nut. Use the hammer to tighten the nut two additional flats of the nut. c. If the alignment of the lock plate makes it difficult to install, the nut can be tightened a minimum additional amount for installation. Do not loosen the nut. 7. Make sure the dust seal on the oil seal is in the position shown in FIGURE 28. when the crankshaft pulley is installed.
4. Remove the capscrews and remove the oil seal housing and seal assembly. Clean the parts and discard the gasket. 5. Check that the oil seal area and outer circumference of the crankshaft flange are not worn or damaged. If there is wear or damage, the crankshaft must have a new surface ground on the crankshaft flange. Contact the engine manufacturer for the size limits. 6. Press the oil seal out of the housing and discard the oil seal. 1.54 Installation NOTE: The rear oil seal is mounted on a plastic sleeve that must NOT be be removed until the final assembly is 19
complete. The outer circumference of the seal has a coat of dry sealant. DO NOT apply any oil, grease, or sealants to the oil seal or the housing during assembly. 1. Put the seal housing on a flat plate under a small hand press. Put the oil seal in position on the seal housing. Make sure the lip of the seal is up. Cover the oil seal with another flat steel plate. Use the press to push the oil seal into position in the seal housing. 2. Make sure that the two position dowels are installed in the engine block. Use a new gasket. Do not use gasket compound on any of the surfaces. 3. Slide the oil seal and housing into position on the crankshaft. Install and tighten the capscrews. 4. Remove the plastic sleeve from the oil seal. Make sure the dust seal on the oil seal is in the position shown in FIGURE 28. 5. Install the flywheel and housing. See ¶ 1.146 Flywheel and ¶ 1.151 Flywheel Housing, Installation. 6. Install the oil sump and the oil pump. See ¶ 1.102 Oil Sump, Installation and ¶1.111 Oil Pump, Installation.
6. Remove the timing case cover. See ¶ 1.66 Timing Case Cover, Removal. 7. Remove the fuel injection pump. See ¶ 1.117 Fuel Injection Pump, Removal. 8. Remove the timing gears and the timing case. See the sections ¶ 1.64 – 1.76 Timing Case And Timing Gears. 9. Remove the flywheel and the flywheel housing. See ¶ 1.146 Flywheel and 1.150 Flywheel Housing, Removal. 10. Remove the rear oil seal housing. See ¶ 1.53 Oil Seal, Removal. 11. If the engine is not already in a position with the crankshaft facing up, turn the engine to that position. Remove the suction pipe and oil strainer. Remove the oil pump, delivery tube and relief valve. See ¶ 1.108 Oil Pump, Removal.
12. Remove the bearing caps and lower bearing halves from the connecting rods. Make an arrangement so that the parts for each connecting rod will be assembled again in their original positions. Carefully push the pistons into their bores a so that the connecting rods do not cause interference with the crankshaft.
1.55 MAIN BEARINGS If the main bearings must be replaced, the crankshaft must be removed. See ¶ 1.57 Crankshaft, Removal
1.56 CRANKSHAFT 1.57 Removal 1. Remove the engine from the lift truck. See THE FRAME section. See the TRANSMISSION section for separating the engine from the transmission. 2. Remove the oil sump. See ¶ 1.101 Oil Sump, Removal. Remove the oil pump. See ¶ 1.108 Oil Pump, Removal.
3. Remove the fan, drive belts, fan drive pulley and housing, and the coolant pump. Remove the thermostat housing and coolant manifold.
CAUTION Make sure the cooling jets for the pistons are not damaged or moved out of alignment. If a cooling jet is hit, the alignment must be checked and the cooling jet replaced if necessary. 13. Make sure that the main bearing caps are marked with their position number. Remove the main bearing caps, lower bearing halves, and the upper and lower thrust bearings. Keep all the parts in an arrangement so that the parts can be installed in their original positions. 14. Use a lifting device to lift the crankshaft from the engine block. Remove the upper main bearing halves and put each of them with their lower bearing half. 1.58 Inspection
4. Remove the crankshaft pulley, damper, and hub assembly. See ¶ 1.46 Crankshaft Pulley.
Check the crankshaft for wear and other damage. The maximum wear and out–of–round on the bearing journals is 0.04 mm (0.0016 in).
5. Remove the alternator and its mount bracket. Remove the starter motor.
The bearing journals on standard crankshafts can be ground to the following diameters smaller than the
20
original size: 0.25 mm (0.010 in) 0.50 mm (0.020 in) 0.75 mm (0.030 in) Special bearings are available for these sizes.
FIGURE 29. Lubricate the bearing and thrust bearings with engine oil. Install the bearing cap.
The crankshaft must be replaced if the surface must be ground more than 0.75 mm (0.030 in). Inspect the crankshaft drive gear and the drive gear for the oil pump for wear and damage. Remove the plugs for the “sludge” traps. Lightly hit the plugs to release the pressure on the snap rings and remove the snap rings. Use a capscrew to remove the plugs. Check the crankshaft for cracks. Use a penetrant test or an electro–magnetic test. Install the plugs for the “sludge” traps. Use new O– rings. and push the plugs into the bores. Install the snap rings and use a capscrew to pull the plugs tightly against the snap rings. 1.59 Installation 1. Make sure that all of the oil passages are clean. 2. Make sure all of the bearings and bearing caps are clean. Install the upper bearing halves into their positions in the connecting rods and the housings for the main bearings. Make sure that the position tags of the bearings fit into their position slots. Lubricate the bearings with engine oil. 3. Install the crankshaft into position on the main bearings. 4. Lubricate the thrust bearings with engine oil. Slide the upper halves of the thrust bearings into their positions in the engine block. Make sure that the sides of the thrust bearings with the grooves are against the crankshaft. 5. Install the lower halves of the thrust bearings into the main bearing cap. Make sure that the location tags are in their correct positions. 6. Make sure that the location thimbles are installed in either the bearing cap or the bearing housing of the engine block. Make sure that the orientation of the location slots for the bearing halves are correct as shown in
1. POSITION OF LOCATION TAB
FIGURE 29. ORIENTATION OF THE MAIN BEARING CAP 7. Make sure that the location thimbles are installed in either the bearing cap or the bearing housing of the engine block for the other four main bearings. Make sure that the orientation of the location slots for the bearing halves are correct as shown in FIGURE 29. Lubricate the bearing half with engine oil. Install the bearing cap. Make sure the main bearing caps are installed according to their position numbers shown on the cap. The identification numbers on the main bearing caps will also be in alignment. The serial number on the main bearing caps must be the same as the number on the bottom face of the engine block. 8. Make sure the capscrews are in good condition. Install the capscrews into the main bearing cap. Tighten the capscrews gradually and evenly in the sequence shown in FIGURE 30. Tighten the capscrews on the front, center, and rear main bearing caps to a final torque of 216 N.m (160 lbf ft). Tighten the capscrews on the main bearing caps 2, 3, 5, and 6 to a final torque of 272 N.m (200 lbf ft). Tighten the lateral bolts A–F to a final torque of 95 N.m (70 lbf ft). 9. Make sure that the crankshaft rotates freely. Check the axial movement of the crankshaft. See ¶ 1.61 Check The Axial Movement Of The Crankshaft. 10. Install the upper bearing half into the connecting rod. Make sure that the location tab is installed correctly into its position in the connecting rod. See FIGURE 19. 21
FIGURE 30. MAIN BEARING TIGHTENING SEQUENCE
11. Install the bearing cap on the connecting rod. Make sure that the assembly number on the bearing cap is the same as the number on the connecting rod. Make sure that the two assembly numbers are on the same side of the connecting rod as shown in FIGURE 17.
20. Install the crankshaft pulley. See ¶ 1.46 Crankshaft Pulley. 21. Install the thermostat housing and outlet coolant manifold. Install the coolant pump, fan drive pulley, drive belts, and the fan.
12. Install and tighten the capscrews evenly to a torque of 155 N.m (114 lbf ft). Make sure that the crankshaft turns smoothly.
22. Install the oil sump. See ¶ 1.102 Oil Sump, Installation.
13. Install the oil pump, suction pipe and oil strainer. See ¶ 1.111 Oil Pump, Installation.
23. Install the engine into the lift truck. See THE FRAME section and the TRANSMISSION section.
14. Install the rear oil seal housing. See ¶ 1.52 Oil Seal. 15. Install the flywheel and the flywheel housing. See ¶ 1.148 Flywheel and 1.151 Flywheel Housing, Installation. 16. Install the timing gears and the timing case. See the sections after ¶ 1.64 for the Timing Gears And Timing Case, Installation. 17. Install the fuel injection pump. See ¶ 1.118 Fuel Injection Pump, Installation. 18. Install the timing case. See ¶ 1.67 Timing Case, Installation. 19. Install the alternator and its mount bracket. 22
1.60 THRUST BEARINGS 1.61 Check The Axial Movement Of The Crankshaft The axial movement of the crankshaft is controlled by two sets of thrust bearings. Each set of half thrust bearings is installed on each side of the center main bearing. See FIGURE 31. The axial clearance can be checked with a spacer gauge inserted between the crankshaft and the thrust bearing. See FIGURE 32. A dial indicator can be used to check the axial movement from the end of the crankshaft as shown in FIGURE 33. The normal axial movement is 0.05–0.33 mm (0.002–0.013 in).
ings are 0.019 mm (0.0075 in) larger than the standard thrust bearings. 1.62 Removal 1. Drain the engine oil from the sump. Remove the oil sump. See ¶ 1.101 Oil Sump, Removal. 2. Remove the oil pump. See ¶ 1.108 Oil Pump, Removal. FIGURE 31. THRUST BEARINGS
3. Remove the capscrews for the center main bearing cap. Remove the bearing cap, lower bearing half, and the lower halves of the thrust bearings. 4. Use a thin flexible tool to push the upper halves of the thrust bearings from their positions next to the main bearing housing. Use a small prybar as necessary to move the crankshaft to loosen a tight thrust bearing. 1.63 Installation 1. Lubricate the thrust bearings with engine oil. Slide the upper halves of the thrust bearings into their positions in the engine block. Make sure that the sides of the thrust bearings with the grooves are against the crankshaft.
FIGURE 32. MEASURE THE AXIAL CLEARANCE WITH A SPACER GAUGE
2. Install the lower halves of the thrust bearings into the main bearing cap. Make sure that the location tabs are in their correct positions. 3. Make sure that the location thimbles are installed in either the bearing cap or the bearing housing of the engine block. Make sure that the orientation of the location slots for the bearing halves are correct. Lubricate the bearing and thrust bearings with engine oil. Install the bearing cap. 4. Make sure the capscrews are in good condition. Install the capscrews into the bearing cap. Tighten the capscrews gradually and evenly. Tighten the capscrews to a final torque of 216 N.m (160 lbf ft). See FIGURE 30.
FIGURE 33. MEASURE THE AXIAL MOVEMENT WITH A DIAL INDICATOR
5. Make sure that the crankshaft rotates freely. Check the axial movement of the crankshaft to make sure that it is within the specifications. 6. Install the oil pump, suction pipe and oil strainer. See ¶ 1.111 Oil Pump, Installation.
If the axial movement is greater than the specifications, oversize thrust bearings can be installed on one side or both sides of the main bearing. The oversize thrust bear-
7. Install the oil sump. See ¶ 1.102 Oil Sump, Installation. 23
TIMING CASE AND TIMING GEARS 1.64 GENERAL The timing case has two parts (timing case and back plate) made from cast aluminum. Location dowels and capscrews fasten the backplate to the engine block. The holes for the capscrews in the timing case are a close fit so that the front oil seal fits correctly around the crankshaft. The timing gears are steel. A PTO gear turns the drive shaft to the air compressor. A steel transfer tube is installed between the backplate and the main oil passage in the engine block. The supply of lubrication oil flows through this transfer tube to the timing gear train. Holes are drilled in the backplate so that some lubricating oil goes to lubricate the fuel injection pump. The backplate is the mount points for the coolant pump, alternator, and tensioner bracket for the drive belts. The backplate is also the housing for the thermostat housing and the coolant outlet pipe. The gear train includes the crankshaft gear, idler gear, gear for the fuel injection pump, camshaft gear, and PTO gear (air compressor). The camshaft is made from cast iron. An oil passage is drilled through its length and it turns in seven lead– bronze bearings installed in the crankcase. The front and center bearings of the camshaft have a groove machined into them to permit lubricating oil to flow to other components. Lubricating oil flows from the center bearing and through the camshaft to lubricate the other six bearings. Some engine oil goes through the center camshaft bearing to the rocker arm assembly. The camshaft gear is fastened to the camshaft with a location dowel, five capscrews, and a lock plate.
6. Remove the crankshaft hub. See ¶ 1.50 Crankshaft Hub, Removal. 7. Remove the coolant pump. See ¶ 1.139 Coolant Pump, Removal. 8. Remove the air compressor. See ¶ 1.158 Air Compressor, Removal. 9. Remove the oil sump. See ¶ 1.101 Oil Sump, Removal. 10. Remove the capscrews and nuts that hold the timing case to the backplate. Remove the timing case. 1.67 Installation 1. Use a new gaskets and install the timing case on the backplate. Make sure the front oil seal fits correctly on the crankshaft. 2. Install the oil sump. See ¶ 1.102 Oil Sump, Installation. 3. Install the air compressor. See ¶ 1.159 Air Compressor, Installation. 4. Install the coolant pump. See ¶ 1.143 Coolant Pump, Installation. 5. Install the crankshaft hub. See ¶ 1.51 Crankshaft Hub, Installation. 6. Install the crankshaft pulley. See ¶ 1.48 Crankshaft Pulley, Installation. 7. Install the alternator. 8. Install the tensioner bracket for the drive belts. 9. Install the drive belts and adjust the tension. See ¶ 1.152 Drive Belts.
1.65 TIMING CASE
10. Install the fan. Fill the cooling system.
1.66 Removal
1.68 IDLER GEAR
1. Drain the coolant. Remove the fan.
1.69 Removal
2. Remove the drive belts.
1. Remove the timing case. See ¶ 1.66 Timing Case, Removal.
3. Remove the tensioner bracket for the drive belts. 4. Remove the alternator. 5. Remove the crankshaft pulley. See ¶ 1.47 Crankshaft Pulley, Removal. 24
2. Turn the crankshaft until No. 1 piston is at TDC. (The timing mark on the flywheel will be aligned with the timing pointer on the flywheel housing.) When No. 1 piston is at TDC, the marked teeth of the crankshaft gear,
the camshaft gear will be aligned toward the axle of the idler gear as shown in FIGURE 34. The mark on the end of the crankshaft will be at the top. Also see ¶ 1.162 How To Set Number 1 Piston To TDC On The Compression Stroke. NOTE: The marked teeth on the idler gear will not necessarily be aligned with the marked teeth of the other three gears because of the different speed of rotation of the idler gear. The arrangement shown in FIGURE 34. is the arrangement when the engine is assembled and before it is operated. 1. CAMSHAFT GEAR 2. LOCK PLATE 3. CAPSCREWS (5)
4. THRUST PLATE 5. CAPSCREW 6. IDLER GEAR
FIGURE 35. CAMSHAFT GEAR AND THE IDLER GEAR MOUNTS
1.70 Installation 1. Lubricate the bushings in the idler gear with engine oil. Align the timing marks on the idler gear with the marks on the crankshaft gear and the cam shaft gear. Make sure the alignment marks are aligned as shown in FIGURE 34. Install the idler gear on its axle. 1. IDLER GEAR 2. CRANKSHAFT GEAR 3. CAMSHAFT GEAR
4. GEAR FOR FUEL INJECTION PUMP 5. DRIVE GEAR FOR AIR COMPRESSOR
FIGURE 34. ALIGNMENT OF THE TIMING MARKS
2. Install the thrust plate for the idler gear and the capscrew. Make sure the slot in the thrust plate is in the correct position on the roll pin before the capscrew is tightened. See FIGURE 36. Tighten the capscrew.
3. See FIGURE 35. Remove the capscrew, remove the thrust plate of the idler gear, and remove the idler gear.
CAUTION Make sure that the crankshaft is not turned while the idler gear is removed. A piston can hit and damage a valve. 1. SLOT IN THRUST PLATE
4. Inspect the idler gear and bushings for wear and damage. The idler gear and bushings are available as an assembly or as separate parts.
2. ROLL PIN
FIGURE 36. ROLL PIN AND SLOT ARRANGEMENT ON THE IDLER GEAR
25
3. Check the clearance between the bushings of the idler gear and the thrust plate of the idler gear. The correct clearance is 0.051–0.20 mm (0.002–0.008 in).
FIGURE 38. CHECK THE TIMING GEAR CLEARANCES 1. The camshaft gear and the crankshaft gear must be installed. FIGURE 37. CHECK THE HUB CLEARANCE ON THE IDLER GEAR
4. If the bushings must be replaced, use a driver to remove them from each side of the idler gear. Use liquid air or liquid nitrogen, if available to freeze the bushings before they are installed. Use a press to install new bushings. The bores and faces of the bushings will need machining to correctly fit the hub. Use a lathe make the axle bore to 41.275 mm (1.625 in). The clearance between the bushings of the idler gear and the thrust plate of the idler gear must be adjusted by machining when the idler gear is installed. See Step 3. 5. Check the timing gear clearances as described in ¶ 1.71 Clearance Adjustment, Timing Gears. 6. Install the timing case and the other components that were removed. See ¶ 1.67 Timing Case, Installation. 1.71 Clearance Adjustment, Timing Gears Special Tools: Reaming kit (Part No. GA808 and Part No. GA 807) The gear clearance between the timing gears is controlled by the axle of the idler gear. If the axle of the idler gear has been replaced, the correct position of the axle must be adjusted so that the gear clearances are correct. 26
2. Install the idler gear axle without the alignment dowels into its approximate position. Leave the capscrews loose enough so that the axle can be moved for adjustment. 3. Slide the idler gear into position on the axle. Measure the gear clearance at four places equally on its circumference between the camshaft gear and the crankshaft gear. 4. Lightly hit the hub of the idler gear to move the axle as necessary to have an equal clearance of 0.051 to 0.152 mm (0.002 to 0.006 in) at each of the four places. 5. Carefully remove the idler gear without permitting the axle to move. Tighten the capscrews. 6. Install the jig (Part No. GA807) on the axle and put the location pin in one of the dowel holes. Use the reamer on the other dowel hole. 7. Reverse the position of the jig and reamer and use the reamer on the second dowel hole. 8. Remove the idler gear axle and clean any metal filings. 9. Install new alignment dowels. Install the idler gear axle and install the capscrews and lock washers. Tighten the capscrews. Install the idler gear as described in ¶ 1.70 Idler Gear, Installation. Check that the clearances between the gears is still correct. NOTE: The GA808 Reamer Kit has a variation of sizes of location pins and reamers. Make sure that the correct
sizes are used for the size of the alignment dowel to be installed.
1.74 Installation
CAUTION Contents of GA808 Reamer Kit: Dowel size 8.331 mm (0.328 in) oversize. Reamer Jig GA807 Location Pin GA340 7.887 mm (0.3105 in) Reamer GA104 8.331 mm (0.328 in) Location Pin GA341 8.331 mm (0.328 in) Dowel size 8.730 mm (0.343 in) oversize. Reamer Jig GA807 Location Pin GA341 8.331 mm (0.328 in) Reamer GA105 8.730 mm (0.3437 in) Location Pin GA342 8.730 mm (0.3437 in) Installation of new idler axle to reamed cylinder block Reamer Jig GA807 Location Pin GA339 7.671 mm (0.302 in) Reamer GA258 7.937 mm (0.3125 in)
1.72 CAMSHAFT GEAR 1.73 Removal
If the crankshaft or the camshaft must be turned to permit the alignment of the marks on the timing gears, a piston can hit and damage a valve. The rocker arm assembly must be loosened so that the valves are closed when the crankshaft or the camshaft are turned. 1. Install the camshaft gear on the shaft with the marked teeth towards the idler gear. Make sure the camshaft gear fits over the roll pin in the end of the camshaft. The bolt holes in the camshaft gear are not regular and will only align in one position. Use a soft hammer to push the gear onto the camshaft. Make sure that the timing marks are aligned correctly as the gear teeth are engaged. See FIGURE 34. 2. Install the lock plate and capscrews. Install the capscrews, but do not tighten them at this time. 3. Install the idler gear. See ¶ 1.70 Idler Gear, Installation. 4. When the installation of the other timing gears is correct, tighten the capscrews on the camshaft gear to 61 N.m (45 lbf ft). Bend the tabs on the lock plate to lock the capscrews into position.
Special Tools: Gear puller with adaptors 1. Remove the timing case. See ¶ 1.66 Timing Case, Removal. 2. Turn the crankshaft until the marked teeth of the crankshaft gear and the camshaft gear are aligned as shown in FIGURE 34. The marked teeth on the idler gear will not necessarily be aligned with the marked teeth of the other gears because of the different speed of rotation of the idler gear.
CAUTION Make sure that the crankshaft is not turned while the camshaft gear is removed. A piston can hit and damage a valve. 3. See FIGURE 35. Open the tabs on the lock plate so that the capscrews can be removed. Use a puller and adaptor to pull the gear from the camshaft. Inspect the camshaft gear for wear and damage.
5. If new gears have been installed, check the timing gear clearances as shown in FIGURE 38. 6. Install the timing case and the other components that were removed. See ¶ 1.67 Timing Case, Installation.
1.75 BACKPLATE 1.76 Removal 1. Remove the timing case. See ¶ 1.66 Timing Case, Removal. 2. Remove the fuel injection pump. See ¶ 1.117 Fuel Injection Pump, Removal. 3. Remove the thermostat housing, coolant manifold, and coolant outlet pipe from the top of the backplate. 4. Turn the crankshaft until No. 1 piston is at TDC. (The timing mark on the flywheel will be aligned with the timing pointer on the flywheel housing.) When No. 1 piston is at TDC, the marked teeth of the crankshaft gear, the camshaft gear will be aligned toward the axle of the 27
idler gear as shown in FIGURE 34. The mark on the end of the crankshaft will be at the top.
3. Install the camshaft thrust plate. Evenly tighten capscrews to a final torque of 54 N.m (40 lbf ft).
NOTE: The marked teeth on the idler gear will not necessarily be aligned with the marked teeth of the other three gears because of the different speed of rotation of the idler gear. The arrangement shown in FIGURE 34. is the arrangement when the engine is assembled and before it is operated.
4. Install the camshaft gear. See ¶ 1.74 Camshaft Gear, Installation. 5. Install the adapter housing for the fuel injection pump. Use two new O–rings. See FIGURE 40.
5. Remove the idler gear. See ¶ 1.69 Idler Gear, Removal. 6. Remove the camshaft gear. See ¶ 1.73 Camshaft Gear, Removal. 7. Remove the camshaft thrust plate. 8. Remove the adapter housing for the fuel pump from the backplate and discard the O–rings. 9. Remove the three capscrews that hold the backplate to the engine block. Carefully and lightly hit the backplate to remove it from the alignment dowels on the cylinder block. Discard the gasket. 10. Pull the oil transfer tube from the backplate and discard the O–ring.
1.77 Installation 1. Install a new O–ring on the oil transfer tube and install it in the back plate. See FIGURE 39. FIGURE 40. O–RING POSITIONS, ADAPTER HOUSING FOR THE FUEL INJECTION PUMP 6. Use new gaskets and O–rings. Install the thermostat housing, coolant manifold, and coolant outlet pipe to the top of the backplate. 7. Install the fuel injection pump. See ¶ 1.118 Fuel Injection Pump, Installation.
1. OIL TRANSFER TUBE 2. O–RING
FIGURE 39. OIL TRANSFER TUBE 2. Install a new gasket for the backplate to the engine block. Install the backplate and install the three capscrews. 28
8. Install the timing case and other components that were removed. See ¶ 1.67 Timing Case, Installation. 9. If the oil sump was removed, install it. Make sure that any joints in the gaskets are fitted to prevent oil leaks.
1.78 CAM FOLLOWERS AND CAMSHAFT NOTE: The removal and installation of the camshaft require disassembly of many components of the engine.
The engine is normally removed from the lift truck for this operation. The removal and installation of the cam followers can be done with the engine in the lift truck. See THE FRAME section for procedures to remove the engine. See the TRANSMISSION section for procedures to separate the engine from the transmission.
FIGURE 41. Also see ¶ 1.162 How To Set Number 1 Piston To TDC On The Compression Stroke.
1.79 Removal, Cam Followers 1. Drain the coolant system to below the level of the inlet pipe for the coolant to the air compressor. 2. Remove the valve covers and rocker arm assemblies. See ¶ 1.7 Valve Cover, Removal and ¶ 1.10 Rocker Arm Assembly, Removal. 3. Remove the oil line and coolant pipes to the air compressor. 4. Remove the filter for the air compressor. 5. Loosen the hose clamp and remove the breather pipe from the cover for the cam followers.
1. IDLER GEAR 2. CRANKSHAFT GEAR 3. CAMSHAFT GEAR
4. GEAR FOR FUEL INJECTION PUMP 5. DRIVE GEAR, AIR COMPRESSOR
FIGURE 41. ALIGNMENT OF THE TIMING MARKS
6. Remove the bolts that fasten the cover for the cam followers and remove the cover and the baffle. Discard the gaskets.
3. Install the thrust plate for the camshaft and tighten to 54 N.m (40 lbf ft).
7. Lift the cam followers from their positions in the engine.
4. Install the camshaft gear. See ¶ 1.74 Camshaft Gear, Installation. Do not bend the tabs on the lock plate until the check for axial movement has been made.
1.80 Camshaft, Removal 1. Remove the timing case. See ¶ 1.66 Timing Case, Removal. 2. Remove the camshaft gear. See ¶ 1.73 Camshaft Gear, Removal.
5. Check the axial movement as shown in FIGURE 42. The limits for the axial clearance are 0.152 to 0.405 mm (0.006 to 0.016 in). If the axial clearance is greater than the limits, a new thrust plate or camshaft gear must be installed. When the axial clearance is correct, bend the tabs to lock the capscrews in position.
3. Remove the thrust plate for the camshaft. 4. Carefully remove the camshaft. 1.81 Camshaft. Installation 1. Make sure all of the parts are clean. Lubricate the parts with engine oil as they are assembled. 2. If the crankshaft has not been rotated, carefully install the camshaft. If the crankshaft has been rotated, turn the crankshaft until the No. 1 piston is at TDC. The mark on the end of the crankshaft must be in the up position. The single dot on the idler gear must be between the two dots on the crankshaft gear. Carefully install the camshaft. See
FIGURE 42. CHECK THE AXIAL CLEARANCE OF THE CAMSHAFT 29
6. Check the clearance of the timing gears. See ¶ 1.71 Clearance Adjustment, Timing Gears. The clearance limits are 0.051 to 0.152 mm (0.002 to 0.006 in).
3. Use a new gasket and install the cover and baffle for the cam followers.
7. Use a new gasket and install the timing case and the other components that were removed. See ¶ 1.77 Timing Case, Installation.
5. Install the filter for the air compressor.
1.82 Cam Followers, Installation 1. Make sure all of the parts are clean. Lubricate the parts with engine oil as they are assembled. 2. Install the cam followers into the engine block.
4. Connect the breather pipe to the cover and tighten the hose clamp.
6. Install the oil line and coolant pipes to the air compressor. 7. Install the push rods and rocker arm assembly. See ¶ 1.11 Rocker Arm Assembly, Installation. Adjust the clearances for the valves. See ¶ 1.14 Valve Clearance Adjustments. 8. Install the valve covers. See ¶ 1.8 Valve Covers, Installation.
ENGINE BLOCK ASSEMBLY 1.83 DESCRIPTION The engine block is made of cast iron. The crankshaft chamber extends below the centerline of the crankshaft to give a more rigid engine block. There are lateral bolts from the sides of the engine block to the front, center, and rear main bearing caps for additional support. There are seven main bearings. Replaceable cylinder liners are installed in the engine block. The cylinder liner has a special surface where the pistons travel. If a cylinder liner will be used again after engine repairs, a hone or other grinding tool must not be used on the surface. The top of the cylinder liner has a flange that makes a coolant seal with a counterbore in the engine block. Three seal rings are installed in grooves that are machined in the bottom of each cylinder liner. The camshaft has seven journals and runs in seven lead– bronze bearings in the engine block.
The following Steps A through H are often done before the engine is removed from the lift truck. If these steps have not been done before the engine was removed, do them before going to Step I. 1. Remove the fan. Loosen the belt tensioner and remove the drive belts. 2. Remove the air duct to the turbocharger. 3. Remove the filter for the air compressor and the pipes. Disconnect the coolant pipe and the oil supply to the air compressor. Remove the air compressor. See ¶ 1.158 Air Compressor, Removal. 4. Make alignment marks on the exhaust pipe from the turbocharger. Remove the exhaust pipe from the turbocharger. 5. Remove the oil filters. Remove the oil cooler assembly. See ¶ 1.104 Oil Cooler, Removal. 6. Remove the turbocharger. See ¶ 1.93 Turbocharger, Removal.
1.84 ENGINE BLOCK
7. Remove the alternator and its mount bracket.
1.85 Disassembly
8. Remove the oil fill tube and the dipstick tube assemblies.
The engine must be removed from the lift truck. See THE FRAME section for procedures to remove the engine. See the TRANSMISSION section for procedures to separate the engine from the transmission. 30
9. Remove the exhaust manifolds. 10. Remove the crankshaft pulley. See ¶ 1.46 Crankshaft Pulley, Removal.
11. Disconnect the coolant pipes to the water pump. Remove the pulley from the water pump. Remove the water pump. 12. Disconnect and remove the low pressure fuel lines. Disconnect the fuel filter. Remove the bracket and fuel filter. 13. Remove the outlet coolant manifold and the thermostat housing. 14. Remove the high pressure fuel lines and shrouds. 15. Remove the inlet manifold. 16. Remove the cylinder head assembly. See ¶ 1.17 Cylinder Head Assembly, Removal. 17. Remove the starter motor. See ¶ 1.155 Starter Motor, Removal. 18. Remove the cam followers. See ¶ 1.79 Cam Followers, Removal. 19. Remove the flywheel and the flywheel housing. See ¶ 1.146 Flywheel And Flywheel Housing. 20. Remove the oil sump. See ¶ 1.101 Oil Sump, Removal. 21. Remove the timing case. See ¶ 1.66 Timing Case, Removal. 22. Remove the oil pump and oil pipes. See ¶ 1.108 Oil Pump, Removal. 23. Remove the rear oil seal housing. See ¶ 1.53 Rear Oil Seal, Removal. 24. Remove the fuel injection pump. See ¶ 1.117 Fuel Injection Pump, Removal. 25. Remove the idler gear and camshaft gear. Remove the thrust plate for the camshaft. See the timing gear sections ¶ 1.69 – 1.73 . Carefully remove the camshaft. 26. Remove the backplate. See ¶ 1.76 Backplate, Removal. 27. Remove the cooling jets for the pistons.
CAUTION Make sure the cooling jets for the pistons are not damaged or moved out of alignment. If a cooling jet is hit, the alignment must be checked and the cooling jet replaced if necessary.
28. If the engine is not already in a position with the crankshaft facing up, turn the engine to that position. Remove the bearing caps and lower bearing halves from the connecting rods. Make an arrangement so that the parts for each connecting rod will be assembled again in their original positions. Push the pistons into their bores and carefully remove the pistons and connecting rod assemblies from the engine. 29. Make sure that the main bearing caps are marked with their position number. Remove the lateral bolts from the front, center, and rear main bearing caps. Remove the main bearing caps, lower bearing halves, and the upper and lower thrust washers. Keep all the parts in an arrangement so that the parts can be installed in their original positions. 30. Lift the crankshaft from the engine block. Remove the upper bearing halves and put each of them with their lower bearing half. 31. If the cylinder liners must be removed, remove the cylinder liners. See ¶ 1.89 Cylinder Liners, Removal. If the cylinder liners can be used again, make an identification mark for the cylinder from which it was removed. 1.86 Inspection 1. Make sure all of the oil and coolant passages in the engine block are clean. Make sure that the plugs in the engine block are in good condition. If any plugs have been removed for cleaning the engine block, make sure they are replaced. 2. Check the engine block for cracks and damage. NOTE: The top face of the engine block can be machined to repair a damaged engine block. The counterbores for the cylinder liners and coolant transfer inserts must be machined to the correct clearances between the engine block and the cylinder heads. The pistons must be changed or machined for the correct clearance from the cylinder heads. If a damaged area on the top face or the bottom seal area of the engine block needs repair, contact the engine manufacturer. 3. Check the flange seat in the engine block for each cylinder liner for wear or damage. Use an indicator dye to check the seal surface between the cylinder liner and its seat in the engine block. The seal surfaces must join at 100% of the circumference and a minimum of 50% of the width. A cutter tool (GA5038, GA5038–1) can be 31
used to repair or change the depth of the flange seat. See FIGURE 43. 4. If the flange seat in the engine block must be repaired or the top face of the engine has been machined, do the following procedure: Measure the depth of each counterbore in the engine block for the cylinder liner at four equal points on the circumference. See FIGURE 44. If the points are not equal so the the cylinder liner will fit with the specifications described in ¶ 1.90 Inspection (Cylinder Liners), the counterbore must be repaired.
FIGURE 43. FLANGE SEAT REPAIR FIGURE 44. CHECK THE DEPTH OF THE COUNTERBORE 1.87 Assembly 1. Make sure all the parts are clean. Lubricate the parts with engine oil as they are assembled. 2. Install the crankshaft. See ¶ 1.59 Crankshaft, Installation and ¶ 1.61 Check The Axial Movement Of The Crankshaft. Install the rear oil seal. 3. Install the cylinder liners. See ¶ 1.91 Cylinder Liners, Installation. 4. Install the piston and connecting rod assemblies. See the sections ¶ 1.34 – 1.44 Piston And Connecting Rod Assemblies. Make sure that the correct clearance height of the piston below the engine block is 0.28–0.38 mm (0.011–0.015 in). 5. Install the flywheel housing and flywheel. See ¶ 1.148 Flywheel and 1.151 Flywheel Housing section. 6. Turn the engine block so that the crankcase is facing up. Use a new O–ring and install the cooling jets for the
32
pistons. Rotate the crankshaft to make sure that the jet pipe is in the center position of the slot in each piston skirt.
22. Install the drive belts and adjust the tension. See ¶ 1.152 Drive Belts.
7. Install the two stud connections and blank plug to the oil passages to the rocker arm assemblies. Use a new seal washer.
24. Install the fan.
8. Install the oil pump, suction line and oil strainer. See the sections ¶ 1.111 Oil Pump, Installation.
23. Install the engine into the lift truck.
25. Remove the air from the fuel system before operating the engine. See ¶ 1.133 Remove Air From The Fuel System.
1.88 CYLINDER LINER 9. Install the oil sump. See ¶ 1.102 Oil Sump, Installation. 10. Install the oil filter assembly and the oil cooler. See ¶ 1.106 Oil Cooler, Installation. 11. Turn the engine block so that the cylinders are facing up. Carefully install the camshaft. See ¶ 1.81 Camshaft, Installation. 12. Use a new O–ring and install the oil transfer tube in the front face of the engine block. Install the two location dowels and a new gasket. Install the backplate. See ¶ 1.77 Backplate, Installation. 13. Install the adapter housing for the fuel injection pump. Use two new O–rings. See FIGURE 40. 14. Install the timing case and the timing gears. See The sections ¶ 1.67 – 1.74 Timing Case And Timing Gears.
1.89 Removal Special Tools: Removal and installation tool for cylinder liners (GA5037) Piston height tool Dial indicator gauge 1. Disassemble the engine as necessary. The piston, connecting rod, and piston cooling jet must be removed from the engine for each cylinder liner that must be removed. 2. Turn the crankshaft to give access to the cylinder liner and protect the bearing journal. 3. Install the removal and installation tool over the center of the cylinder liner as shown in FIGURE 45. Turn the handle to remove the cylinder liner from the engine block. Use lubricating oil on the moving parts to reduce the friction.
15. Install the cam followers. See ¶ 1.82 Cam Followers, Installation. 16. Install the cylinder head assembly. See ¶ 1.18 Cylinder Head Assembly, Installation. NOTE: The torque on the capscrews for the cylinder heads must be checked again after the engine has been operated approximately 10 hours. 17. Install the starter motor. 18. Install the fuel injectors, fuel lines, fuel filter, and fuel injection pump. See ¶ 1.118 – 1.125 Fuel System sections. 19. Install the turbocharger. See ¶ 1.94 Turbocharger, Installation. 20. Install the coolant manifold, thermostat housing and water pump. See ¶ 1.143 – Water Pump, Installation. 21. Install the alternator and mount brackets.
FIGURE 45. CYLINDER LINER REMOVAL 1.90 Inspection 1. If a cylinder liner will be used again, carefully check it for cracks. Make sure the seal surfaces are good. 2. Carefully install the cylinder liner, without seal rings into is bore in the engine block. Make sure that the posi33
tion number marked in the cylinder liner is toward the large coolant port.
5. The maximum variation on the flange of any one cylinder liner is 0.025 mm (0.001 in).
3. Carefully measure the distance that the flange of the cylinder line extends above the face of the engine block. Measure the cylinder liner at four equal points on the circumference. See FIGURE 46.
6. The maximum variation on the flanges at the adjacent points of any other cylinder liner is 0.025 mm (0.001 in).
4. The maximum extension of the cylinder liner above the face of the engine block is 0.08 to 0.13 mm (0.003 to 0.005 in). The variation can not be more than the specifications shown in the following paragraphs and in FIGURE 46.
7. If the cutter tool (GA5038 and GA5038–1) has been used to repair a seal seat in the counterbore of the engine block, a cylinder liner with a thicker flange is available. This cylinder liner with a thicker flange has a groove machined around the top flange. If a new cylinder liner is installed, a mark (“etch”) of its position number must be made on the flange nearest the large coolant port.
FIGURE 46. LIMITS OF VARIATION AND EXTENSION OF CYLINDER LINERS ABOVE THE FACE OF THE ENGINE BLOCK. 1.91 Installation NOTE: Some replacement cylinder liners are easier to install than others because of the manufacturing tolerances. A removal and installation tool can be used to install a cylinder liner. DO NOT use a hammer to install a cylinder liner. 1. Make sure the parts are clean. Lubricate the seal ring area in the bore of the engine block with mineral oil. Lubricate the seal rings with mineral oil and install them on the cylinder liner. See FIGURE 47. FIGURE 47. INSTALL THE SEAL RINGS
34
2. Install the cylinder liner in the bore in the engine block. Make sure the cylinder liner is vertical and aligned with the bore in the engine block. Use the cylinder installation tool to press the cylinder liner into the engine block. 3. When the cylinder liner has been installed, check that the bore of the piston is round and does not have a taper. The maximum variation from being round or having a taper is 0.05 mm (0.002 in). See FIGURE 48. and FIGURE 49.
FIGURE 49. WHERE TO MEASURE TO CHECK THE WEAR IN THE CYLINDER LINER
4. Install new piston rings on the piston. See ¶ 1.44 Piston Rings, Installation. 5. Install the piston and connecting rod assembly. See ¶ 1.39 Piston And Connecting Rod Assembly, Installation. 6. Use a new O–ring and install the cooling jet. Rotate the crankshaft to make sure that the jet pipe is in the center position of the slot in the piston skirt. 7. Install the cylinder head assembly. See ¶ 1.18 Cylinder Head Assembly, Installation. 8. Install the oil sump. See ¶ 1.102 Oil Sump, Installation. NOTE: If a cylinder liner has been removed and installed again or a piston has been repaired, the following recommendations are for the next five hours of engine operation:
• Do not operate the engine at full load. • Do not operate the engine at high speed. FIGURE 48. CHECK THAT THE BORE OF THE CYLINDER IS ROUND AND DOES NOT HAVE A TAPER
• Do not permit the engine to operate at idle speed for long periods.
35
1. 2. 3. 4. 5. 6. 6. 7. 8. 9. 10. 11. 12. 13. 14.
ADAPTER FITTING GASKET GASKET PIPE GASKET PIPE FITTING ELBOW SEAL LOCKNUT WASHER SLEEVE NUT PLUG WASHER
28
24 29 25
18
29
1 11
15
12
14
26
13 17 20
1 18 8
2 28
9 11
21
12
6
7
15. 16. 17. 18. 19. 20. 21. 22. 23. 24. 25. 26. 27. 28. 29.
BOLT SETSCREW WASHER WASHER SETSCREW FLANGE CLAMP TURBOCHARGER GASKET WASHER HOSE AIR DUCT RING PLUG CLAMP
22
3
4
14 16
5 10 19
FIGURE 50. TURBOCHARGER MOUNT PARTS
36
TURBOCHARGER 1.92 GENERAL A Holset H2C turbocharger is normally installed on this engine. Exhaust gases from the engine turn the turbocharger and causes it to supply air to the inlet manifold at greater than atmospheric pressure. The bearings in the turbocharger are lubricated with engine oil from the main oil passage in the engine block. The oil goes through the bearing housing of the turbocharger and returns to the oil sump. 1.93 Removal
3. Lubricate the bearing housing of the turbocharger with clean engine oil. Use a new gasket and install the oil supply line. 4. Use a new gasket and install the oil drain line. 5. Install the exhaust pipe connection to the turbocharger. Install a new gasket on the studs. If the original nuts are to be used, make sure they are in good condition. Use a compound on the threads to prevent seizure of the nuts to the studs. New nuts have a coating on them to prevent seizure.
1. Clean the turbocharger. Remove the duct from the air filter where it connects to the inlet of the turbocharger.
6. Make sure that there is no restriction in the duct from the air filter to the turbocharger. Install the duct on the turbocharger and tighten the fastener.
2. Remove the nuts and remove the exhaust pipe connection and its gasket from the turbocharger.
1.95 Disassembly (See FIGURE 51.)
3. Loosen the clamp on the pipe to the inlet manifold so that the turbocharger can be removed.
1. Put the turbocharger in a vise. Use the flange to the turbine inlet to hold the turbocharger in an upright position.
4. Disconnect the oil supply line at the flange at the top of the bearing housing of the turbocharger. Remove the oil supply line and gasket. 5. Disconnect the oil drain line at the flange at the bottom of the bearing housing of the turbocharger. If necessary, remove the oil drain line and gasket. 6. Remove the four nuts at the flange that fastens the turbocharger to the exhaust manifold. Disconnect and remove the turbocharger from the exhaust manifold. Remove the gasket. 7. Check the hoses, lines, and duct for cracks, wear, or damage. 1.94 Installation 1. Check that the openings of the turbocharger and the manifolds are clean. Make sure that the compressor shaft in the turbocharger rotates freely. 2. Install the turbocharger to the exhaust manifold. If the original nuts are to be used, make sure they are in good condition. Use a compound on the threads to prevent seizure of the nuts to the studs. Install the turbocharger and tighten the nuts. Make sure the pipe to the inlet manifold is aligned with the air outlet from the turbocharger so that the clamp can be tightened. Tighten the clamp.
2. Make a reference mark on the compressor housing (1), bearing housing (19), and the turbine housing (23) so that the parts can be assembled again in the same position. 3. Remove the capscrews (4) and the clamp plates (2). Lift the compressor housing (1) from the turbocharger. 4. Open the tabs on the lock plates (25) and remove the capscrews (24). Remove the clamp plates (26) from the turbine housing (23). Remove the impeller assembly from the turbine housing.
CAUTION Be careful that the blades of the impeller are not damaged. If the impeller is damaged, the turbocharger must be replaced or repaired by a special repair service. 5. Put the turbine in a holding fixture and remove the lock nut (5). NOTE: Left–hand thread. Do not bend the shaft (21). 6. Remove the compressor impeller (6) from the shaft (21). 7. Remove the snap ring (7) and lift the oil seal plate (8) from the bearing housing (19). Remove the O–ring (9) from the bearing housing. Remove the oil slinger (11) from the oil seal plate. 37
1. 2. 3. 4. 5. 6. 7.
COMPRESSOR HOUSING CLAMP PLATE LOCK WASHER CAPSCREW LOCK NUT (LEFT HAND THREAD) IMPELLER, COMPRESSOR SNAP RING
8. 9. 10. 11. 12. 13. 14.
OIL SEAL PLATE O–RING SNAP RING OIL SLINGER OIL BAFFLE SNAP RING CAPSCREW
15. 16. 17. 18. 19. 20. 21. 22. 23. 24. 25. 26.
THRUST BEARING THRUST COLLAR SNAP RING BEARING BEARING HOUSING HEAT SHIELD SHAFT ASSEMBLY SEAL HOUSING, TURBINE CAPSCREW LOCK PLATE CLAMP PLATE
FIGURE 51. HOLSET H2C TURBOCHARGER ASSEMBLY 8. Remove the oil baffle (12). 9. Remove the three capscrews (14) and remove the thrust bearing (15) and the thrust collar (16). 10. Remove the shaft assembly (21) with the seal (22). Remove the heat shield (20). 11. Remove the outer snap rings (17). Remove the bearing assembly (18). Remove the inner snap rings (17).
2. Clean the aluminum parts with a brush or plastic scraper. Make sure the passages in the housings are clean. 3. Inspect the shaft (21) and the seal grooves for wear or damage. Replace worn or damaged parts. 4. Inspect the surfaces of the thrust bearing for wear or damage. Make sure the grooves in the thrust bearing are clean. Replace worn or damaged parts. 5. Inspect the bearings and bearing housing. Replace
1.96 Cleaning And Inspection 1. Put the parts in a container with a solvent that is not caustic. When the dirt has loosened, use a hard brush or a soft scraper to clean the compressor housing. Use compressed air at low pressure to dry the compressor housing. Clean the impeller with a soft brush. 38
worn or damaged parts.
6. If there are symptoms that the impeller and compressor assembly is not in balance, ask Holset for their publication, Balancing Turbocharger. 7. Inspect the housings. Replace a damaged or worn part.
1.97 Assembly (See FIGURE 51.) NOTE: Use new seals and O–rings during assembly. Carefully install the seals in their bores so that they do not break and cause damage. Do not cut or damage an O–ring during assembly. Lubricate the parts that move with engine oil during assembly.
parallel with the dial indicator extension and make a note of the movement on the dial indicator. The limits of total movement is 0.12 to 0.17 mm (0.005 to 0.0065 in).
1. Install the inner snap rings (17). The bevel on the snap rings must be toward the bearings. Install the bearing assembly (18). Install the outer snap rings (17). 2. Install the heat shield (20). Install the shaft assembly (21) with the seal (22). 3. Install the thrust collar (16) and the thrust bearing (15). Install the three capscrews (14) and tighten them to 4.5 N.m (40 lbf ft). 1. ADAPTER PLATE
2. GAUGE EXTENSION
4. Install the oil baffle (12). 5. Install a new O–ring (9) on the oil seal plate (8). Install the oil slinger (11) in the oil seal plate. Install the oil seal plate (8) into the bearing housing (19). Install the snap ring (7). 6. Install the compressor impeller (6) on the shaft (21). Put the turbine in a holding fixture and install the lock nut (5). NOTE: Left–hand thread. Do not bend the shaft (21). Tighten the lock nut to 17 N.m (150 lbf in). 7. Install the impeller assembly into the turbine housing. Make sure the alignment mark on the bearing housing is aligned with the mark on the turbine housing. Install the clamp plates (26) on the turbine housing (23). Install the lock plates (25) and tighten the capscrews (24) to 13.6 N.m (120 lbf in). Close the tabs on the lock plates (25) so that the capscrews can not loosen.
FIGURE 52. GAUGE TO CHECK RADIAL MOVEMENT OF TURBOCHARGER SHAFT
8. Install the compressor housing (1) on the turbocharger. Make sure the alignment mark on the bearing housing is aligned with the mark on the compressor housing. Install the clamp plates (2) and tighten the capscrews (4) to 6.8 N.m (60 lbf ft). 9. Turn the turbine assembly with your hand to make sure that it turns freely. 10. Check the radial movement of the turbine shaft. Make a dial indicator adapter as shown in FIGURE 52. Install the dial indicator so that the gauge extension touches the turbine shaft as shown in FIGURE 53. Use equal pressure in the same direction at both ends of the turbine shaft. Raise and lower the turbine shaft assembly
FIGURE 53. INSTALL THE GAUGE TO CHECK RADIAL MOVEMENT OF TURBOCHARGER SHAFT 39
11. Check the axial movement of the turbine shaft as shown in FIGURE 54. Raise and lower the turbine shaft assembly parallel with the dial indicator extension and make a note of the movement on the dial indicator. The limits of total movement is 0.05 to 0.08 mm (0.002 to 0.003 in). 12. If the radial or axial movements are greater than the limits, the turbocharger must be rebuilt.
FIGURE 54. INSTALL THE GAUGE TO CHECK AXIAL MOVEMENT OF TURBOCHARGER SHAFT
40
LUBRICATION SYSTEM 1.98 GENERAL The oil pump is turned by a gear on the crankshaft engaged with a gear on the oil pump. A relief valve in the outlet of the oil pump controls the maximum oil pressure in the lubrication system. The engine oil flows from the oil pump through an oil cooler fastened on the side of the engine block. The housing for the oil cooler is the mount for the two oil filters. The oil flows from the oil cooler through the oil filter. The oil filters have a by– pass that permits oil flow directly to the main oil passage if the oil filter becomes too dirty. The normal oil flow is through the oil filter to the main oil passage in the engine block. Engine oil from the main oil passage flows to the main bearings of the crankshaft and through the passages in the crankshaft to the rod bearings. The primary lubrication for the pistons and the cylinder bores is oil from the cooling jets. The cooling jets spray engine oil on the bottoms of the pistons for additional cooling.
1. 2. 3. 4. 5. 6. 7. 8. 9.
The front and center bearings of the camshaft have a groove machined into them to permit lubricating oil to flow to other components. Lubricating oil flows from the center bearing and through the camshaft to lubricate the other six bearings. Some engine oil goes through the center camshaft bearing to the rocker arm assembly. A steel transfer tube is installed between the backplate and the main oil passage in the engine block. The supply of lubrication oil flows through this transfer tube to the timing gear train. Holes are drilled in the backplate so that some lubricating oil goes to lubricate the fuel injection pump. The axle of the idler gear has an oil passage to the main oil passage. An outlet from the main oil passage supplies oil to the bearings of the turbocharger. The engine flows through the bearings of the turbocharger and returns to the oil sump. An oil pressure switch in the oil cooler will cause the engine to stop if the engine oil pressure is less than 124 kPa (18 psi).
OIL STRAINER OIL PUMP RELIEF VALVE OIL COOLER OIL FILTER (2) COOLING JETS OIL SUPPLY TO TURBOCHARGER OIL SUPPLY TO FUEL INJECTION PUMP AXLE, IDLER GEAR
12422
FIGURE 55. LUBRICATION SYSTEM
41
25
27
28
26
1
29
2 30
4 3
1
25 31
5
32
36 37 38 34 35 33
6
36 37
32
7
38
40
19
6
39
8 9
36
10
38
37
9
EARLIER PRODUCTION
12 13
11 15
23 16
24 25
29
17
18
30
26
12 13
1 20
2 1. HOSE CLAMP (4) 2.HOSE (2) 3. WASHER 25 4. PLUG 5.PIPE 31 6.HOSE CLAMP (2) 7. HOSE (2) 8. WASHER (4) 9. WASHER (6) 10. CAPSCREW (4) 38 11. PLUG 12. WASHER 13.ADAPTER 14. WASHER 15. PRESSURE SWITCH (AUTO SHUT OFF) 16. WASHER 17. ADAPTER
32
9
1
21
15 22
36 37
18. PLUG 19. OIL COOLER 20.WASHER (4) 21. CAPSCREW (2) 22. FILTER CARTRIDGE (2) 23 WASHER
24. 25. 26. 27. 28. 29. 30.
DRAIN PLUG SEAL RING (4) PIPE WASHER PLUG WASHER (4) CAPSCREW
EARLIER PRODUCTION 31. 32. 33. 34. 35. 36. 37. 38. 39. 40.
FIGURE 56. OIL FILTERS, OIL COOLER, AND CONNECTING PARTS 42
14
CONNECTOR SEAL RING (3) SEAL RING (4) BOBBIN SEAL RING WASHER (3) WASHER (3) CAPSCREW (3) PLUG WASHER
1.99 OIL FILTER, REPLACEMENT 1. Change the oil filters when the engine oil is changed. Put a drain pan under the filters. Remove the filter cartridges. See FIGURE 57. Discard the filter cartridges. 2. Clean the filter head. 3. Fill the new filter cartridges with clean engine oil. Apply clean engine oil to the gasket. Turn the filter until the gasket touches the filter head. Tighten the filter cartridge !P2 to #P4 turn.
2. Remove the oil line and elbow connection between the oil cooler and the engine block. 3. Remove the capscrews that fasten the oil sump to the engine block. Lower the oil sump. Remove the gasket. 4. Discard the gaskets and the O–rings. Clean the oil sump with mineral oil solvent. 5. If necessary, remove the suction line and oil strainer.
4. When new oil has been added and the engine can be operated, start the engine. Check the area around the filter for leaks.
1. DIPSTICK
FIGURE 58. OIL FILLER TUBE AND DIPSTICK ASSEMBLY 1.102 Installation 1. FILTER CARTRIDGE
FIGURE 57. OIL FILTERS
1. If the oil strainer and suction line was removed, install them to the oil pump. Make sure that the suction line is aligned correctly.
1.101 Removal
2. Use a new gasket and o–rings and install the oil sump. Use studs on each side of the oil sump to align and hold the gasket in position during assembly. Install the remainder of the capscrews. Tighten the capscrews evenly.
1. Drain the engine oil. Remove the oil filler tube and the dipstick assembly from the oil sump. See FIGURE 58.
3. Use new O–rings and install the oil line and elbow connection between the oil cooler and the engine block.
1.100 OIL SUMP
43
4. Use a new gasket and install the oil filler tube and the dipstick assembly to the oil sump. 5. Install the drain plug in the oil sump. Use a new washer.
1.103 OIL COOLER Coolant from the coolant system flows through the tubes of the oil cooler. The lubricating oil from the engine oil pump flows over the tubes of the oil cooler. Baffle plates in the oil cooler send the oil over across the tubes six times before it enters the passage to the two oil filters.
NOTE: Do not push the section with heat exchanger tubes through the housing with the O–ring still installed on the end of the heat exchanger tubes. This action will require additional force that will damage the oil cooler. Force must not be applied to the sheet metal on the ends of the heat exchanger tubes. Use a soft wood block to apply a small force on the ends of the tubes. 5. Carefully push the section with the heat exchanger tubes in the opposite direction to remove the section from the housing. Remove the other O–ring. 6. Clean the heat exchanger section with a cleaner for heat exchangers. Follow the manufacturer’s directions.
1.104 Removal
1.105 Inspection
1. Drain the cooling system. Disconnect the coolant hoses and the oil lines from the oil cooler.
Inspect the heat exchanger tubes for cracks and damage. A test for leaks can be made with a container of water and air pressure. Apply up to 200 kPa (30 psi) of air pressure while the heat exchanger tubes are in a container of water. Air bubbles will indicate leaks in the heat exchanger tubes.
2. Remove the two oil filters. 3. Remove the capscrews that fasten the unit to its mount and lift from the crankcase. 4. See FIGURE 59. Remove the 2BA screw (3) from each end of the housing. Push the section with the heat exchanger tubes into the housing far enough so that the O–ring (2) can be removed from the end of the heat exchanger tubes.
1.106 Installation 1. Lubricate the ends of the bore in the housing with a thin coating of rubber grease or engine oil. Use new O– rings and hoses for assembly. 1. HEAT EXCHANGER TUBES 2. O–RING 3. 2BA SCREW (2)
2 1
3
3
FIGURE 59. OIL COOLER
44
NOTE: Do not push the section with heat exchanger tubes through the housing with the O–ring installed. This action will require additional force that will damage the oil cooler. Force must not be applied to the sheet metal on the ends of the heat exchanger tubes. Use a soft wood block to apply a small force on the ends of the tubes. 2. Install the O–ring on the end of the heat exchanger with the hose connections. Push the heat exchanger section into the housing so that the other O–ring can be installed. 1. DRIVE GEAR 2. PULLER
3. Install the other O–ring. Carefully adjust the heat exchanger to its correct position in the housing so that the retainer screws can be installed.
FIGURE 60. REMOVE THE DRIVE GEAR FROM THE OIL PUMP
4. Install the 2BA screws. Install the oil cooler on the engine.
2. Remove the capscrews and separate the housing of the oil pump. See FIGURE 61. Clean all of the parts and check for damage and wear.
1.107 OIL PUMP
1. LOCATION DOWELS 2. SHIMS
1.108 Removal 1. Drain the engine oil and remove the oil sump. Remove the oil strainer and suction line. See ¶ 1.101 Oil Sump, Removal. 2. Remove the oil strainer and suction line. 3. Remove the capscrews that hold the oil pump to the main bearing cap and remove the oil pump. Make a note of the shim arrangement installed between the oil pump and the main bearing cap.
1.109 Disassembly And Inspection If the oil pump is worn so that the performance is decreased, the oil pump must be replaced. This procedure describes disassembly to check for wear. The normal procedure for repair is replacement of the oil pump . 1. Use a puller to remove the drive gear from the oil pump. See FIGURE 60.
1 2
FIGURE 61. OIL PUMP 3. When the parts are clean and inspected, assemble the oil pump as shown in FIGURE 61. and FIGURE 62. Lubricate the moving parts of the oil pump with engine oil during assembly. Do Not lubricate the joint faces of the pump housing. Do Not use sealant between the joint faces of the pump housing. 4. Before the capscrews are tightened, put a straight edge across the mount face of the pump to make sure that the two parts of the housing are aligned with each other. Tighten the capscrews. 5. Heat the drive gear to 150°C (302°F) and use a press to install it on the pump shaft. Use the puller to hold the drive gear and tighten the center bolt to 20 N.m (15 lbf ft). Remove the puller and make sure that the drive gear is still even with the end of the pump shaft. 45
1. 2. 3. 4. 5. 6. 7. 8. 9. 10. 11. 12. 13. 14. 15. 16. 17. 18. 19. 20.
18 6
20
19
19
10 2 1
11 5
3
21 27
13
28
12
23
4
4
9 8 15
OIL PUMP ASSEMBLY DOWEL (2) SHAFT GEAR SHAFT GEAR PLUNGER PLUG SPRING BODY BUSHING COVER BUSHING WASHER GASKET CAPSCREW CAPSCREW (4) SHIM DOWEL (2) SHIM
7
24
17
14
33
16
21. INLET PIPE AND SCREEN (LATER PRODUCTION SHOWN) 22. WASHER 23. WASHER (4) 24. SEAL RING (2) 25. SEAL RING (2) 26. CAPSCREW 27. CAPSCREW (2) 28. CAPSCREW (2) 29. PIPE CLAMP 30. PIPE (LATER PRODUCTION SHOWN) 31. SEAL RING (2) 32. CONNECTOR 33. GASKET 34. WASHER (2) 35. CAPSCREW (2)
25
30
32 31
21 34 35 29 22 26
FIGURE 62. ARRANGEMENT, OIL PUMP AND SCREEN 6. Check the axial movement of the drive gear and pump shaft. The limit of axial movement is 0.130 to 0.165 mm (0.005 to 0.0065 in). 1.110 Inspection Inspect the tube assembly for damage, cracks, and cor46
rosion. If a pressure test is available, test the tube assembly with 200 kPa (30 psi) of air pressure while the tube assembly is in a warm water bath.
1.111 Installation
1.113 Removal
1. Lubricate the internal parts of the oil pump with engine oil before installation. Install the oil pump on the main bearing cap and tighten the capscrews. make sure the location dowels are installed. Use the same shim arrangement that was removed.
1. Drain the engine oil. Remove the oil sump. See ¶ 1.101 Oil Sump, Removal.
2. Check the gear clearance. The clearance limits are 0.010 to 0.025 mm (0.004 to 0.010 in) between the drive gear and the gear on the crankshaft. This clearance is adjusted by adding or removing shims between the oil pump and the main bearing cap. 3. Use new O–rings and install the oil strainer and oil pipes. 4. Install the oil sump. See ¶ 1.102 Oil Sump, Installation.
1.112 RELIEF VALVE The relief valve is one of the parts of the oil pump. See FIGURE 63. A plunger and spring are in the outlet of the oil pump controls the maximum oil pressure in the lubrication system.
WARNING The relief valve has a compressed spring. Do not permit the spring to be released so that it causes an injury.
2. Carefully remove the cap and release the spring. Remove the spring and plunger.
1.114 Inspection and Installation 1. Clean the parts. Check the parts for wear and damage. Check the spring as necessary. Replace the spring if it has wear or distortion. The spring has the following length: free length: 80.77 mm (3.18 in) installed length: 65.50 mm (2.58 in) 2. Check that the seat of the plunger is not damaged and that the plunger moves easily in its bore.
1. PLUNGER 2. CAP 3. WASHER
FIGURE 63. RELIEF VALVE
3. Lubricate the parts with engine oil during assembly. Install the plunger in the bore as shown in FIGURE 63. Use a new washer and install the spring and end cap. 4. Install the oil sump. See ¶ 1.102 Oil Sump, Installation.
47
FUEL SYSTEM 1.115 DESCRIPTION
has a small pump that can be operated with your hand to “prime” the fuel pump.
NOTE: Special tools and training are needed to repair the fuel injection pump and it is normally sent to an authorized repair station if repairs are necessary. The manufacturer of the engine has a “Service Exchange”. The fuel injectors receive fuel under high pressure from the fuel injection pump. The fuel injectors are set by the manufacturer to operate at 23.3 MPa (3381 psi) (230 atmospheres), but must be checked according to the maintenance schedules. See PERIODIC MAINTENANCE. The fuel pump has a plunger that is actuated by the fuel injection pump. The plunger is actuated by two lobes on the drive shaft of the fuel injection pump. The fuel pump
1. 2. 3. 4. 5. 6. 7.
The fuel pump brings the fuel from the fuel tank and sends it through a fuel filter to the injection pump. The fuel pressure to the injection pump is a constant 140 to 210 kPa (20 to 30 psi). Fuel that is not used by the fuel injectors at the engine is returned to the fuel tank through the fuel return line. NOTE: Good operation of the fuel injection system requires clean fuel and no dirt can be permitted in the system. Always clean carefully around a connection before it is disconnected. Install covers on open ports during maintenance. When the fuel system is opened for maintenance, the air must be removed from the fuel system before the engine is operated.
PRIMING PLUNGER FUEL PUMP FUEL FILTER RELIEF VALVE FUEL INJECTOR FUEL RETURN LINE LUBRICATING OIL 12422
FIGURE 64. FUEL SYSTEM
48
LATER PRODUCTION
EARLIER PRODUCTION
FIGURE 65. ARRANGEMENT, HIGH PRESSURE FUEL LINES
49
1
1 1 1 1 1
2
3 1. FUEL INJECTORS (6) 2. FUEL FILTER 3. FUEL INJECTION PUMP
FIGURE 66. ARRANGEMENT, FUEL RETURN LINES
1.116 FUEL INJECTION PUMP
1. 2. 3. 4. 5. 6. 7.
PRIMING PLUNGER FUEL PUMP CAP, TIMING POINTER LOCATION DEVICE IDLE SPEED ADJUSTMENT GOVERNOR IDENTIFICATION PLATE BOOST CONTROL DEVICE SPEED CONTROL LEVER
8. 9. 10. 11. 12.
STOP SCREW, SHUT DOWN DATA PLATE, PUMP AND GOVERNOR STOP CONTROL LEVER PRESSURE RELIEF VALVE IDENTIFICATION PLATE, FUEL INJECTION PUMP
FIGURE 67. BOSCH FUEL INJECTION PUMP 50
1.117 Removal 1. Disconnect all of the fuel lines from the fuel injection pump. Disconnect the engine stop control. Disconnect the control rod to the fuel injection pump. NOTE: Additional information can be found in the section under ENGINE TIMING AND ADJUSTMENT PROCEDURES beginning with ¶ 1.160 . 2. Remove the front valve cover and turn the crankshaft in the direction of engine rotation until the No. 1 inlet valve closes. 3. Remove the access cover from the engine. See FIGURE 68.
FIGURE 69. CAPSCREWS AND PLATE, DRIVE GEAR FOR THE FUEL INJECTION PUMP 5. Remove the four nuts and washers from the flange and the two bolts and washers that hold the fuel injection pump to the support bracket. See FIGURE 70.
1. NUTS (4)
FIGURE 70. REMOVE THE NUTS FOR THE FUEL INJECTION PUMP 1. ACCESS COVER
FIGURE 68. ACCESS COVER, FUEL INJECTION PUMP
6. Carefully remove the fuel injection pump from the engine. Remove the pump hub. 1.118 Installation 1. The timing position for the fuel injection pump is on the engine data plate.
4. Remove four capscrews and plate from the drive gear for the fuel injection pump. See FIGURE 69.
2. If the crankshaft has been moved, turn the crankshaft in the direction of engine rotation until the No. 1 inlet valve closes.
51
3. Open the cover plate from the timing pointer on the lower right–hand side of the flywheel housing. See FIGURE 71. Turn the crankshaft in the direction of engine rotation until the timing number on the flywheel aligns with the pointer in the flywheel cover. Use the number on the flywheel that is the same as the number on the engine data plate.
7. Loosen the bolts for the support bracket. See FIGURE 73. DO NOT loosen the bolts that fasten the support bracket to the crankcase.
1. BOLTS
FIGURE 73. SUPPORT BRACKET, FUEL INJECTION PUMP 1. COVER PLATE
FIGURE 71. TIMING POINTER 4. Install the drive hub on the fuel injection pump and tighten the nut to 163 N.m (120 lbf ft). 5. Install new O–rings and lightly lubricate the larger O– ring with engine oil. See FIGURE 72.
1. LARGE O–RING 2. SMALL O–RING
8. Tighten the four nuts on the flange of the fuel injection pump to 47 N.m (35 lbf ft). 9. Install and tighten the support mounting bolts to 40 N.m (30 lbf ft). 10. Tighten the bolts for the support bracket. See FIGURE 73. 11. Remove the cap and pull the timing pointer location device. See FIGURE 74.
3. HUB 1. TIMING POINTER LOCATION DEVICE
FIGURE 72. O–RINGS AND HUB, FUEL INJECTION PUMP
FIGURE 74. TIMING POINTER LOCATION DEVICE
6. Put the injection on the four studs that fasten it to the backplate. Install the washers and nuts and tighten them with your fingers. Do not tighten them at this step.
12. Use a 30 mm wrench to turn the camshaft on the fuel injection pump until the timing pointer is in the center of the hole for the timing pointer location device.
52
13. Carefully install the drive gear for the fuel injection pump. Do not move the camshaft for the fuel injection pump. Make sure the bolt holes in the hub are in the center of the slots of the drive gear. Install the plate and four cap screws and washer. Tighten the capscrews with your fingers. 14. Put the stop lever in the NO FUEL position. 15. Make sure that the timing pointer is still in the center of the hole. Install the timing pointer location device so that the end with the larger slot engages the timing pointer. See FIGURE 75.
23. When the engine can be operated, do the Checks And Adjustments as necessary. See the ENGINE TIMING AND ADJUSTMENT PROCEDURES beginning with ¶ 1.160 .
1.119 ENGINE STOP SOLENOID The engine stop solenoid is fastened to the side of the fuel injection pump. This solenoid is energized when the engine is operating. The solenoid is connected with a link to the control lever for the governor stop. See FIGURE 76. When the engine is operating, the solenoid moves the stop control lever to the RUN position. There are two sets of windings (pull and hold). The hold windings use a small electric current to hold the solenoid in position. The pull windings use a larger electric current to move the solenoid to its energized position. The pull windings are designed for a momentary operation and are deenergized after the solenoid plunger is moved to its energized position. The pull windings can be damaged if they are continuously energized. When the solenoid is deenergized, a return spring in the solenoid housing move the solenoid plunger to its deenergized position. The stop control lever is moved to the STOP position when the solenoid is deenergized.
1. TIMING POINTER LOCATION DEVICE
FIGURE 75. TIMING POINTER LOCATION DEVICE 16. Tighten the four capscrews for the drive gear to 45 N.m (33 lbf ft). 17. Remove the timing pointer location device. Turn the crankshaft of the engine in the direction opposite of its normal rotation approximately 60 degrees. Repeat the timing checks (Step 3 and Step 15). If the timing is not correct, repeat the steps to adjust the timing. 18. If the timing is correct, install the timing pointer location device in its original position and install the cap. 19. Install the valve cover. 20. Install the cover plate over the timing pointer on the flywheel housing. 21. Connect the fuel lines. Connect the engine stop control and the control rod for the fuel injection pump. 22. Remove the air from the fuel system. See ¶ 1.133 Remove Air From The Fuel System.
1. 2. 3. 4.
ADJUSTMENT LINK STOP LEVER MECHANICAL STOP END OF SOLENOID SHAFT
FIGURE 76. ENGINE STOP SOLENOID 1.120 Adjustment Work carefully so that the pull windings are not continuously energized when the engine is operating. The linkage is adjusted when the solenoid is deenergized. See 53
FIGURE 76. Adjust the linkage (1) when the stop lever (2) is in the STOP position. The linkage must be adjusted to give full travel of the mechanism and move against the stop (3) when the solenoid is deenergized (STOP position). When the linkage is correctly adjusted, the end of the solenoid shaft (4) normally extends 0.4 mm (0.016 in) in the RUN position.
moved. Remove the plunger (3), check valve (6), spring (7), spacer (5), and spring seat (8). 4. Clean and inspect the parts for wear or damage. The O–rings and any worn or damaged parts must be replaced before assembly. 1.124 Assembly
1.121 FUEL PUMP 1.122 Removal 1. Clean the area near the fuel pump. Disconnect the fuel lines to the fuel pump. 2. Remove the nuts and washers that fasten the fuel pump to the fuel injection pump. Remove the fuel pump. 1.123 Disassembly
1. See FIGURE 77. Lubricate the parts with engine oil during assembly. Install the spring seat (8), spacer (5), spring (7), check valve (6), and plunger (3). Install and tighten the tappet shell (2). 2. Install the hand pump (4). 1.125 Installation
1. Clean the outside surfaces of the fuel pump. See FIGURE 77. Remove the tappet (1).
1. Install the tappet (1). Use a new gasket and install the fuel pump. Install the nuts and washers that fasten the fuel pump to the fuel injection pump.
2. Remove the hand pump (4).
2. Connect the fuel lines to the fuel pump.
3. Carefully loosen and remove the tappet shell (2). Make a note of the arrangement as the parts are re-
3. Remove the air from the fuel system. See ¶ 1.133 Remove Air From The Fuel System.
1. 2. 3. 4. 5. 6. 7. 8.
TAPPET TAPPET SHELL PLUNGER PRIMING PLUNGER SPACER CHECK VALVE SPRING SPRING SEAT
FIGURE 77. FUEL PUMP
54
1.126 FUEL FILTER (REPLACEMENT) 1. Clean the outside of the fuel filter assembly. Remove and discard the filter element. See FIGURE 78.
WARNING Do not put your hands on fuel lines under pressure. Diesel fuel can be injected into your body by the hydraulic pressure. 1.128 Removal 1. Clean the area near the fuel injector. Disconnect the fuel return line from the fuel injector. 2. Disconnect the high pressure line at the inlet to the fuel injector. Do not bend the fuel line. Remove the line clamps as necessary. 3. Remove the capscrews from the clamp and remove the clamp. Remove the fuel injector and its washer. (The washer often stays in the bottom of the injector sleeve.) A tight injector can be removed with tool GA5100 and adapter GA5100–11. See FIGURE 79.
1. FUEL FILTER ELEMENT
FIGURE 78. FUEL FILTER ASSEMBLY 2. Check that the seal ring is in the correct position. Lubricate the seal ring with fuel oil and install the filter element on the filter head. Turn the filter element until the seal ring just touches the filter head. Then tighten the filter element approximately #P4 of a turn. 3. Remove the air from the fuel system. See ¶ 1.133 Remove Air From The Fuel System.
1.127 FUEL INJECTORS The engine will run roughly if a fuel injector has a defect. To find which fuel injector has a defect, operate the engine at approximately 1000 rpm. Loosen and tighten the connection to the inlet of each fuel injector in a sequence. When the connection to the defective fuel injector is loosened, there will not be a change in the engine speed.
1. TOOL GA5100 (SLIDE HAMMER)
FIGURE 79. FUEL INJECTOR REMOVAL
55
1.129 Disassembly NOTE: The inspection and repair of fuel injectors require special tools and training. Many users have a special repair service make repairs on injectors. 1. Put the injector body in a vise and loosen the nozzle cap nut (8). See FIGURE 80. Do not tighten the vise so that distortion is caused in the injector body.
able to clean the spray holes. A cleaning kit (KRP1089) is also available. The cleaning kit has a holder for the wire. Be careful that a wire is not broken in a spray hole. A nozzle that will be used again must be very clean. 1.130 Inspection 1. Use a magnifying glass to inspect each valve and nozzle. If a valve and nozzle and spray holes are worn, damaged or has color because of too much heat, the unit must be replaced. 2. Lubricate the valve with fuel oil and install it in its nozzle. Hold the unit in a vertical position. Pull the valve approximately !P3 of its travel from the nozzle. When the valve is released, a good valve will slide smoothly into its seat in the nozzle under its own weight. 3. Inspect the pressure faces between the injector body, transfer ring, and nozzle for scratches or damage that can permit leakage under pressure. 4. Inspect the shims for damage and the springs for distortion. 1.131 Assembly 1. Put the injector body (1) in a vise. See FIGURE 80. Do not tighten the vise so that distortion is caused in the injector body. 2. Install the shims (2), valve spring (3), and spring seat (4). Install the transfer ring (5) around the spring seat.
1. 2. 3. 4.
INJECTOR BODY SHIMS VALVE SPRING SPRING SEAT
5. 6. 7. 8.
TRANSFER RING VALVE NOZZLE NOZZLE CAP NUT
FIGURE 80. FUEL INJECTOR 2. Remove the nozzle assembly, transfer ring, spring cap, and shims. Keep all of the parts of each nozzle together. Do not change parts of nozzles with other units. NOTE: Each valve and nozzle are a special unit and each part can not be used separately with other parts. 3. Clean the parts in mineral oil solvent of fuel oil. 4. Use a special solvent for carbon to remove the carbon from the nozzle. Special wire [0.34 mm diameter (OD13157) and 0.36 mm diameter (OD13158)] is avail56
3. Lubricate the valve (6) and the nozzle (7) in clean fuel oil and install the valve in the nozzle. Put the unit on the transfer ring and install the nozzle cap nut (8). Tighten the nozzle cap nut to 45 N.m (34 lbf ft). 4. The operation of the fuel injector must be checked with an injection tester. The injection tester uses a special oil for calibration tests. Nozzle test oils: SHELL (UK) Calibration fluid C SHELL (worldwide) Calibration fluid B ESSO Calibration fluid IL 1838 CASTROL Calibration oil 8327
WARNING Make sure that the nozzle of the injector is away from the operator during a test. Test oil can be injected into your body by the hydraulic pressure.
5. Use an injector tester to check the pressure at which the nozzle operates. The correct pressure is 23.3 MPa (3381 psi) (230 atmospheres). 6. To change the pressure at which the nozzle operates, add or remove shims in the fuel injector. 7. Check the spray pattern of the nozzle. See FIGURE 81. If the spray pattern is not correct, the needle valve is not against the valve seat. Remove carbon deposits or replace parts as required.
9. Increase the pressure slowly to 22.9 MPa (3322 psi) (226 atmospheres) for a leak back test. Release the lever on the tester and make a note of the time required for the pressure to decrease to 15.2 MPa (2205 psi) (150 atmospheres). If the time to decrease is less than six seconds, the fuel injector has a defect and can not be used. (Make sure the test equipment does not have a defect). 10. Continue to check the decrease in pressure for the leak back test. The pressure must not decrease to less than 10 MPa (1450 psi) (99 atmospheres) in less than 45 seconds. 1.132 Installation 1. See FIGURE 82. Use a new seal ring (1) and a new copper washer (2) on the fuel injector.
FIGURE 81. CHECKING THE FUEL INJECTORS
8. When the injector operates at the correct pressure, remove any oil from the tip of the nozzle. Apply a pressure of 22.0 MPa (3190 psi) (217 atmospheres) and hold the pressure for more than 10 seconds. Test oil must not leak from the injector tip at this pressure. Do not try to stop leakage from the tip by tightening the nozzle cap nut. If the nozzle tip leaks test oil, the valve and nozzle must be replaced.
1. SEAL RING
2. COPPER WASHER
FIGURE 82. FUEL INJECTOR 2. Slide the fuel injector into position in the sleeve. Install the clamp and capscrews. Tighten the capscrews evenly to 11 N.m (8 lbf ft). 3. Install the high pressure line and tighten the connections. Hold the outlet fitting so that it does not twist 57
while the connection is tightened. Install the line clamps if they were removed. 4. Install new seal washers and connect the fuel return line to the fuel injector. 5. Remove the air from the fuel system. See ¶ 1.133 Remove Air From The Fuel System. 6. When the engine can be operated, check for fuel leaks.
1.133 REMOVE AIR FROM THE FUEL SYSTEM
system. The air must be removed from the fuel system if any part of the fuel system has been disconnected or there is a leak in the low pressure part of the fuel system during operation of the engine. Use the procedure in FIGURE 83. for removal of air from the fuel system. The engine is now ready to start. If the engine runs correctly for a short time and then stops, or runs roughly, check for air in the fuel system. Make sure you check for leaks in the low pressure (suction) part of the fuel system.
The engine can not be started if there is air in the fuel
STEP A. Use a 19 mm wrench to loosen the nut (1) approximately !P2 to 1 complete turn. Do not loosen the bolt (2) which holds a spring and plunger in position.
STEP B. Operate the priming plunger (3) on the fuel pump until fuel, without air bubbles, comes from the loosened connection bolt. Continue to operate the priming plunger while the nut (1) is tightened again.
FIGURE 83. REMOVE AIR FROM THE FUEL SYSTEM
58
COOLING SYSTEM 1.134 GENERAL Coolant from the bottom of the radiator flows through the heat exchanger for the lubricating oil and to the centrifugal water pump installed on the front of the engine. The water pump is turned by drive belts connected to the crankshaft pulley. The coolant goes from the rear outlet of the water pump through the coolant inlet manifold into the engine block. The coolant then flows around each of the cylinder liners and to the coolant passages in
1. HEAT EXCHANGER, LUBRICATING OIL 2. COOLANT INLET MANIFOLD 3. INLET MANIFOLD (Engine not equipped with intercooler shown in illustration) 4. COOLANT OUTLET MANIFOLD 5. OUTLET TO RADIATOR 6. THERMOSTAT HOUSING 7. THERMOSTAT
the cylinder heads. The coolant from the cylinder heads flows through the outlet manifold to the thermostat housing. When the engine is at normal operating temperature, the coolant flows through the thermostat valves to the top of the radiator. When the thermostat valves are closed, the coolant flows through a by–pass and returns to the coolant pump. The thermostat unit has three valves. A small coolant line from the thermostat housing goes to cool the head of the air compressor.
8. 9. 10. 11.
TO THERMOSTAT FROM OUTLET MANIFOLD THERMOSTAT BY–PASS TO COOLANT PUMP COOLANT PUMP TO INLET MANIFOLD TO COOLANT PUMP FROM HEAT EXCHANGER, LUBRICATING OIL 12. DRAIN PLUGS 13. TO ENGINE RADIATOR 14. TO RADIATOR FROM ENGINE
FIGURE 84. COOLANT SYSTEM
59
25
16
40, 42
13 15 44,38 19,38
14 11
24
22
23
25 22
32
28 23
7
43 28
33 34 12 31 8
36
7
22
29
18 26,27 17
35 41 39
31
21
20
2
4 9
30
3
7
1 5, 6
7 7 10 10 1. 2. 3. 4. 5. 6. 7. 8. 9. 10. 11. 12.
SEAL RING (2) GASKET ADAPTER GASKET CONNECTOR INSERT (3) WASHER (7) CAPSCREW (4) CAPSCREW CAPSCREW CONNECTOR GASKET
13. 14. 15. 16. 17. 18. 19. 20. 21. 22. 23. 24. 25. 26. 27. 28 29.
PLUG SEAL (4) GASKET CAPSCREW (4) PLUG WASHER CAPSCREW (2) PLUG (ENGINE BLOCK DRAIN) WASHER RING (6) PIPE (2) CONNECTOR SEAL RING (3) CONNECTOR INSERT WASHER (7) CAPSCREW (4)
30. 31. 32. 33. 34. 35. 36. 37. 38. 39. 40. 41. 42. 43. 44.
CAPSCREW (3) SEAL RING (6) PLUG PIN SEAL RING HOUSING PIPE THERMOSTAT WASHER (3) PLUG (3) PLUG GASKET (3) GASKET GASKET CAPSCREW
FIGURE 85. THERMOSTAT AND COOLANT CONNECTIONS (LATER PRODUCTION)
1.135 THERMOSTAT 1.136 Replacement 1. Drain the cooling system so that the coolant level is below the thermostat position. 2. Remove the capscrews and remove the cover for the thermostat housing. 3. Remove the thermostat. 60
4. Make sure that the surfaces for the joint between the cover and the thermostat housing are clean. Install a new thermostat in the housing. 5. Use a new gasket and install the cover. Tighten the capscrews. 6. Fill the cooling system.
CAUTION Never operate the engine without a thermostat. If the engine is operated without a thermostat, some parts of the engine will become too hot and damage the
engine. If a thermostat does not operate correctly and a replacement is not immediately available, make a modification of the valves so that they will stay open and put a partial blank in front of the radiator to control the temperature.
FIGURE 88. SEAL RING POSITIONS, COOLANT MANIFOLD AND THERMOSTAT HOUSING (EARLIER PRODUCTION, LATER PRODUCTION IS SIMILAR)
1.137 Check The Operation OPERATING TEMPERATURES 1. Make a note of the leading valve (valve that will open first). Put the thermostat in a water bath. Put a thermometer in the water and near the thermostat.
1. THERMOSTAT VALVES 2. THERMOSTAT HOUSING
3. ROLL PIN 4. COVER
FIGURE 86. THERMOSTAT HOUSING
2. Heat the water and make a note of the temperature when the leading thermostat just begins to open. [A 0.05 mm (0.002 in) spacer gauge can be put between the valve and valve seat.] 3. Heat the water and make a note of the temperature when the other two valves just begin to open. Make a note of the temperature when all of the valves are fully open. The thermostat valves have the following temperature specifications: Leading valve to open: 77 to 79°C (171 to 174°F) Last valve begins to open: 81 to 83°C (178 to 181°F) All valves fully open: 93 to 96°C (199 to 205°F) OPERATING SPEEDS
1. THERMOSTAT VALVES (NUMBER OF VALVES CAN BE DIFFERENT) 2. BY–PASS PORTS
FIGURE 87. THERMOSTAT
1. Put the thermostat in a water bath. Put a thermometer in the water and near the thermostat. Heat the water to boiling. 2. Quickly put the thermostat in the boiling water. Make a note of the time for each valve to go fully open. 61
3. Remove the thermostat from the hot water and quickly put it into a cold water bath. Make a note of the time for each valve to go fully closed.
1.138 COOLANT PUMP
The thermostat valves have the following specifications for operating speeds: Leading valve begins to open: within 15 seconds Last valve begins to open: within 20 seconds All valves fully open: within 60 seconds All valves fully closed in cold water: 4 to 8 seconds
1. Drain the cooling system.
1.139 Removal
2. Remove the cooling fan and the drive belts 3. Remove the alternator, mount bracket, and drive belts. 4. Loosen the hose clamps and disconnect the coolant pipe from the oil cooler to the water pump.
4. If the thermostat does not operate according to the specifications, it must be replaced.
5. Remove capscrews and remove the coolant pump. LATER PRODUCTION
1 20 21 11
14
22
22 15
19
15 15 23 9
2
12 3
10
7
11 6
15
23
18 5 15
15
16
4
8
24
25
13
26
17 1. 2. 3. 4. 5. 6. 7. 8. 9. 10.
COOLANT PUMP SEAL SEAL SNAP RING BEARING SPACER SPACER OIL SEAL ROTOR SHAFT
11. HOUSING 12. BEARING 13. HUB 14. GASKET 15. WASHER (11) 16. CAPSCREW 17. CAPSCREW 18. CAPSCREW 19. BOLT (2) 20.BOLT
21. BOLT 22. NUT (4) 23. FAN
FIGURE 89. COOLANT PUMP ASSEMBLY
62
24. ADAPTER (2) 25. WASHER (6) 26. CAPSCREW (60
1.140 Disassembly NOTE: The repair of the coolant pump requires special tools. Many users have a special repair service make repairs on coolant pumps. The manufacturer of the engine has a “Service Exchange”. Special tool:
Puller (GA5090 and GA5090–1)
1. If the coolant pump has a backplate, remove it. 2. Use a puller to remove the impeller from the shaft. 3. Use a press to remove the pump shaft. Push the pump shaft towards the direction of the impeller. 4. Remove the hub. Use a puller or prybar to remove the oil seal. Discard the oil seal. Remove the snap ring for the bearing. 5. Use a prybar to remove the water seal and ceramic face from the pump body.
FIGURE 90. PREPARE THE BORE FOR THE BEARING 3. Apply a thin coat of Shell Retinax A grease to the bore for the bearing. Install the two spacers. 4. If the outer bearing is not a sealed bearing, lubricate the bearing with Shell Retinax A grease. Install the outer bearing in the bore.
1.141 Inspection 1. Inspect the parts for wear and corrosion. Discard all used gaskets and seals. 2. Measure the diameter of the shaft and the bore of the hub for an “interference” fit. The clearance limits between the shaft and it bore is 0.036 to 0.055 mm (0.00145 to 0.0022 in). If the clearance is greater than the limits, the shaft and hub must be replaced.
5. Make sure the pump shaft is clean and does not have any grease or oil on it. Apply a thin layer of Loctite 648 on the large diameter next to the flange. See FIGURE 91.
3. Clean the bearings and carefully check rough and worn parts. 1.142 Assembly 1. Clean the pump body. Give special attention to the bore for the bearing and the bore for the coolant seal. Both of these bores and their chamfers must be clean and not have corrosion. 2. Apply a thin layer of Loctite 648 to the shoulder inside of the bearing housing. See FIGURE 90. Make sure the Locktite is not applied to the ends of the bearing. Make sure the alignment is correct and the bearing is parallel with the bore. Use a press or tool GA5150 to push the bearing into its bore. The sealed side of the bearing goes into the bore first. Remove any Locktite that is on the end of the bearing.
FIGURE 91. PREPARE THE PUMP SHAFT 6. Use the tool GA5150 as a support for the front of the pump housing. Press the pump shaft into position in the bearings. Make sure that the flange on the pump shaft is tightly against the bearing. Check that the drain passage in the pump housing is open. Look through the drain passage to see that the pump shaft is installed correctly. Install the snap ring that is the retainer for the bearing. 63
7. Turn the water pump so that there is access to the shaft for the impeller. Install the coolant seal. Use tool GA5143. See FIGURE 92.
12. Cool the hub to room temperature. Check the tightness of the hub on the pump shaft. Install the puller GA5090 on the pump hub as shown in FIGURE 93. Tighten the center bolt of the puller against the end of the pump shaft to 27 N.m (20 lbf ft). If the hub moves on the pump shaft at this torque, the hub is too loose on the pump shaft. The hub and pump shaft must be replaced if the tightness of the hub on the pump shaft is too loose.
1. INSTALLATION TOOL GA 5143
FIGURE 92. INSTALL THE COOLANT SEAL 8. Install a new ceramic seal face into the impeller. Use a press to install the impeller on the pump shaft. The impeller goes on the pump shaft until the hub of the impeller is even with the end of the pump shaft.
FIGURE 93. USE A PULLER TO CHECK THE HUB
9. Use the tool GA5149 to press a new oil seal into the front bore of the pump housing. Make sure that the open side of the seal is facing away from the pump housing.
1.143 Installation
10. Heat the hub of the coolant pump to a temperature of 130°C (226°F) in an oven. If an oven with a temperature control is not available, heat the hub in boiling water for five minutes.
2. Use a thin layer of gasket sealer on the faces of the gaskets. Install the coolant pump on the engine.
CAUTION Do not heat the hub more than the specification or the seal lip will be damaged.
1. Make sure that the joint surfaces are clean. Use new gaskets.
3. Install the crankshaft pulley and damper. See ¶ 1.48 Crankshaft Pulley, Installation. 4. Install the pulley on the coolant pump. Tighten the capscrews to 24 N.m (18 lbf ft). 5. Install the mount bracket and alternator.
11. Install the hub on the pump shaft. Put the pump housing on a press so that the pump shaft has a good support. Make sure that the force use to install the hub is against the pump shaft and not against the bearings and seals. While the hub is still hot, use the press to install the hub on the pump shaft. The hub fits tightly against the inner race of the outer bearing.
64
6. Install the coolant pipe from the oil cooler to the coolant pump. 7. Install the drive belts. See ¶ 1.152 Drive Belts. 8. Install the fan. 9. Fill the coolant system with coolant, Check for leaks.
FLYWHEEL AND FLYWHEEL HOUSING 1.144 GENERAL The steel flywheel has a hardened steel starter ring gear. A location dowel and 12 capscrews are used to fasten the flywheel to the crankshaft. The flywheel housing is made of cast iron and is also the mount for the starter. Two location dowels are used to align the flywheel housing with the engine block.
1.145 FLYWHEEL 1.146 Removal 1. Remove the timing pointer from the flywheel housing to prevent interference when the flywheel is removed. 2. Remove two opposite capscrews from the flywheel and temporarily install two studs to help control the flywheel when the other capscrews are removed.
Install the ring gear on the flywheel. Make sure that the chamfer on the teeth is in the correct direction. Make sure that the ring gear fits tightly against the shoulder on the flywheel for its complete circumference. 1.148 Installation 1. Make sure the surfaces of the crankshaft and flywheel are clean so that the two parts will fit together correctly. 2. Install the flywheel over the guide studs. Install four capscrews and washers. Remove the two studs and install the remainder of the capscrews and washers. Tighten the capscrews in a cross pattern to 122 N.m (90 lbf ft). 3. Check the concentric variation (often called the “run– out”) when the flywheel is turned. Use a dial indicator. See FIGURE 94. This measurement must be less than 0.254 mm (0.010 in) total indicator reading.
3. Remove the other 10 capscrews that fasten the flywheel to the crankshaft. Remove the flywheel. 4. Inspect the flywheel and ring gear for damage. 1.147 Ring Gear (Replacement)
WARNING Wear eye protection for this operation to prevent eye injury from metal chips. You will be using a hammer and chisel to break the ring gear. Before the ring gear is removed, check the position of the chamfer on the teeth. Use a hammer and chisel to break the ring gear. Make sure that you do not damage the flywheel. Some service persons drill holes in the ring gear between the teeth so that it is easier to break and remove from the flywheel. The ring gear must be heated before it can be installed on the flywheel. Use an oven that has a temperature control. Heat the ring gear to approximately 215°C (419°F). Make sure that the ring gear is not heated to more than 250°C (480°F).
FIGURE 94. CHECK THE CONCENTRIC VARIATION OF THE FLYWHEEL 4. Check the alignment of the face of the flywheel with a dial indicator. See FIGURE 95. This measurement must not be greater than 0.03 mm (0.001 in) total indicator reading for every 25 mm (1.0 in) of the flywheel radius from the axis of the crankshaft to the indicator plunger. When this measurement is made, force must be applied against the flywheel to remove the axial movement of the crankshaft from the measurement.
65
2. The flywheel housing is heavy. Use lifting equipment to hold and lift the flywheel housing when it is removed. Remove the capscrews that hold the flywheel housing to the engine block. Use a soft hammer to carefully hit the flywheel housing and remove it from the alignment dowels. 1.151 Installation
FIGURE 95. CHECK THE ALIGNMENT OF THE FLYWHEEL FACE
1.149 FLYWHEEL HOUSING
1. Make sure the surfaces of the engine block and the flywheel housing are clean so that the two parts will fit together correctly. Make sure that the location dowels are installed correctly. 2. Install the flywheel housing onto the alignment dowels. Install the washers and capscrews and tighten them to 61 N.m. 45 lbf ft). 3. Install the flywheel. See ¶ 1.148 Flywheel, Installation.
1.150 Removal 1. Remove the starter motor and the flywheel. See ¶ 1.155 Starter, Removal and ¶ 1.146 Flywheel, Removal.
4. Install the starter motor. See ¶ 1.156 Starter, Installation.
ELECTRICAL EQUIPMENT 1.152 DRIVE BELTS Check the drive belts for wear and damage. When a pair of drive belts are used, they must be replaced as a pair. When a pair of drive belts are used, adjust the tension for the tightest belt. A gauge is available that will indicate the tension in the drive belt. Fit the gauge at the center of the longest length of the drive belt and measure the tension. See FIGURE 96. The correct tension is approximately 355 N (80 lbf) FIGURE 96. GAUGE TO CHECK DRIVE BELT TENSION Many service people press on the drive belt with their thumb at the center of the longest length of the drive belt and check the deflection. See FIGURE 97. When the thumb pressure is 100 N (20 lbf), the correct deflection is approximately 13 mm (1/2 in). DRIVE BELTS (COOLANT PUMP). Loosen the bolts on the belt tensioner (2) and slide the belt tensioner 66
until the drive belt tension is correct. See FIGURE 98. for additional information about the drive belt tensioner. DRIVE BELTS (ALTERNATOR). Loosen the bolts on the adjustment link (3) and the pivot fasteners (3) to adjust the tension of the drive belts. Move the alternator pulley against the drive belts to adjust the tension. Tighten the adjustment link and pivot fasteners. The drive belts are removed from the engine by loosening the tension and then removing them from the pulleys. The fan normally must be removed to replace the drive belts.
1.153 ALTERNATOR See THE ELECTRICAL SYSTEM, 2200 SRM 431 for troubleshooting and repairs.
1.154 STARTER MOTOR See THE ELECTRICAL SYSTEM, 2200 SRM 431 for troubleshooting and repairs for the starter motor. 1.155 Removal 1. Disconnect the battery. 2. Disconnect the cables to the starter motor. 3. Remove the capscrews and remove the starter motor. 1.156 Installation 1. Install the starter motor in position on the flywheel housing. Install and tighten the capscrews. 2. Connect the cables to the starter motor. 3. Connect the battery.
1. LONGEST LENGTH BETWEEN PULLEYS 2. BOLTS FOR DRIVE BELT TENSIONER 3. BOLTS FOR ALTERNATOR
FIGURE 97. CHECK AND ADJUST DRIVE BELT TENSION
67
1
20
19 9 16
4 12
3
7
8
10
21
2 14
5
11
18 15
6
17 13 14
1. 2. 3. 4. 5. 6. 7.
DRIVE BELT DRIVE BELT (3) SHIM WASHER PULLEY BEARING SHAFT
8. 9. 10. 11. 12. 13. 14.
SPACER PULLEY SNAP RING SNAP RING (2) TENSIONER WASHER (2) WASHER (3)
15. 16. 17. 18. 19. 20. 21. 22.
WASHER CAPSCREW CAPSCREW (2) CAPSCREW WASHER (6) CAPSCREW (6) PULLEY PULLEY
FIGURE 98. DRIVE BELT TENSIONER
68
22
AIR COMPRESSOR 1.157 GENERAL
The cylinder head of the single cylinder compressor is cooled by coolant from the engine. The compressor is lubricated from the engine oil system of the engine. Engine oil flows through a pipe from the main oil passage in the engine to the crankcase of the compressor. The engine oil then flows through the bearings of the compressor and the bushing for the drive shaft. The engine oil returns to the oil sump through the timing case.
NOTE: This air compressor is used on earlier production lift trucks. Some later production lift trucks that have this engine do not have an air compressor. The WABCO (Clayton Dewandre) air compressor (293 cc) is installed in the PTO position on the rear face of the backplate. The drive gear is for the air compressor is engaged with the camshaft gear in the timing gear train.
5
1. 2. 3. 4. 5. 6. 7. 8. 9. 10.
CONNECTING ROD ASSEMBLY PISTON ASSEMBLY VALVE PLATE ASSEMBLY CYLINDER HEAD CAPSCREW (4) WASHER (4) PLUG (3) CRANKSHAFT NUT PISTON RINGS PARTS INCLUDED IN CRANKSHAFT REPAIR KIT 11. PLUG (2)
7 10 6 4 10 7 9 3 10 10
2
10 1 NOTE: THE REPAIR PARTS FOR THIS AIR COMPRESSOR ARE ONLY AVAILABLE IN REPAIR KITS.
10
10 10 10 8
10
10 11
1
10 1
FIGURE 99. AIR COMPRESSOR
69
1.158 REMOVAL
2. Install the pipe for the engine oil between the compressor and the engine block.
1. Drain the cooling system. Disconnect and remove the rubber coolant hose from the air compressor and the crankcase.
3. Connect the steel coolant pipe from the coolant inlet to the air compressor. Be careful that the pipe is not bent.
2. Release the air pressure in the air system and disconnect all the pipe connections to and from the cylinder head of the compressor.
4. Connect the hose from the filter assembly to the air inlet of the air compressor. Connect the hose from the air compressor to the air tanks.
3. Disconnect the hose from the filter assembly to the air inlet of the air compressor. Disconnect the hose from the air compressor to the air tanks. 4. Disconnect the steel coolant pipe from the coolant inlet to the air compressor. Be careful that the pipe is not bent.
5. Install the pipe connections to the cylinder head of the compressor. 6. Fill the cooling system with correct coolant. 7. When the engine can be operated, check for leaks.
5. Remove the pipe for the engine oil between the compressor and the engine block. 6. See FIGURE 100. Remove the three capscrews and washers that hold the compressor flange to the backplate. Discard the gasket.
1.159 INSTALLATION 1. Use a new gasket and install the air compressor. See FIGURE 100. Make sure the drive gear on the air compressor correctly engages the camshaft gear. Install the three washers and capscrews and tighten the capscrews.
FIGURE 100. AIR COMPRESSOR REMOVAL AND INSTALLATION
ENGINE TIMING AND ADJUSTMENT PROCEDURES 1.160 ENGINE SPEEDS 1. Operate the engine until it reaches normal operating temperature and check the idle speed. The idle speed can be adjusted with the idle adjustment screw (4) shown in FIGURE 67. The correct idle speed is 550 to 600 rpm. 2. Check the governed speed to make sure the governor is operating correctly. The maximum engine speed can not be adjusted. The maximum speed of the engine is set by the engine manufacturer and the adjustment is sealed.
70
See the Engine Data at the beginning of this section for the governed speed.
1.161 TIMING GEAR MARKS The timing gears have timing marks to make sure that they are installed on the engine correctly. When the number 1 piston is at TDC the marks on gears for the crankshaft, camshaft, and idler gear were aligned during installation as shown in FIGURE 101.
7. Install a dial indicator so that its plunger touches the top of the valve stem. Slowly turn the crankshaft in a clockwise direction until the dial indicator just shows that the piston is not raising in its cylinder. Make a mark on the crankshaft pulley that aligns with the temporary pointer. Slowly turn the crankshaft in a clockwise direction until the dial indicator just begins to show that the piston is lowering in its cylinder. Make another mark on the crankshaft pulley that aligns with the temporary pointer. Mark the center point between the two marks on the crankshaft pulley and remove the other two marks. 1. IDLER GEAR 2. CRANKSHAFT GEAR 3. CAMSHAFT GEAR
4. GEAR FOR FUEL INJECTION PUMP 5. DRIVE GEAR FOR AIR COMPRESSOR
FIGURE 101. ALIGNMENT OF THE TIMING MARKS
1.162 HOW TO SET NUMBER 1 PISTON TO TDC ON THE COMPRESSION STROKE Special Tools: Valve spring compressor Stud adaptor for valve spring compressor Capscrew adaptor for valve spring compressor 1. Fasten a temporary pointer to the timing case cover so that its tip is near the outer edge of the crankshaft pulley. 2. Remove the valve cover over the Number 1 piston. 3. Turn the crankshaft in a clockwise direction until the push rod for the rear cylinder just begins to push on the rocker arm for the inlet valve for the Number 6 cylinder. 4. Remove the snap ring from the front of the rocker arm shaft. Loosen the capscrews from the first two brackets of the rocker arm shaft. Remove the rocker arm for the first inlet valve from the rocker arm shaft. Tighten the nuts on the first two brackets of the rocker arm shaft. 5. Use the valve spring compressor and adaptor to remove the valve springs from the first inlet valve. 6. Make sure that the valve will be held in its valve guide by the top of the piston. If the piston is not at approximately TDC to hold the valve, hold the valve so that it does not drop into the cylinder. Rotate the crankshaft so that the piston will hold the valve in position.
8. Turn the crankshaft approximately 45 degrees counter–clockwise and then clockwise until the mark on the crankshaft pulley is aligned with the temporary pointer. Number 1 piston is now at TDC.
1.163 CHECK THE VALVE TIMING 1. Open the cover for the timing pointer on the flywheel housing. 2. Remove the valve covers and gaskets. 3. Turn the crankshaft clockwise until the inlet valve for the Number 6 cylinder is just beginning to open and the exhaust valve is just closing. 4. Adjust the valve clearance on the inlet valve of number 1 cylinder to 0.89 mm (0.035 in). 5. Turn the crankshaft clockwise until the clearance between the rocker arm and the valve stem just begins to be removed. [A 0.13 mm (0.005 in) spacer gauge will began to tighten in the space between the rocker arm and the valve stem.] Check if the “V1” mark on the flywheel is now aligned with the timing pointer in the flywheel housing. 6. If the “V1” mark on the flywheel is not aligned with the timing pointer in the flywheel housing, either the timing gears are not aligned correctly or the procedure to find TDC of Number 1 piston was not correct. 7. Turn the crankshaft clockwise until the inlet valve of the rear cylinder is fully open. Adjust the valve clearance on the inlet valve of number 1 cylinder to 0.25 mm (0.010 in). 8. Install the valve cover. See ¶ 1.8 Valve Cover, Installation. 9. Close the cover for the timing pointer on the flywheel housing. 71
1.164 TIMING, FUEL INJECTION PUMP 1. The timing position for the fuel injection pump is on a data plate on the right–hand side of the engine.
5. Check that the timing pointer is in the center of the hole for the timing pointer location device. See FIGURE 104.
2. Put the stop lever in the NO FUEL position. Remove the valve cover over the Number 1 piston. 3. Open the cover plate from the timing pointer on the lower right–hand side of the flywheel housing. See FIGURE 102. Turn the crankshaft in the direction of engine rotation until the timing number on the flywheel aligns with the pointer in the flywheel cover. Use the number on the flywheel that is the same as the number on the data plate.
1. POSITION OF TIMING POINTER
FIGURE 104. POSITION OF TIMING POINTER
6. Install the timing pointer location device so that the end with the larger slot engages the timing pointer. See FIGURE 105. If the timing is correct, the timing pointer location device will engage the timing pointer. 1. COVER PLATE
FIGURE 102. TIMING POINTER
7. If the timing is not correct, the access cover must be removed from the front of the engine. See FIGURE 106.
4. Remove the cap and pull the timing pointer location device. See FIGURE 103.
1. CAP 2. TIMING POINTER LOCATION DEVICE
FIGURE 103. TIMING POINTER LOCATION DEVICE 72
1. TIMING POINTER LOCATION DEVICE
FIGURE 105. TIMING POINTER LOCATION DEVICE
FIGURE 107. GEAR FOR THE FUEL INJECTION PUMP 11. If the timing is correct, install the timing pointer location device in its original position and install the cap. See FIGURE 108.
1. ACCESS COVER
FIGURE 106. ACCESS COVER 8. Loosen the four capscrews on the gear for the fuel injection pump so that the drive shaft of the fuel injection pump can be turned without turning the other parts of the engine. See FIGURE 107. Put a 30 mm wrench on the end of the drive shaft and turn the fuel injection pump until timing pointer location device engages the timing pointer. 9. Tighten the four capscrews to 45 N.m (33 lbf ft) and remove the timing pointer location device. 10. Turn the crankshaft of the engine in the direction opposite of its normal rotation approximately 60 degrees. Repeat the timing checks (Step 7 and Step 8). If the timing is not correct, repeat the steps to adjust the timing.
1. TIMING POINTER LOCATION DEVICE
FIGURE 108. TIMING POINTER LOCATION DEVICE 12. Install the access cover over the gear for the fuel injection pump. 13. Install the valve cover. See ¶ 1.8 Valve Cover, Installation. Put the stop lever in the RUN position. 14. Close the cover for the timing pointer on the flywheel housing.
73
ENGINE SPECIFICATIONS 1.165 Valve Assembly Inlet Valves Valve clearance, valve stem to rocker arm 0.254 mm (0.010 in) Angle of valve face
30°
Length under 529 to 583 N (119 to 131 lbf) load: 37.0 mm (1.457 in) Inlet Valve Springs – Inner Free length 73.4 mm (2.89 in) Length under 271 to 306 N (61 to 69 lbf) load:
Maximum change from flatness across valve face 0.038 mm (0.015 in)
32.8 mm (1.1.292 in)
Maximum clearance in valve guide 0.13 mm (0.005in)
1.166 Piston And Connecting Rods
Depth of valve head below face of cylinder head: – Production limit 0.025 to 0.33 mm (0.001 to 0.013 in)
Pistons
Seal arrangement
No seal installed
Type: Controlled expansion, top ring groove has insert, anodized top face. Compression height
Exhaust Valves Valve clearance, valve stem to rocker arm 0.508 mm (0.020 in) Angle of valve face
45°
Maximum change from flatness across valve face 0.038 mm (0.015 in) Maximum clearance in valve guide 0.15 mm (0.006 in) Depth of valve head below face of cylinder head: – Production limit 0.025 to 0.33 mm (0.001 to 0.013 in) Seal arrangement
Seal installed on valve guide
Exhaust Valve Springs – Outer Free length 86.6 mm (3.41 in) Length under 636 to 689 N (143 to 155 lbf) load: 37.0 mm (1.457 in) Exhaust Valve Springs – Inner Free length 85.9 mm (3.38 in) Length under 364 to 396 N (82 to 89 lbf) load: 32.8 mm (1.292 in) Inlet Valve Springs – Outer Free length 77.9 mm (3.07 in)
74
98.81 to 98.93 mm (3.890 to 3.895 in)
Height of piston below top face of engine block at TDC 0.30 to 0.38 mm (0.012 to 0.015 in) Maximum limit for machining top of piston 0.127 mm (0.005 in)
Piston Rings Top compression ring
15_ wedge shape, molybdenum inlay, top and bottom faces are the same.
Gap of top ring
0.406 to 0.610 mm (0.016 to 0.024 in)
Second compression ring Chrome plate with chamfer on top inner face. One face has “TOP” mark for installation. Gap of second ring
0.406 to 0.610 mm (0.016 to 0.024 in)
Oil ring
Coil spring back–up, chromium face
Gap of oil control ring
0.406 to 0.660 mm (0.016 to 0.026 in)
Connecting Rods
1.168 Timing Case And Drive Assembly Camshaft Bearing clearances
Alignment + 0.025 mm _ (+_ 0.010 in)
127 mm (5 in)
127 mm (5 in)
Alignment _ 0.025 mm + (+_ 0.010 in)
0.127 to 0.177 mm (0.005 to 0.007 in)
Axial movement limit
0.152 to 0.40 mm (0.006 to 0.016 in)
Gear clearance (all)
0.051 to 0.152 mm (0.002 to 0.006 in)
Idler gear, axial movement limit 0.051 to 0.20 mm (0.002 to 0.008 in) The large and small bores in the connecting rod must be square and parallel with each other within the limits of + 0.25 mm (0.010 in). The measurement is made at 127 mm (5.0 in) on each side of the axis of the connecting rod. If the bushing is installed in the small end of the connecting rod, the limits are reduced to + 0.06 mm (0.0025 in).
FIGURE 109. CHECK THE ALIGNMENT OF THE CONNECTING ROD
1.169 Engine Block Assembly Cylinder Liners Top of flange above face of engine block 0.08 to 0.13 mm (0.003 to 0.005 in) Maximum variation of flanges above face of engine block 0.025 mm (0.001 in)
1.170 Turbocharger Connecting Rod Bearings Bearing clearance 0.063 to 0.100 mm (0.0025 to 0.004 in) Bearing side clearance 0.076 to 0.200 mm (0.003 to 0.008 in) Available undersize bearings: –0.25 mm (–0.010 in) –0.51 mm (–0.020 in) –0.76 mm (–0.030 in)
1.167 Crankshaft Assembly
Holset H2C
1.171 Lubrication System Oil Pump Type
Gear clearance, crankshaft drive gear to oil pump gear 0.102 to 0.254 mm (0.004 to 0.010 in) Available shims to adjust gear clearance 0.2 and 0.3 mm (0.008 and 0.012 in) Axial movement limit
Crankshaft Axial movement
0.127 to 0.33 mm (0.005 to 0.013 in)
Bearing clearance (main bearings 0.088 to 0.0139 mm (0.0035 to 0.0055 in) Bore clearance, crankshaft gear 0.013 to 0.038 mm (0.0005 to 0.0015 in) Available undersize bearings: –0.25 mm (–0.010 in) –0.51 mm (–0.020 in) –0.76 mm (–0.030 in) Crankshaft Thrust Washers Position each side of the center main bearing
gear driven
0.127 to 0.165 mm (0.005 to 0.006 in)
Relief Valve Length of spring, not installed 80.77 mm (3.18 in) Length of spring, installed 65.50 mm (2.58 in) Oil Filter Type
Full flow, canister (2)
1.172 Fuel System Fuel Injection Pump
Bosch S3000
Fuel Injectors
Bosch
Fuel Pump
Bosch, single acting
Method of drive
Eccentric on drive shaft of the fuel injection pump 75
Fuel Filter
Primary – water separator Secondary – single element canister
1.173 Cooling System Water Pump Type
centrifugal, belt drive
Interference fit, shaft to hub 0.0036 to 0.055 mm (0.00145 to 0.0022 in) Thermostat Type
Triple, wax pellet, by–pass blanking
Leading valve to open: 77 to 79°C (171 to 174°F) Last valve begins to open: 81 to 83°C (178 to 181°F) All valves fully open: 93 to 96°C (199 to 205°F) Operating speeds: Leading valve begins to open:
76
within 15 seconds Last valve begins to open: within 20 seconds All valves fully open: within 60 seconds All valves fully closed in cold water: 4 to 8 seconds
1.174 Flywheel And Housing Concentric variation (often called the “run–out”) less than 0.254 mm (0.010 in) total indicator reading.
1.175 Electrical Equipment Alternator Type Starter Motor Type
Butec A3024 with integral regulator, 24 V at 55 amps Butec LMS1A, 24 volts
1.176 Air Compressor Type
WABCO (Clayton Dewandre) 293 cc single cylinder
TORQUE SPECIFICATIONS TORQUE N.m lbf ft
DESCRIPTION Cylinder Head Assembly Capscrews, Cylinder head Fasteners, rocker arm brackets: Lock nuts, valve clearance adjustment Clamp bolts, injectors Injector sleeves Cap nuts, valve cover nuts, exhaust manifold
See 204 237 41 41 10.8 27 11 45
¶ 1.18 150 175 30 30 8.0 20 8.0 33
Connecting Rod Assemblies Nuts, connecting rods
217
160
Crankshaft Assembly Capscrews, 1, 3, and 6 main bearings Capscrews, 2 and 5 main bearings Capscrews, lateral to 1, 3, and 6 main bearings Nut, hub Capscrews, damper
217 272 95 949 41
160 200 70 700 30
Timing Case And Drive Assembly Capscrews, camshaft thrust plate Capscrews, camshaft gear
54 61
40 45
Turbocharger Nuts, “V” band
14
10
Oil Sump Insert for drain plug Plug, oil sump
325 115
240 85
Flywheel And Flywheel Housing Capscrews, flywheel to crankshaft Capscrews, flywheel housing to engine block
122 61
90 45
176 25 to 30
130 18 to 22
163 40 45 47
120 30 33 35
Initial Final
Air Compressor Nut for drive gear Capscrews, cylinder head Fuel System Nut, drive hub, fuel injection pump Capscrews, rear support mount Nuts for drive gear for fuel injection pump Nuts for flange of fuel injection pump
77
SPECIAL TOOLS The following list of tools was supplied by Perkins Engines (Shrewsbury) Limited. Contact Perkins Engines for information to purchase these tools. Perkins Engines (Shrewsbury) Limited Sentinel Works Shrewsbury, Shropshire SY1 4DP England Telephone: STD Code 0743/52262 FUEL SYSTEM TOOLS GA 5073 Pressure test kit
GA 5100 Slide hammer
GA 5100–11 Adapter
CYLINDER HEAD TOOLS GA 5000 Valve spring compressor
GA 5000–3 Valve spring compressor adapter
GA 5000–4 Valve spring compressor adapter
78
SPECIAL TOOLS CYLINDER HEAD TOOLS GA 5007 Valve guide remover
GA 5009 Valve face gauge
GA 5018 Valve guide replacer
GA 5019 Valve guide seal replacer
GA 5100–12 Injector sleeve extractor GA 5164 Injector sleeve remover and replacer wrench GA 5165 Injector sleeve reamer and facing tool GA 5047 Cylinder head to crankcase bobbin remover
GA 5066 Cylinder head lifting bar
79
SPECIAL TOOLS CYLINDER HEAD TOOLS GA 5091 Valve seat replacing tool
GA 5101 Drive handle
GA 5101–8 Insert insertion tool (use with GA 5101)
CYLINDER BLOCK TOOLS GA 5101–4 Core plug replacer kit (use with GA 5101)
GA 5031 Piston crown checking gauge
GA 5033 Piston replacer sleeve
80
SPECIAL TOOLS CYLINDER BLOCK TOOLS GA 5035 Dial gauge and holder
GA 5035–1 Dial gauge and holder
GA 5037 Cylinder liner replacer and remover tool
GA 5038 Holder for cylinder liner recess cutter
GA 5038–1 Cylinder liner recess cutter
GA 5039 Piston ring pliers
GA 5040 Location ring
81
SPECIAL TOOLS CYLINDER BLOCK TOOLS GA 5054 Main bearing cap remover
GA 5061 Sump guide stud
GA 5063 Remover and replacer for bushing in small end of a connecting rod.
GA 5075 Internal bore gauge
82
SPECIAL TOOLS CRANKSHAFT AND FLYWHEEL TOOLS GA 5050 Flywheel guide stud
GA 5053 Crankshaft bearing remover
GA 5055 Wrench for crankshaft hub nut
GA 5067 Bracket for lifting flywheel
83
SPECIAL TOOLS GENERAL PURPOSE TOOLS GA 5071 Engine lifting beam
GA 5055 Wrench for crankshaft hub nut
GA 5090 Puller
GA 5090–1 Adapter bolts
GA 5099 Engine build stand assembly
84
TROUBLESHOOTING PROBLEM The engine will not start.
The engine rotates but will not start.
The engine does not idle smoothly.
The engine does not have normal power.
The engine uses too much fuel.
POSSIBLE CAUSE
PROCEDURE OR ACTION
1. Fuel tank is empty. 2. Starter does not operate. 3. Neutral start circuit does not operate correctly. 4. Engine has internal damage. 5. Fuel shut–off solenoid does not operate correctly. 6. Battery is not fully charged. 7. Battery cables dirty or loose.
1. Fill fuel tank. 2. Check starter and circuit. 3. Check wiring and switches.
1. Fuel tank is empty. 2. Fuel injector(s), or fuel injection pump does not operate correctly. 3. Cold start aid does not operate. 4. Fuel lines have a restriction. 5. Fuel shut–off solenoid does not operate correctly.
1. Fill fuel tank. 2. Clean or repair.
1. Air is in the fuel system. 2. Fuel injectors, or fuel injection pump does not operate correctly. 3. Fuel lines have a restriction. 4. Fuel filter has a restriction. 5. Water in the fuel system. 6. Valves are not adjusted correctly. 7. Compression pressure is too low.
1. Remove air. 2. Clean or repair.
1. Air filter has a restriction. 2. Fuel injectors, or fuel injection pump does not operate correctly. 3. Fuel lines have a restriction. 4. Fuel filter has a restriction. 5. Water in the fuel system. 6. Valves are not adjusted correctly. 7. Compression pressure is too low. 8. Valve springs are worn or broken. 9. Exhaust pipe has a restriction. 10.Turbocharger is dirty, or worn, or damaged.
1. Clean or install a new filter. 2. Clean or repair.
1. Air filter has a restriction. 2. Fuel injectors, or fuel injection pump does not operate correctly. 3. Valves are not adjusted correctly. 4. Compression pressure is too low. 5. Valve springs are worn or broken.
1. Clean or install a new filter. 2. Clean or repair.
4. Check and repair. 5. Check wiring and solenoid. 6. Charge the battery. 7. Clean and tighten battery terminals.
3. Check circuit for glow plugs. 4. Repair fuel lines. 5. Check wiring and solenoid.
3. 4. 5. 6. 7.
Repair fuel lines. Install a new filter element. Drain water from filter. Adjust the valves. Repair engine.
3. Repair fuel lines. 4. Install a new filter element. 5. Drain water from filter. 6. Adjust the valves. 7. Repair engine. 8. Replace springs. 9. Clean exhaust pipe. 10.Repair turbocharger.
3. Adjust the valves. 4. Repair engine. 5. Replace springs.
85
TROUBLESHOOTING PROBLEM Engine oil pressure is too low.
The engine uses too much oil.
POSSIBLE CAUSE
PROCEDURE OR ACTION
1. Too much oil in the engine, or the wrong type of oil. 2. Oil filter has a restriction. 3. Oil strainer has a restriction. 4. Oil pump is worn. 5. Rocker arm bushings are worn. 6. Camshaft or bearings are worn. 7. Crankshaft or bearings are worn.
1. Use correct amount and type of oil.
1. Too much oil in the engine, or the wrong type of oil. 2. Oil leaks from seals or gaskets. 3. Seals for valve guides are worn. 4. Piston rings are worn or broken. 5. Cylinder liners are worn or damaged. 6. Oil lines or oil filter is loose.
1. Use correct amount and type of oil.
2. 3. 4. 5. 6. 7
Install a new oil filter. Clean oil strainer. Install a new oil pump. Install new bushings. Install a new camshaft or bearings. Install a new crankshaft or bearings.
2. 3. 4. 5.
Install new seals or gaskets. Install new valve guide seals. Install new piston rings. Install new cylinder liners. Repair engine. 6. Check for loose fittings or filter.
The engine operating temper- 1. Coolant level is too low. ature is too high. 2. Drive belt for fan and water pump is loose or missing. 3. Radiator has a restriction. 4. Water pump is worn or damaged. 5. Cylinder head gasket leaks. 6. Thermostat does not operate. 7. Leaks in the cooling system. 8. Fuel injection timing is not correct.
1. Check coolant level. 2. Install drive belt and adjust tension. 3. 4. 5. 6. 7. 8.
Clean or repair radiator. Install a new water pump. Install a new head gasket. Install a new thermostat. Repair leaks. Check and adjust timing.
White or blue exhaust smoke. 1. 2. 3. 4. 5. 6.
1. 2. 3. 4. 5. 6.
Drain water at fuel filter. Check and adjust timing. Repair engine. Install new valve guide seals. Install new piston rings. Install new cylinder liners. Repair engine
Black exhaust smoke.
86
There is water in the fuel. Fuel injection timing is not correct. Compression pressure is too low. Seals for valve guides are worn. Piston rings are worn or broken. Cylinder liners are worn or damaged.
1. Air filter has a restriction. 2. Fuel injector is dirty or pressure is too low 3. Fuel injection timing is not correct.
1. Clean or install a new filter. 2. Clean and adjust injectors. 3. Check and adjust timing.
87