![Trans Smart Sterilizer - Service Manual [PDF]](https://pdfs.asia/img/200x200/trans-smart-sterilizer-service-manual.jpg)
4 0 755 KB
SMART / SMART S MODEL STEAM STERILIZER SERVICE MANUAL
SERVICE MANUAL FOR STEAM STERILIZER
Rev.Date / No : 20.02.2013 /2 Item No : SMART / SMART-S - SE01
1/20
SMART / SMART S MODEL STEAM STERILIZER SERVICE MANUAL CONTENT PART 1. 1.1. 1.2. 1.3. 1.4. PART 2. 2.1 2.1.1 2.1.2 2.1.2-A 2.1.2-B 2.1.2-C 2.1.2-D 2.2 2.2.1 2.3. 2.3.1 2.3.2 2.3.3 2.3.4 2.3.5 2.4 2.4.1 2.4.2 2.5 2.5.1 2.5.2 2.5.2-1 2.6 2.6.1 2.7 2.7.1 2.7.2 2.7.2.A 2.7.2.B 2.7.2.C 2.7.2.D 2.7.2.E 2.7.2.F
PRESENTATION INTRODUCTION OF COMPANY RESPONSIBILITY OF MANUFACTURER CLASSIFICATION LIFE TIME OF PRODUCT STERILIZER DEVICE AND PARTS CHAMBER CAPACITIES TECHNICAL INFORMATION CHAMBER OPERATION RUST DEFECTS ON CHAMBER SURFACE AND CLEANING METHOD CHAMBER STEAM LINE CHAMBER VACUUM LINE CHAMBER SIDE CONNECTIONS JACKET TECHNICAL INFORMATION GENERATOR TECHNICAL INFORMATION HEATERS HEATERS CHECK FUNCTION LIME IN THE GENERATOR HEATERS REPLACEMENT FRAME TECHNICAL INFORMATION FRAME CLEANLINESS DOOR TECHNICAL INFORMATION DOOR WEIGHTS DOOR BOTTOM AND TOP SWITCHES SHELF TECHNICAL INFORMATION WATER CONNECTION MAIN PARTS OF WATER CONNECTIONS WARNING ABOUT SANITARY INSTALLATIONS FILTERS SOLONOID VALVES CHECK VALVES SAFETY VENT STEAM SEPERATOR (OPTIONAL) STEAM GENERATOR OUTLET
PAGE 3 3 3 3 3 4 4 4 5 5 5 6 6 7 7 7 7 7 8 8 9 9 9 10 10 10 10 10 10 10 11 11 11 11 12 12 12 12 13
2.7.2.G
VACUUM PUMP
13
2.7.2.G.1
VACUUM PUMP REPLACEMENT
14
2.7.2.H
VACUUM LINE AIR INLET
14
2.7.2.I
TEMPERATURE AND PRESSURE SENSORS
15
2.7.2.J
MANOMETERS
15
2.7.2.K
AIR FILTER
15
2.7.2.L
WATER LEVEL BUOYS
16
2.7.2.L.1 2.7.2.M 2.7.2.N 2.7.2.O 2.7.2.P 2.7.2.P.1 2.7.2.R
DISMANTLING OF WATER LEVEL BUOY REPLACEMENT OF TROLLEY WHEELS AIR REGULATOR AIR CONNECTION POINTS WATER MOTOR WATER MOTOR REPLACEMENT AIR TUBE AND CONNECTIONS
16 17 17 17 18 18 19
EX.1
SAMPLE MAINTENANCE FORM
20
Rev.Date / No : 20.02.2013 /2 Item No : SMART / SMART-S - SE01
2/20
SMART / SMART S MODEL STEAM STERILIZER SERVICE MANUAL 1.
PRESENTATION
1.1.
INTRODUCTION OF COMPANY
Our company was incorporated in 1984, and has been one of the leading companies in Medical Equipment Industry for twenty (20) years. The company has ISO 9001 : 2008, ISO 13485 : 2003 and CE Sign certifications from the beginning of 2005 year. Trans Medikal has already completed all Product Standards relating to the Steam Sterilizer it manufactures : Directive on Pressure Equipment (97/23/EEC) – Approval of PED Documentation, Electromagnetic Compatibility Tests (EN 60601-1-2), Electrical Safety Tests (EN 60601-1), EN 285 : 2010 New Design and plans to proceed with Standard Product Manufacturing from 2005 after completing CE Sign Certification Process. Please contact us at the following address, phone and e-mail for further detailed information on our company and products. PRODUCTION FACILITY ADDRESS
TRANS MEDİKAL ALETLER SAN. VE TİC. A.Ş. Adress : Cevat Dündar Cad. 65.Sok.No:1 Ostim-Ankara/TURKEY Phone : +90 (0312) 385 77 20-385 77 36 Fax : +90(0312) 385 71 00 Web : www.transmedikal.com e-mail : [email protected] 1.2.
RESPONSIBILITY OF MANUFACTURER
Trans Medikal Aletler A.Ş. is defined as a manufacturer in this book.Company carries out renewal, replacement, repair – maintenance and calibration of all devices and equipment it supplies and manufactures, through its authorized personnel or authorized agent, by using equipment it declares to be suitable for the products and in accordance with gas and electrical installations, air circulation and temperature – applicable to the location where such products are used. Our company is responsible for reliability, safety and performance of the devices. 1.3.
CLASSIFICATION
Trans Brand Elite Model Steam Sterilizer is classified as Class II b equipment pursuant to Directive on Medical Devices MDD (93/42/EEC), ANNEX – IX Requirement – 15. 1.4.
LIFETIME OF PRODUCT The life cycle of the Steam Sterilizer (Autoclave) is 15 (fifteen) years, as determined by the Medical Device Directive (MDD-93/42/EEC) . Never use the steam sterilizer before the electrical performance and mechanical performance tests are carried out by Trans Medical Co. Inc. authorized technical personnel!
Rev.Date / No : 20.02.2013 /2 Item No : SMART / SMART-S - SE01
3/20
SMART / SMART S MODEL STEAM STERILIZER SERVICE MANUAL 2. 2.1
STERILIZER DEVICE AND PARTS CHAMBER CAPACITIES
WIDTH (cm)
HEIGHT (cm)
DEPTH (cm)
VOLUME (lt)
SINGLE DOOR MODEL
50 67 67 67 67 67 67
50 67 67 67 67 67 67
54 74,2 64 94 124 154 184
180 330 285 420 555 670 825
SMART-130 SMART-330 SMART-285 SMART-420 SMART-555 SMART-670 SMART-825
2.1.1 • • • • •
DOUBLE DOOR MODEL
SMART/S SMART/S SMART/S SMART/S SMART/S
-285 -420 -555 -670 -825
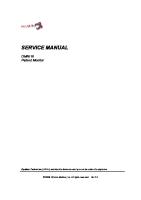
(Boiler Dimensions) Technical Information Chamber is produced of AISI 316L stainless steel (X2CrNiMo17-12-2) Sheet thickness: 6 mm. Chamber’s inner surface is subjected to increase rust protection and Chamber’s life is increased thereby. Chamber operating pressure: 2.2 Bar. Chamber safety valve releasing pressure: 3 Bar.
Emniyet Ventili Sıcaklık Sensörü Basınç Sensörü Test Bağlantısı Test Bağlantısı Test Connection Vacuum Line Boiler Steam Distributor parts
(Pictures are Given as Samples)
2.1.2 Chamber Operation: 2.1.2.A. Rust Defects on chamber Surface and Cleaning Method: AISI 316L as chamber material, keep the rust formation on the chamber surface at the minimum. But it does not mean that the chamber will never form any rust. Not using the chamber as recommended may cause rust formation. Reasons for the formation of rust are given below under SYMPTOM-CAUSE-SOLUTION headings
Rev.Date / No : 20.02.2013 /2 Item No : SMART / SMART-S - SE01
4/20
SMART / SMART S MODEL STEAM STERILIZER SERVICE MANUAL SYMPTOM
CAUSE Contacting internal surface of chamber with rust forming materials
Appearance of Rust on chamber Surface
Placing material into the chamber without packaging
Cleaning the boiler with scratchy sponges or brushes Cleaning the inner surface of chamber with acid, salt and rust forming solutions
SOLUTION Check to make sure whether or not there are any foreign materials forming rust at the beginning and end of each sterilization process. Sterilization of materials in sterilization kits and bundles, transparent on one side and paper on the other Cleaning of boiler surface with a clean and moist cloth after the boiled cools down
Chamber Surface should never be cleaned with acid, salt or rust forming solutions. 2.1.2.B. Chamber Steam Line There is one Steam access to the chamber. As there is an immediate steam entry into the boiler during sterilization, the injected steam into the chamber inside is distributed inside the chamber by hitting a steam distributor. Symptom that should be paid attention to in the steam line are given below under SYMPTOM-CAUSE-SOLUTION headings
SYMPTOM
Insufficient Steam
Non-rotation of Indicators During Sterilization
CAUSE Closing of steam manner whatsoever
line
in
any
Clogging of line by the material to be sterilized
Clogging of steam line and inability to complete sterilization due to insufficient steam
SOLUTION After the boiled cools down, the side of steam distributors overlooking the boiler is checked for any clogging in any manner. Prevent the opening of materials loaded for sterilization during the sterilization process After the boiled cools down, the side of steam distributors overlooking the boiler is checked for any clogging in any manner.
2.1.2.C. Chamber Vacuum Line Chamber Vacuum Line is the line provides vacuum during the chamber vacuuming process. Symptom that should be paid attention to in the vacuum line are given below under SYMPTOM CAUSE-SOLUTION headings:
Rev.Date / No : 20.02.2013 /2 Item No : SMART / SMART-S - SE01
5/20
SMART / SMART S MODEL STEAM STERILIZER SERVICE MANUAL SYMPTOM
CAUSE
SOLUTION Keep the vacuum Line open during Vacuum Line closed loading and after discharge*. Materials to be sterilized should be loaded on shelves or trolleys. Wet Material Bad loading Good loading of materials keep it not falling from the shelf or trolley during sterilization and clog the vacuum line *As the chamber inner surface may be hot, you should wait for the chamber to cool down an take measures against burning incidents. 2.1.2.D. Chamber Side Connections There is temperature measurement outlet, pressure measurement outlet and safety vents on the chamber. As these outlets are connected to the sensors used to measure the pressure and temperature in the chamber, they receive the information about measurements from here. SYMPTOM
CAUSE
Faulty reading of chamber inner temperature on the display
Temperature sensor defective
Faulty reading of chamber inner pressure on the screen
Non-functioning of safety vent in operative
Pressure sensor defective
Safety vent inlet clogged
SOLUTION check chamber inner temperature sensor outlet clogging Replace Temperature Sensor Check chamber inner pressure sensor outlet clogging Replace pressure Sensor Clean the access of vent to chamber
The parts of temperature sensor, pressure sensor and safety vent connected to the boiler should not be obstructed in any manner whatsoever. As the pressure sensor, temperature sensor and safety vent provide mechanical and electronic safety, they have a vital importance. Connections of the temperature sensor, pressure sensor, safety vent and test stoppers connected to the chamber should never be removed. If they are loosened, pressurized steam leakage may damage the device and injure the operator. Device performance will fall. 2.2. Jacket 2.2.1. Technical Information • • •
Material: AISI 316L (X2CrNiMo17-12-2) stainless steel. Sheet thickness is 3mm. Jacket is used to keep the temperature in the Sterilizer room fixed and prevent loss of temperature.
Rev.Date / No : 20.02.2013 /2 Item No : SMART / SMART-S - SE01
6/20
SMART / SMART S MODEL STEAM STERILIZER SERVICE MANUAL • •
Jacket surrounds the chamber from all sides.The jacket feeds the chamber with necessary steam to heat it and keeping in the target temperature during the sterilization period. Jacket operating pressure : 1.2 bars.
As the Jacket System is under the chamber insulation, there is no need for any maintenance by operators.
2.3. Generator 2.3.1. • • • •
Technical information Material: AISI 316L stainless steel (X2CrNiMo17-12-2). Sheet thickness: 3mm. Operating pressure: 2.5 bar. Generator safety vent releasing pressure: 4 bar.
As the Generator providing steam to the Sterilizer, always keep it operative.
As the generator is fed by water, feed water must be in quality to increase the life time of generator and sterilizer. Heaters used in the generator must be original. False heaters should never be used. 2.3.2. Heaters • • •
Dip-type muff-interlocked heaters. Heater Performance: 10Kw or 15 Kw (for each one) Quantity: depends on the generator capacity. Protective covers must be held over the heater ends.It must be re-mounted as soon as heater replacement completed or cover removal for any reason whatsoever.
Rev.Date / No : 20.02.2013 /2 Item No : SMART / SMART-S - SE01
7/20
SMART / SMART S MODEL STEAM STERILIZER SERVICE MANUAL 2.3.3. Heater checks function:
1.
This check made by Ohmmeter as measuring the heater ends.
2.
Before measurement, make sure that sterilizer does not operate, that is and switched off from the main switch.
3.
Make sure that the sterilizer cool before touch the heater elements.
4.
Before measurement, remove the heater end covers and check the heater resistance from 1a and 1b .
5.
Each heater ends are parallel. Function check by measuring the ends resistance. If no resistance value appears on Ohmmeter display this means that the heater is defective and it has to be replaced.
6.
If the measured resistance level appeared on Ohmmeter display is same for all ends and different from “0”, this means that heaters are active.
2.3.4. Lime In The Generator As the generator operates with water, the calcification inside generator may be occur depends on the water quality . Lime formation may be defect the generator. To prevent calcification the water quality used in the sterilizer should be good filtered and in conformity of the EN 285 standard. Specifications of the water to be used in the Sterilizer should be as below. Condensed Water Vaporization Remain ≤ 1,0 mg/kg Silica Oxide, SiO2 ≤ 0,1 mg/kg Iron ≤ 0,1 mg/kg Cadmium ≤ 0,005 mg/kg Lead ≤ 0,05 mg/kg Heavy metals other than Iron, Cadmium, Lead ≤ 0,1 mg/kg Chloride (Cl’) ≤ 0,1 mg/kg Phosphate (P2O5) ≤ 0,1 mg/kg Conductivity at 20oC ≤ 3 µs/cm pH value 5–7 Appearance Colorless,Clean Clear Hardness ≤ 0,02 mmol/l
Feed Water ≤ 10 mg/l ≤ 1 mg/l ≤ 0,2 mg/l ≤ 0,005 mg/l ≤ 0,05 mg/l ≤ 0,1 mg/l ≤ 2 mg/l ≤ 0,5 mg/l ≤ 15 µs/cm 5–7 Colorless,Clean Clear ≤ 0,02 mmol/l
(Water Values is Defined in EN 285 : 2010 Standard.) Rev.Date / No : 20.02.2013 /2 Item No : SMART / SMART-S - SE01
8/20
SMART / SMART S MODEL STEAM STERILIZER SERVICE MANUAL 2.3.5. Heaters Replacement 1.
Heater replacement should be carried out when the heater has calcified.
2.
If it is not necessary, heater should not be dismantled / mounted. In this case heater housing may be damaged and leakage may be happened from the generator.
3.
It should always be remembered that he generator is may be pressurized and hot.
4.
Before replacement the heater, make sure that the Sterilizer is switched off and disconnected from the main power cable.
5.
If the device has just finished operation, it is hot and may burn.
6.
When making sure that the electricity connection of the device has been switched off , wait the chamber and generator to cool down. The generator pressure manometer must drop down to reach “0 bar” value.
7.
When the Sterilizer cools down, open the global valve under the generator and make sure that the water inside generator completely discharged into the drain outlet.
8.
Heater dismantling procedure must be start after make sure that; sterilizer main power connection has been removed, chamber pressure filled down to “0 bar”, sterilizer cooled down and the water inside generator has been completely discharged.
9.
Before dismantling the heater, heater ends covers must be removed carefully without damaging the connections on their ends.
10.
Replace the damage heater with new one.
11.
After squeezing the heater, power connections should be connected correctly. Heater covers should be fixed on the ends.
12.
This procedure should be repeated for any heater you wish to remove.
2.4. Frame 2.4.1 Technical Information • •
Material: Stainless steel AISI 304 with 1mm sheet. There is a nylon tape on the frame and this tape should be removed before the sterilizer start running. This tape protect the sheet against scratches and impacts. The iron sheet of the sterilizer outside prevents the operator from any burning risks as the device surface is hot than the room temperature. Make sure that all outside covers have been mounted before operating the sterilizer.
Foreign substances should never be inside the frame and never be left there. This may defect the device from function and help unwanted situations to occur.
Rev.Date / No : 20.02.2013 /2 Item No : SMART / SMART-S - SE01
9/20
SMART / SMART S MODEL STEAM STERILIZER SERVICE MANUAL
2.4.2. Frame Cleaning The frame out surface should be cleaned with a lightly moist cloth leaving no wetness on the frame. 2.5. Door 2.5.1. Technical Information Material: Stainless steel AISI 316L (X2CrNiMo17-12-2).
Check function of the door “ready” sensor in case of the door ready massage do not appear on the display during the sterilizer switched on.
2.5.2. Door Weights • •
Weights called as counterweights are used during lifting and descending the door. The door should be carefully attached to the weights and should be attached through several points to ensure they will not fall down by accident.
2.5.2.1 Door Bottom And Top Switches Bottom and top movement limits of the door are set by the bottom and top limit switches. Upon contact of the door to the bottom limit or the upper limit, pressurized air within the piston is interrupted and the door movement halts. In the event that the door does not contact with the upper limit switch at the top, then you will not be able to see the door ready phrase and sterilization procedure does not start. If you are not able to see the door ready warning on the screen where you check sterilization, then you have to make sure whether the door upper limit switch closes or not. 2.6. Shelf (accessory) 2.6.1. Technical Information: Material: Stainless steel AISI 304. Shelves, are given optionally and used to loading the sterilizer. Shelves must be used to load the sterilizer. Loads to be placed inside the chamber should never be placed randomly and should not be in contact with the chamber surface. Sterilizer chamber operating volume should never be exceeded.
Shelves should never be cleaned using salt or rust forming solutions. Cleaning should be done with a lightly moist cloth leaving no wetness on the surface.
Rev.Date / No : 20.02.2013 /2 Item No : SMART / SMART-S - SE01
10/20
SMART / SMART S MODEL STEAM STERILIZER SERVICE MANUAL
At the end of the Sterilization program, as the shelf inside the sterilizer will be hot, sterilized materials should be discharged carefully to prevent any burning.
2.7. WATER CONNECTIONS: Material: Brass as copper alloy, stainless steel 304 and copper. In case of a water/steam leakage, the leakage part should be dismantle and good tefloned before re-fixing” When replacing any water connection parts, you must always apply an appropriate Teflon type part of the installation part and squeeze. If you do not good squeeze, leakages will be inevitable. 2.7.1. Main Parts of Water Connections: 2.7.1.a.
Vacuum Pump
2.7.1.b.
Vacuum Pump discharge – Drainage
2.7.1.c.
Chamber drainage
2.7.1.d.
Main outlet
2.7.1.e.
Condensed water collection line
2.7.1.f.
Generator steam distribution line
2.7.1.g.
Chamber-Jacket steam distribution line
2.7.1.h.
Air distribution line
2.7.2. Warnings About Sanitary Installations 2.7.2.A. Filters (Inside Water Connections) There are two filters in the water connections, one filter is in line between chamber and the vacuum pump, the second filter is in the chamber steam inlet. Filters are used to collect any possible dirt and sediment in pipes. Filters are cleanable and should be regularly dismantled and cleaned every 3 months. Filter Cleaning (Dismantling and the dismantling procedure); •
Before dismantling the filters, make sure that the sterilizer switched off and disconnect from main power cable.
•
Make sure that the water source which the sterilizer is connected is closed.
•
As the sterilizer may be hot, wait to cool down .
•
The operating principle of filters is, cutting water flow inside the pipe through angular manner and collects the accumulated sediment in the wire filter.
•
Filters composed of three pieces. Main body, wire filter and stopper.
Rev.Date / No : 20.02.2013 /2 Item No : SMART / SMART-S - SE01
11/20
SMART / SMART S MODEL STEAM STERILIZER SERVICE MANUAL •
To clean the filter holders, dismantle the topper, remove and clean the wire filter, and remount the stopper.
•
No need to dismantle the whole water connections to clean the filters. But in case any broken, crack etc. in the filters or in the pipes the filter has to be completely dismantled and replaced.
2.7.2.B. Solenoid Valves •
Solenoid Valves function is to control the steam flow in the pipes.
•
Solenoid Valves instructed from the electronic circuits.
•
Valves switching on/off is supported by signals from the electronic circuit
•
The electrical connection to Solenoid valve is mounted on top of the valve.
2.7.2.C. Check Valves •
Check valves are mechanically limiting the air flow inside the system.
•
Check valves, no need any electrical or pneumatic connections.
•
Check valves composed from three pieces; Main body, Check valve clamp and stopper
•
Dismantling the check valve is made by dismantling its stopper and replacing the check valve clamp just as in the dirt holders.
•
In the case of the check valve is not operating like leakage or cracks etc., the check valve has to be replaced.
2.7.2.D. Safety Vent There are three safety vent in the system. Safety vent is the most important mechanical safety part installed on the Sterilizer. It is forbidden to replace, dismantle and change the settings of safety parts in any manner whatsoever. TRANS MEDİKAL accepts no responsibility for any damages in the sterilizer or injuries to persons arising to act contrary to this instruction. 2.7.2.E. Steam Separator (optional) •
Steam Separator is to increase the density of steam taken from the Steam Generator
• •
The steam condensate in the Sterilizers should be not less than % 95 saturated steam. Steam separator includes three connection points o
Steam inlet
o
Steam outlet
o
Condensed water outlet
Rev.Date / No : 20.02.2013 /2 Item No : SMART / SMART-S - SE01
12/20
SMART / SMART S MODEL STEAM STERILIZER SERVICE MANUAL
The steam circulates inside the steam separator; the Steam separator is not isolated and may be too hot. Keep away to prevent burning risks.
2.7.2.F. Steam Generator Outlet •
There is one ball valve under the Steam Generator outlet.
•
The main function of the ball valve is to discharge the water or steam from the Generator. Moreover, it should keep away from this outlet to prevent burning risks.
•
Another function of the ball valve is to used during the generator cleaning.
•
To clean the Steam generator, the ball valve should be opened during the sterilizer is running. (The pressure inside generator should be 3.5 bars). Once open the ball valve is opened, the steam inside the generator will come out quickly taking out all of the sediments, lees and dirt.
2.7.2.G. Vacuum Pump Vacuum pump is important part of the Sterilizer and it is used for vacuum and drying stages and to release the door seal. Vacuum pump includes three connection points; • • •
Suction line Discharge line Water inlet line
Vacuum pump has no spare parts for replacement, and it should be completely replaced in case of pump failure. As the pump operating vibrantly, it should be fixed over vibration absorbers. CAUTION: If the Sterilizer did not operated for a log time (more that 3 weeks), the Vacuum Pump (VP) may be does not operate in the first starting and becomes as locked. Before the first staring of the sterilizer, the following steps must be done to make sure that the VP is operative. -Remove the pack side cover of VP by dismantling the 4 screws. - Revolve the fan under cover by hand. If it is revolving left and right it means no problem. If it is not revolving by hand, you have to remove the fan and revolve softly the middle spindle by monkey wrench to make sure that it is unlocked. - Mount the fan and the fan cover and operate the VP safely.
If the sterilizer did not operated for a log time and switched on without control the VP this may be a cause of the irreparable failures in the VP.
Rev.Date / No : 20.02.2013 /2 Item No : SMART / SMART-S - SE01
13/20
SMART / SMART S MODEL STEAM STERILIZER SERVICE MANUAL 2.7.2 G.1 Vacuum Pump Replacement; •
Switch off the sterilizer from the main power connection.
•
Switch off the water connections.
•
Make sure that the pump is cool.
•
Disconnect the pump from the electrical source.
•
Remove the water connection in front of the Vacuum
•
pump, remove the discharge and suction lines on the pump.
•
After disconnecting the vacuum pump from electricity and water connections, remove the pump from main body of the sterilizer by loosening the loaf from plastic wedges connected to the frame.
•
For re-mounting the Vacuum pump, it should be reverse the steps above.
•
Before re-mounting the vacuum pump, it should be switched off the sterilizer form the water and power sources.
•
Vacuum pump should be placed on plastic wedges and the pump’s loaves should be squeezed.
•
If the vacuum pump mounted without vibration absorbers, it will be run with high vibrations and high noise which may be damages to the pump.
•
Suction, Drain and water connections in the sterilizer should be fixed.
•
Electrical connections should be done. Close the main electrical control panel’s cover .
•
Switch the sterilizer on.
2.7.2 H. Vacuum Line Air Inlet •
There is an air inlet point on the vacuum line.
•
The purpose of this air inlet valve is to ensure silent operation of vacuum pump and increase the life of vacuum motor.
•
When the vacuum motor finds no air to suck, it makes suction through this valve and continues its operation without any difficulty.
•
This valve is always in turned down (not fully turned off) made to ensure that the vacuum motor will be able to carry function perfectly. If this valve is open, air from that valve is sucked instead of the steam that the vacuum motor has to suck from the cell. Moreover, the cover washer may not be fully vacuumed.
• •
If the Vacuum motor functions in a different tone as being forced other than its normal operation tone, you have to make sure that it will suck some air from the valve in order to ease the vacuum motor.
Rev.Date / No : 20.02.2013 /2 Item No : SMART / SMART-S - SE01
14/20
SMART / SMART S MODEL STEAM STERILIZER SERVICE MANUAL 2.7.2.I. Temperature and Pressure Sensors Temperature and pressure sensors fixed on the points on the Sterilizer which allowing the Sterilization procedures to be carried out. Moreover, these temperature and pressure sensors also support the sterilizer more electrical safety. • • • • •
Chamber pressure sensor Jacket pressure sensor Generator pressure sensor Seal pressure sensor Chamber temperature sensor
All sensor connections material is copper pipes. If there is any leakage in the connections of copper pipe, the connection should be squeeze correctly. There is no need for any leakage-preventing tape (conical connection prevents the leakage). It is forbidden to replace, dismantle and change the settings of safety parts in any manner whatsoever. TRANS MEDİKAL accepts no responsibility for any damages in the sterilizer or injuries to persons arising to act contrary to this instruction. 2.7.2.J. Manometers Manometers function is to indicate the pressure values. There are 4 manometers in the Sterilizer • • • •
Generator pressure manometer Cell pressure manometer Chamber pressure manometer Seal pressure manometer
Manometers, placed on the front of the sterilizer to be easily visible. Manometers indicate the pressure information which measured from copper pipes through the pressure sensor. If there is any leakage, copper pipes should be squeezed.
Manometer connections are made with copper pipes. This pipes are hot when the sterilizer is working.
2.7.2.K. Air Filter Air filter is to remove the air from the chamber after the last stage of Sterilization process. Air filter permeability: 0,3 µm.
Air Filter is a consumable and should be replaced every six months. Don’t operate the sterilizer without filter; this will be defect the sterilizer.
Rev.Date / No : 20.02.2013 /2 Item No : SMART / SMART-S - SE01
15/20
SMART / SMART S MODEL STEAM STERILIZER SERVICE MANUAL 2.7.2.L Water Level Buoys •
The generator houses 2 pieces of water level buoys.
•
Water level buoys are at the bottom and top levels.
•
Bottom level water buoy indicates that water has sufficiently filled and that the resistances have to start operating now. Whereas top level water buoys determines water to be taken in by the generator and interrupts water.
•
Water level buoys are squeezed by 8 pieces of M12x30 screws 8 pieces of loaves.
•
There is a clinging waster between the water level buoy and the flange. Clinging washer must be placed when changing water level. Screw and loaf connection must be squeezed.
2.7.2.L.1 Dismantling Of Water Level Buoy 1.
Water Level Buoy is dismantled when it is out of order or there is calcification.
2.
Water Level Buoy should not be dismantled at and mounted at any time. In this case water level buoy flange may be damaged and there may be leakage during the operation of the generator.
3.
It should always be remembered that he generator from which the water level buoy will be dismantled is a pressurized container and that there is pressure under normal temperature in it.
4.
Make sure that the Sterilizer is functioning before dismantling the Water Level Buoy
5.
If the Sterilizer is functioning, interrupt it and disconnect it from the main switch.
6.
If the device has just finished its operation, it is hot and may burn.
7.
After making sure that the electricity connection of the device has been interrupted, wait for the Sterilizer boiler and Generator to cool down. Wait for the reading at generator manometer to reach “0 bar” value.
8.
After making sure that the electricity connection of the device has been interrupted, wait for the Sterilizer boiler and Generator to cool down. Wait for the reading at generator manometer to reach “0 bar” value.
9.
After the Sterilizer and the Boiler cools down, open the global valve under the generator and make sure that the water in the generator is discharged in order to be able to give the water remaining in the generator to the outlet.
10.
Wait for about 10 minutes to make sure that water will be fully discharged, after which time water shall be have been discharged.
11.
Before dismantling the Water Level Buoy, the lid where the electrical connections of the buoy are located are opened and electrical connections are dismantled without causing any damage.
12.
4 loaves and screws connecting the Water Level Buoy to the flange are dismantled. New water level buoy is mounted.
Rev.Date / No : 20.02.2013 /2 Item No : SMART / SMART-S - SE01
16/20
SMART / SMART S MODEL STEAM STERILIZER SERVICE MANUAL 13.
Clinging washer should never be forgotten when mounting a new water level.
14.
Water level generator’s screw and loaf connections are made. In the event hat the screws and loaves will be lost; you should never connect different quality screws or loaves instead, but ask for new ones.
2.7.2.M Replacement Of Trolley Wheels • • •
Trolley wheels are made as loaf screw connection. In the event of any failure on the wheels, the wheel must be replaced. 4 wheels must be functioning at all times. The trolley may turn upside down if used without any wheel and the load on top of it may damage the operator and the sterilizer.
2.7.2.N. Air Regulator •
Air regulator serves to adjust the air pressure entering into the washer canal.
•
Air regulator is serially connected on the air line.
•
Main parts of the air regulator are given below;
•
Air regulator water collection glass discharge unit: Used for discharging the water to accumulate in the water collection glass of air regulator. Water is discharged by pressing on the discharge unit from below.
•
Air regulator water collection glass: The purpose of air regulator water collection glass is to collect the water that has condensed and accumulated in the glass. If the air regulator water collection glass cracks, it may be easily dismantled under the body and replaced.
•
Air regulator body is serially (in arrow direction) connected to the downstream line of flow. An appropriate impermeability tape is used to ensure that there will be no leakage in the connection.
•
Air regulator adjustment valve is used to adjust the required pressure valued at the outlet of air regulator.
•
Air regulator adjustment valve lock ensures that the regulator will be fixed at the adjusted outlet pressure. They are locked by a button and the valve becomes non-rotary.
•
Air regulator manometer is used to protect the adjusted pressure value.
2.7.2.O. Air Connection Points •
The sterilizer has one piece of air connection point.
•
The air connection point provides air to the elements used in the device. (to Solenoid valves and to the back of cover washer to act as cover inflator) Air coming to the air connection point must be between 5-7 bars.
• •
Air connection is provided from the air line in the area where it will be installed, if any, and from the pressured air compressor supplied with the Sterilizer if not.
Rev.Date / No : 20.02.2013 /2 Item No : SMART / SMART-S - SE01
17/20
SMART / SMART S MODEL STEAM STERILIZER SERVICE MANUAL •
Air connection must be made using a flexible air hose and should be squeezed on both ends by clamps.
2.7.2.P. Water Motor The purpose in using water motors is to increase the pressure of city network water that has no sufficient water and take the water to wherever necessary in the system. There is water motor in the system; •
Motor providing water to the generator
•
Motor providing cooling water
•
Water motors have two connection points; • Water inlet point in front • Water outlet point on top
•
Water motor is connected to a vibration absorbing plastic plate surface and the frame with a screw loaf connection.
•
Water inlet of the water motor is a ½” pipe thread with thread connection.
•
Water connection can be made by a flexible hose.
2.7.2.P.1 Water Motor Replacement •
Make sure that the device is switched off on the main electrical switch.
•
Make sure that the valve of the network supplying water to the device is closed.
•
Electrical connections are dismantled from the electrical panel on top of the water motor.
•
Connection of the line coming to the device and the connection of the line from where the water goes out of the device is dismantled.
•
The loaf screw connection connecting the device to the frame is dismantled.
•
If the device is to be sent to a certain place, then it has to be properly packed and sent.
•
If the device has to be taken back and mounted, the procedure while dismantling is reversed.
•
Electricity connection of the sterilizer from the main switch is cut off.
• •
The device is fixed to the frame making sure that it will be under the loaf and screw connection and the absorbing plate. Device water inlet and outlets are connected.
•
Device connections are made from its own electrical panel.
•
Device is put into operation.
Rev.Date / No : 20.02.2013 /2 Item No : SMART / SMART-S - SE01
18/20
SMART / SMART S MODEL STEAM STERILIZER SERVICE MANUAL 2.7.2.R. Air Tube And Connections Air tube is the tube where the air from outside is stored and kept available for use in system requirements. Air tube distributes air to the entire system. In short, if the system is divided into two, being bottom and top; • •
Cover and solenoid valves at the bottom Air is supplied to solenoid valves.
There are air solenoids on the air tube end. Air solenoids control the lift and descent movements of the pneumatic piston in the system. There are air reducers together with the air solenoids. Air Reducers control the lift and descend movement speed of the cover and may be adjustable upon request. Air is transferred to the bottom and top part of the piston from the air solenoid connection with the help of the spiral air hose. Air transfer is made by connecting to the air end on the solenoid connection.
Rev.Date / No : 20.02.2013 /2 Item No : SMART / SMART-S - SE01
19/20
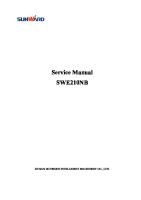
SMART / SMART S MODEL STEAM STERILIZER SERVICE MANUAL EX.1 SAMPLE MAINTENANCE FORM :
User Personel in Unit – Signature 1 2 3 4
: : : :
Water Reservoir Cleaning
User Personnel Control of the water in the reservoir
Revers osmos system control
WEEKLY
Heaters Control
FIVE DAYS If seal older , please change the seal Cleaning external surface of the device Leakage Control Of Installation
Vessel Pressure Values Control
Silicon Seal Maintenance, control
DAILY
-
Cleaning internal surface of the vessel.
Hospital Name Unit Serial No Start Date Finish Date
NameSurname
Signature
Day 1. 2. 3. 4. 5. 6. 7. 8. 9. 10. 11. 12. 13. 14. 15. EXPLANATIONS:…………………………………………………………………………………………………………………………………………
…………………………………………………………………………………………………………………………………………………………………… …………………………………………………………………………………………………………………………………………………………………… …………………………………………………………………………………………………………………………………………………………………… ………..………………………………………………………………………………………………………………………………………………………… Rev.Date / No : 20.02.2013 /2 Item No : SMART / SMART-S - SE01
20/20