![Yamaha Jupiter MX t135 Rextor Adjustable Cdi Manual en [PDF]](https://pdfs.asia/img/200x200/yamaha-jupiter-mx-t135-rextor-adjustable-cdi-manual-en.jpg)
5 0 635 KB
R EXTOR
®
precise your timing
PRODUCT DESCRIPTION The Rextor CDI has the advantages value comparing to the stock CDI or even with other after market brand. This CDI has been equipped with the Fan sensor and TPS sensor that bring “optimum performance” and “engine ability” at the same time. The fan sensor will inform the rider if there is any faulty in cooling system (the fan) of the motorbike. And the TPS sensor gives the correct ignition timing in any different load and condition. Equipped with the standard connector makes this CDI so easy to install just “Plug n Play”. First Initialization Every start up of the motor bike, the CDI has routine tasks to check the fan sensor and TPS sensor is in working condition. The fan will turn on for about 4 seconds to ensure the working condition. And the CDI will detect the position of the TPS sensor as well. Features
Pic. the front side of Rextor CDI 1. TPS (Throttle Position Sensor) Indicator The Rextor CDI has the ability to detect the origin of TPS position (manufacturer spec.). Thus it can be a reference for tuning the motorbike to get the optimum performance. The Green LED will light on during origin position (closed throttle).
DIGITAL ADJUSTABLE CDI for Jupiter MX
2. PPA (Pulser Position Adjuster) Indicator This feature makes adjustment of the ignition curve very easy to be done. The Red LED will light on as an indication of origin or stock ignition curve. 3. Early Warning System The Rextor CDI will inform to the rider if there is any faulty on temperature sensor (fan). The temperature indicator in the dashboard will start to blinking, so it will gives warning to avoid any further damage. 4. Multi Map Control System (3D Map) There are 30 maps (ignition curve) which simultaneously used and controlled by the TPS to drives the optimum performance in any different engine load and condition. Installation The Rextor CDI has equipped with the standard connector, so the installation process is very simple and fast just replace the stock CDI with the Rextor CDI. How to Setting the CDI 1. TPS (Advanced user) 1. Throttle in fully close condition. 2. Loosen the screw so TPS can move to right and left. 3. The Green LED will light on to indicate the origin TPS position. Tighten the screw. 4. The TPS is in origin position now (manufacturer spec.).
2. Ignition timing adjustment using PPA (Pulser Position Adjuster) while the engine running 1. The Red LED will light on to indicate the origin or stock ignition curve. 2. To Advance the ignition timing, turn the switch to the Left (CCW : Counter Clock Wise). The maximum value is 4 degree. Technical Specification 1. Working load (battery) 2. Current Consumption 3. Output Voltage 4. Microprocessor 5. Ignition Accuration
: 10 ~ 23 volt : 0.35 ampere : 270 volt : Motorola 24 MHz MC908QY4A-MPE : 0.001 degree
PT. REXTOR TECHNOLOGY INDONESIA Kampus Politeknik Batam Parkway Street, Batam Center Pulau Batam - Indonesia
WWW.REXTORCDI.COM [email protected]
3. To Retard the ignition timing, turn the switch to the Right (CW : Clock Wise). The maximum value is 4 degree.
3. The optimum ignition timing will vary depend on the engine load, engine modification (porting, muffler, jetting, bigger carb etc.) and riding style. The easiest way is using Dyno test to measure the performance or ride test to define the ignition timing.
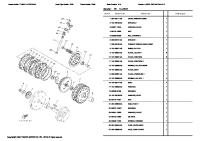
4. Pin Connection
No 1 2 3 4 5 6 7 8 No 1 2 3 4
W ar na Kab el Hit am M erah M uda Hit am St rip Biru Cokelat NC Hijau St rip M erah Put ih Orange
F ung si M asa / Ground Gear 2 TPS ( Ground ) 12 V Temperat ure Sensor Pulser in Koil
Warna Kabel Biru Hijau strip Putih Kuning Strip Putih Kuning
Fungsi TPS (+5V) Temperature Indikator Fan Relay TPS (Out)