![Manual 111010 XMT1000 Temperature Controller [PDF]](https://pdfs.asia/img/200x200/manual-111010-xmt1000-temperature-controller.jpg)
4 0 130 KB
XMT-1000
INTELLIGENT DIGITAL DISPLAY TEMPERATURE CONTROLLER
INSTRUCTION MANUAL
Before using this product, please carefully read this manual for its correct use. In addition, after reading the manual keep it available easily anytime. OPERATION PRECAUTIONS Before cleaning the instrument, check that the power is turned off. Remove stains on the display unit using a soft cloth or tissue paper. As the display unit is easily scratched, do not scrub or touch it with a hard object. Do not operate the front key with a pointed object such as a ballpoint pen or screwdriver, as this may scratch or damage the key.
1.PRODUCT CHECK XMT□-□□□□□□ □ □—□ ① ②③④⑤⑥⑦ ⑧
⑨
①Panel Dimensions(mm)
⑤ Type of Input
D:96×96
1: Thermocouple signal
E:72×72
2: Thermo-resistance signal (RTD input)
F:96×48(Vertical form)
⑥Type of Output No: Relay contact (Maximum 3A)
G:48×48 ②Type of Display
V: Logic output for SSR
1: Double rows display
A: Relay contact (Maximum 16A)
③Type of control action
G: Relay contact (Maximum 16A)
0: On-off action Relay
⑦Type of power
3: Time proportion action
X:20~40v; Y:187~242VAC; Z:85~264VAC
4: On-off PID control with auto tuning
⑧Type of calibration
7: Single phase zero-across pulse PID action with auto-tuning
⑨The range of measurement
④On-off position Alarm
Mounting bracket: 2 pieces
0: No alarm
Instruction manual: 1 copy
1: High alarm
2:absolute value of high 3:Low alarm 4:absolute value of Low
2.MOUNTING 2.1Main technique principal (1) Type of Input: thermocouple E, EA, K; thermo-resistance Pt100, Cu50. (2) Measure the error:≦±0.5%(F,S)±1dig。 (3)Measure temperature at most: 999℃. (4)Control method: On-off action Relay ,Time proportion action ,Single phase zero-across pulse PID action with auto-tuning (5)P I D Choose the range in parameter: Proportional band 1~100%, Integral time 0~999s, Differential time0~999s. (6) The time of keeping time: ten years. (7)Control the capacity of outputting: Contact type:3A/250VAC(Resistance load), Life-span of contact≥10^5times; Level type(Used for driving SSR or controlling the logical circuit): 12VDC/30Ma; SSR(Used for urging SSR to use for driving the two-way silicon controlled rectifier of high-power): 0.5A/250VAC. (8) Alarm output: Contact type, Capacity of contact:1A/250VAC((Resistance load). (9) Great power output type: Contact type: 5A/250VAC. Pulse type: 2.5A/250VAC(XMTG TYPE),4A/250VAC. (10) Voltage of the power: Consulting type table power range. (11) Consumption: ≤5W. (12) Environment for use: Temperature 0~50℃, Ambient humidity≤85%,Has not corroded, there is no conductive dust。
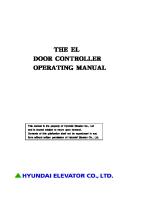
3. Configuration of the Instrument Panel ①Measured value (PV)display unit (Red) Displays measured value (PV). Displays various characters depending on the
PV
instrument. ①
②Set value (SV)display unit (Green) Displays set value (SV)
SP
②
Displays various each parameter set value depending on the instrument. ③Indication lamps
ALM
OUT AT
Auto-tuning(AT)lamp [Green]. Flashes during
③
auto-tuning execution. Control output lamps [Green](OUT)turned on when outputs operate SET
Alarm output lamp (ALM)[Red] turned on when
AT
output operate ④ Function key Used for displaying the change and confirm of the ④
⑤
⑥
⑦
parameters ⑤ Shift Key Used for Adjusting key to change the digital code and/or the key to express entering the autotuning state ⑥,⑦ Adjusting key to change the digital . Used for adjusting the digital code displayed
4. Dimensions
The appearance and the hole measurement form: H
B b
h
type
L b’
h’
Size of the panel
Size of the shell
the size of hole
H×B
h×b×L
h’×b’
XMTD
96×96
92×92×70
(92+1) ×(92+1)
XMTE
72×72
68×68×70
(68+1)×(68+1)
XMTF
96×48
92×44×70
(92+1)×(44+1)
XMTG
48×48
44×44×70
(44+1)×(44+1)
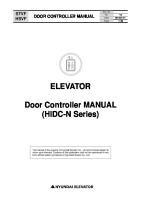
5. Wiring 5.1 Wiring attention (1) The electric thermocouple inputting, should use the corresponding compensation wire. (2) The input signal line should be far away from the instrument cable, motive force cable and load line, in order to avoid producing the miscellaneous news to interfere.
⑴ Control output
㈠ ⑾ Control level output
⑵ ①
㈠
⑥
Alarm output
②
⑴ Control output
⑦
㈩ ⑿
⑻ Alarm output
⑵
⑶
Control output
⑼ ⑷
③
㈩
⑧
⑶
⑽
Alarm output
⑸
signal input
④-
⑨
⑷
Power input
⑤+
㈠ ⑾
signal input
-
⑩
⑹
Control level output
⑸
㈩ ⑿
Power input
⑺ ⑹+
⒀
XMTG-1000
⑻
Power input
⑺
⒁ signal input
XMTE-1000
-
⑼
⑽+ XMTD/F-1000
6. Operation 6.1 Have the electricity to show: Belonging to the display and indicator lamp to light after being set up an electric circuit, then show the type and graduation number , then upper and lower limit Cheng of showing etc., the first three status display enter routine measurement value after the one second respectively / the establishing value show that put into and control running. PV On power
SV
All displays lighting
The type of the instrument and calibration The range of measurement Measureing and establishing value display
Caution: The calibration code of the instrument inputing : E: Thermocouple, K: Thermocouple, EA2: Thermocouple CU50: Thermo-resistance PT100: Thermo-resistance
6.2 Establish temperature value: Press “ ” or “” “” both can enter the state of establishing, If below row displays " SP " ( establishing value code ); Press “” “” can add and subtract the temperature of establishing one by one: Press /AT can select figure number revised to want , make it glimmer , press “” “” can make it glimmer location choose a number value needed from 0 to 9 。After modifying the establishing value , press a key approve and withdraw the setting for value not to set for
the state to revise。 the method of establishing negative temperature: Establish temperature value first , press “/AT”establish high position most , press “” make it reduce to " 0 " , continue according to appear" -"Number。
6.3 P I D parameter Auto-tuning After the machine is set up an electric circuit, establish temperature at first, press “/AT”greater than ten seconds , " AT " indicator lamp show instrument enter course of auto-turning , after two shake cycle system to glimmer, the auto-turning ends, " AT" light put out, instrument at this moment get one control parameter that group optimizes and keep for a long time.
CAUTION: 1 When the systematic operating mode changes bigger, should since exactly fix once again , in order to meet the new systematic parameter 2 it will withdraw from the state of auto-turning while losing electrical power,it’s parameter does not change。
Following table lists the function parameters The first step
Press “ ” + “” ≧10s can enter the state of establishing parameter Initial value setting at
Order
Type of Display
Represent the content
Number value meaning factory Dead band for on-off control and Alarm. For on-off
Db : Difference switched 1
controller, On-off control and alarm adopted Same
0.5
over value. The time proportion is established again, dispel the
Ub : The time proportion
quiet and bad power of maintaining(0~90%).Only
is established again
used for adjusting the quiet difference of the
2
5% proportion controller
The second step: Show each parameter in
the
order
Proportional Band
15.0 Only used for heating Side. P=0,On-off Control
with
pressing “ ”。 If revise the
When “P” is large, the proportional Action is small. 3
(Re-setting time) When “I” is large, the integral action 4
Integral Time
180 Is small. I=0,PD Control
shown (Pre-setting) When “D” is large the derivative Action
parameters,please
5
Differential Time
70 in large. D=0,PI Control
press
“/AT”and 1 Contact type : The electric heater of general
select figure number that will be revised ,
6
machinery is fetched for 20-30 seconds, Fetch the
20s
large capacity oven heater for 30-120 seconds
4s
Control Period
and make it glimmer , press “”
2 Contactless type:fetch for 3-10 seconds
“” can
Ctr=0/4; Routine control; Ctr=1/5; avoid high shoot;
change to glimmer in the location . Press “
7
Control mode
Ctr=2/6: have cable avoid overshoot only, later
2
controlled according to routine PID
” to confirm and keep Warning value of upper
after finishing revising
Lower limit of the
limit , the warning value 8
span/ Ctr=0~2 is AH or AL; Ctr=4~6 is AE
of lower limit, the warning
Upper limit of the
value of the deviation
span
Amplitude
limiting
9
of
Lower limit of the establishing value≤SA
establishing value
span Revise the error of the sensor, revise the range as 0-
10
The sensor revising
0 12.7 ℃ Lck fetches 123, the parameter can be changed, then
11
Set data Lock
1234 the parameter can't be revised to fetch other value.
The third step
Press “ ” and withdraw from the state of establishing parameter